Tuesday 30 July 2013

Mish-mash on the work bench!

I have found myself in the unenviable position of having several toy soldier projects going on simultaneously - so progress is slow. Trouble is that they are all very interesting!


'Albert'!
There is my Black Hat metal French Infantry of the Line project, my Molatarian Light Infantry test figures project, my scratch built head test figure project and my first full body sculpting project!

Left: 'Albert', as I like to call him! This is my own scratch built head and hat mated to the Black Hat artillery figure's body. Looking very much like The Good Soldier Švejk, he is a proper little character, although the head is actually a little over-sized for 1/32 (hence the commencement of my Mk III head)!

The most intensive of these projects is, of course, the full body sculpt. I am just experimenting with armatures at the moment - the wire skeleton that supports the body - and as usual the quandary is what size to make it...

I am after a 1/32 size that is suitable for use with Armies in Plastic's figures - so that's on the larger end of the 1/32 side of things. But even though I am conscious of how I have over-sized my previous sculpting experiments. So this time I am going to try making my body a tiny bit undersized and see if that works.


...All this is driving me inextricably to the eventual and inescapable job of making a full soldier of my own original design. Though from my experiments so far I can tell that is going to be some ways off yet.

Still, keeps me out of trouble!

Saturday 27 July 2013

Even more heads!

I know, you are fed up with seeing heads. But today's delivery from my brother's little resin factory marks a real bit of progress in my quest to make a completely original toy soldier. I now have a supply of heads - of my own design - to use in my sculpting and conversion projects...


As usual, resin is a pig to photograph, but this little sample of my Mk II heads get me off the blocks with the next phase of my grand project...

There is actually several things I can do with these; first of all I can convert these heads further - with differing expressions and facial hair - and then send them back up to my brother to have a 'variety sprue' of differing heads cast OR I can start to add them, as is, to my Armies in Plastic bodies. Just two ideas, but the head really sets the tone for any figure project.

Eventually, as my skills improve, I will make a Mk III head (and so on), but for now 'Albert' - as I have named him - will be the first part in my planned 1/32 body kit!

Wednesday 24 July 2013

1873 Krupp 9cm field gun build

It seems I have passed on the FLW bug to my brother! While he has been casting resin bits and bobs for me it seems he has also been working on a little project of his own...


He's decided that he wants to produce a model 1873 Krupp breach loading field gun in 1/32.

It's a very interesting gun as it is suitable for a large number of the European armies in the late 19th century. So I will be keeping an eye on this project as I may have to nab one of these for my Molaterian army!

Tuesday 23 July 2013

Mk II head in resin

Albert
My brother sent a quick snap of the first of my MK II heads to come off the production line!

It's just to show me that samples will soon be winging their way to me.

So what - you ask - will I be doing with these? Well, I hope to use these in my next infantry regiment, my Molaterian Guards regiment. I also hope to start producing a body of my own design to go with it.

Light Infantry test figures

Having received my resin heads with Romanian hats it was time to fit a couple of these to my AiP Russian bodies. My Molarian light infantry are loosely based on the Romanian army of the 1890s, the 1900 Russians being a very good base as they shared several items of equipment that were common to the Romanians.


However, there is some differences between the Russians and the Romanians, including the double breasted Russian style tunic and I will have to modify this. A simple job which just entails smoothing away the tunic button seam and replicating it with a central seam and pockets...


You might be able to see that I have already removed the tunic seam on the officer figure (in the foreground) and I will be adding a thin strip of kitchen foil to represent a new seam and pocket tabs. I also added a pin to help attach the heads to the bodies and will smooth out any gaps or jagged join with some Milliput putty.

Once I have any imperfections filled and modifications added I will start the painting of these two test figures.

Adding new heads to commercial figures is the next stage in move towards - eventually - producing a wholly original toy soldier of my own design. The next stage will be to add a completely custom head, including face, and then a custom body.

Review all my Molatarian Light Infantry posts by
clicking on this Complete Series Link.

Sunday 21 July 2013

Historical note - French Shakos versus kepi

Bit of a 'note to myself' really here...

When I bought the samples from Irregular Miniatures one of the heads I ordered was the 'EMH 4 1850's French/Italian/Austrian shako 50p'. I had thought (or hoped) that this was the same type of hat that my other French toy soldiers wear wearing (the short kepi), but it wasn't.

Instead I got a very tall shako - see left - which, I believe, is completely inappropriate for the French army of the period that I am interested in (1890-1910).


Well, I acquired Osprey's 'French Army 1870-71 Franco-Prussian War 1 - Imperial Troops' today and it seems that the French army began to replace this tall shako with the shorter kepi around 1868.

Left: French Grenadier, 1853.

From it's adoption the French kepi has evolved, from the early bec de canard (duck bill) - what we would recognise as the type worn by both sides in the American Civil War - to the pattern 1876 with a rounded visor, to the 1884 pattern which was the type used by French soldiers up to the First World War.

And so, in building a French regiment using Irregular Miniatures I have to decide whether to use their 'EMH 1 Kepi' (duck bill) or make my own heads with the later French kepi.

Wonderful vignette called 'Last Bullets' -  This shows the early 'duck bill'
kepi typical of the Franco-Prussian War (1870-71)

I still have to research the various different models of kepi of the 1880-1914 period to understand the nuances in the differences, but unfortunately Irregular's 'duck bill' does not seem to suit this period (it's represents the type similar to that used during the Franco-Prussian War of 1870-71).

Right: Pattern 1876 kepi with rounded visor.

For my little French army I would favour versions of the kepi of the 1876 pattern and later 1884 pattern.

This all sounds a bit pernickety I know, and I don't count myself as being a 'button counter' when it comes to toy soldiers - but, the headgear is perhaps the most immediately identifiable item of dress that gives the toy soldier his unique identity so I would like to feel comfortable that I have that right at least.

Left: The 1884 pattern kepi with kepi covers. The covers are another thing that confuse the issue as they give the hat a slightly different look and shape!

The 1884 kepi remained with the French soldier right up and into the early years of the first world war. This is a good thing for me as it means I can use early WW1 French toy soldiers - like those made by Dorset Soldiers - knowing that the general French uniform changed little from that of the turn of the 19th century.

LOL - I am sure experts in French uniforms will find fault in my logic though!

Saturday 20 July 2013

Er, a whole lot of heads!

...Can't think of a suitable pun for this post, but the postman delivered a consignment of resin heads from my brother. These are copies of the custom Romanian headgear I made for my Molaterian light infantry.


My Romanian officer's kepis turned out brilliantly well. I really am pleased with these, my brother's done a fantastic job. Far more than I actually need, but I happen to know someone who will be very happy to have any spares sent their way!

The Romanian capela field cap was a lot more tricky to cast apparently, but he has sent me enough to get me started...


I will be detaching these hats from the heads and then transplanting them onto my AiP Russians. Once I have my own custom head cast I will start adding my hats to this so I have a totally original head/hat combo. But for now just getting the hats on my AiPs soldiers is good enough, my dream of eventually producing a complete soldier of my own design will have to wait! (Small steps eh?)

Well, aside from this, Ian also included a bag of miscellaneous heads for me to play with...The more the merrier. :)


So... Onwards and upwards - let's get on with my test Molatarian light infantry! Let's get some heads on shoulders.

Friday 19 July 2013

Mk II head complete!

A bit of progress. Scale is better and I am starting to be a bit more daring with detail, but still lots to learn...


Comparing my latest attempt (left) with my first try (right) I think I am pleased with the Mk II head.


Ears seem to be my problem area at the moment, though I am working on a method and they are better than my first go. The new head also has a bit of a Victoria Beckham pout going on, but this will be less noticeable once I get a nice moustache on the working version!

Next: Posting this head up to my brother for him to cast in resin. I will then use the resin copies as working models to customise and personalise (with hats and hair, etc...) before sending them back for final casting.

Mk II head...Putting on a brave face!

I started adding the features to my Mk II 'skull' today. I have found that the brown Milliput putty seemed to dry a lot quicker that the other types of Milliput that I have used before - so the trick seems to be to just make a small batch and work on a very specific area of the face before the putty hardens.

One thing I didn't consider until I started is what kind of expression to give my little head. I guess 'expressionless' is actually what I want to be going for as I want a generic head I can use for many different figures. A cheeky grin wouldn't do!

Next: My wee guy needs some ears! And that's that!

Thursday 18 July 2013

What is 54mm? Scale conundrums

Now I have collected three samples of metal toy soldiers from different manufacturers I have a chance to compare the details including scale...And here we have a problem...


From left to right: Dorset Miniatures 'Chasseurs a Pied' Band Major, Irregular Miniatures 'Fusilier Marin' and finally Black Hat's 'Infanterie de Ligne' (all circa 1900-1914).

All of these toys are described by their manufacturers as being 54mm! But, as you can see somebody is fibbing. Dorset and Irregular look fairly compatible, but Black Hat soldiers will not mix with the other soldiers at all.

Dorset Soldiers French Band Major
In height and stature the Black Hat soldier is closer in scale to one of my Armies in Plastic 1/32 soldiers. Though that's sort of academic as 1/32 is supposed to be the same as 54mm as far as I can find out.

Quality of figures...
Anyway - scale aside all the manufacturer's toy soldiers display the features characteristic of traditional toy soldiers and are simplified or stylised appropriately as such. You might say they are all caricatures of soldiers rather than any serious attempts at authentically or historically recreating period soldiers.

All are fit for purpose, but I rather like the modular 'multi-part' format of York's Irregular Miniatures. They have a wide range of heads in a variety of military hats, different tunics and webbing and weapons - all designed to be mixed and matched so you can make practically any uniform up that you might want.

Irregular Miniatures allows you to mix and match to make
a multitude of different national uniforms.
French Fusilier Marin 1900
Take my French 'Fusilier Marin' - he is made up from their Empire range's new French sailor's head, a suitably antique looking Martini Henry rifle and their 'EMB 18 Sailor in landing kit marching'. And looking through their online lists I could make up a good many of the French regiments from the period that interests me.

Last words on '54mm'
Well, that was an interesting exercise. I got a chance to have a look at what's on the market for French military figures from the turn of the 19th century and see what kind of compatibility there is between makes.

I can see me making a return visit to Irregular Miniatures, and maybe even a proper visit to their shop as York is within easy travelling distance...So I may be coming back with more goodies.

But this inconsistency between 54mm models does concern me. It seems that the scale is somewhat open to interpretation. This make me all the more determined to start making my own models.

Links to manufacturers:

Black Hat: www.blackhat.co.uk

Irregular Miniatures: www.irregularminiatures.co.uk

Dorset Soldiers: www.dorsetsoldiers.com

Wednesday 17 July 2013

Head sculpting Mk II

Learning from my first attempt I have started another 1/32 head. This time I am taking the task in phases and hopefully I have the scale nearer the mark...

My Mk I head and the new Mk II 'skull'. The new head is
slightly smaller for compatibility with my AiP soldiers.
The first phase, which you see here, is to make a featureless mannequin head. This will just be the rough shape of the skull and will be the canvas onto which I sculpt the features. At this point shape and scale are my main priorities.

With regards to scale I repeatedly compared the size of my Mk II 'skull' with one of my Armies in Plastic soldiers...

While using the AiP head as inspiration, my head will be of
my own design and will have differing features.
I am aiming at compatibility with these toy soldiers as these will be the source of the bodies onto which I will be planting my custom heads.

Again, I used the red-brown Milliput putty and I let this head dry before I start the next phase. I will now start to plan out the features on my head, nose, brow, mouth and ears - I will probably draw them on first before starting to add the putty.

The goal is a generic head, with basic features but no hair. I will add this to the duplicated resin versions to make variations in the look of the head. The other thing that I will do when I get the resin versions is to cut the top of the head off to add the various types of hats that I want.

Once the hats are added to my head I will again send them back to my brother who will cast the final version. And there you go - an original head of my own design.

One issue is that the scale of heads differs from one manufacturer of toy soldiers to another - I would have to design different heads, of different style and size, for each type of soldier I wanted to convert or personalise. Still, progress.

Next: Facial features.

Tuesday 16 July 2013

Sculpting heads! My first attempt.

I begun my first ever head sculpting session today! This is no more that a practise to get an idea of how I should go about doing things - I can see me doing several of these trial sculpts before I produce anything useful.

First things first, I needed something to sculpt onto - and it just so happens I had a spare bit of white Milliput which I rolled into a rough oval shape and stuck onto a cocktail stick last night...


When my base was nice and hard this morning I started to flesh out (excuse the pun) the basic shape of a 1/32 head with brown Milliput. The change in colour was because I have been finding it hard to make out detail with white Milliput...


Once the general skull shape was there I started to stick on small balls and rods of putty to represent the muscles and features in the face...


Tools were a cocktail stick and a sharp hobby knife...


And there we go. Not perfect by any means. The main problem I found was the propensity to over scale - I started with a  goal of a 1/32 head similar in size to those of the Armies in Plastic toy soldiers (for compatibility) but soon found that my head was quite a bit bigger.

It's easy to understand why this would be - it's simply easier to make things bigger.

So, my MK. II sculpt will be concentrating on getting closer to the scale I want.

Edit: Anyone else think it looks a bit like Patrick Stewart? :)

> To review to my series on making custom Molaterian infantry follow this 'Complete Series Link'.

Sunday 14 July 2013

New heads cast for Molaterians

My brother didn't hang about! No sooner had he received the two heads that I sent up - bedecked in their Romanian style hats - that he began the casting process...

As usual white resin does not photograph so well.
What will happen next is that he will send me back a few copies of these and then I will add the hats to different custom heads. I will send these back up to him and he will then cast the final working heads.

In the end I will end up with about 25 or so of these new custom heads which I will attach to my AiP Russians to make my Molaterian infantry. I think the officer's kepi looks particularly dashing!

-----------
Update: My brother posted up this photo of the progress of his casting today...


These are the prototypes he will be sending back to me so I can add my own custom faces...Progress!

Making a traditional 'tin' soldier

An interesting day today - I started cleaning up my very first metal toy soldier. The Black Hat c.1900 French Infantry are what I would describe as traditional 'tin soldiers'. The are caricatures of soldiers and hardly realistic, but as I explained in my previous posts they are not meant to be.

That said, today's work gave me a chance to examine the quality of these metal toys in more detail.

The main thing with cast figures is moulding marks, seams and any imperfections in the metal itself. Being multipart toys complicates matters as each component must fit snuggly onto another appropriate part. So how does Black Hat fair up with fit and quality?

Well, to be honest I have to borrow a phrase from my wife - who is a teacher - and say 'could do better'. They aren't terrible, being metal one should expect a little work to make things fit, but the parts hardly snap into place!

That said, and bearing in mind - again - that these are supposed to look like toy soldiers the fact that there are noticeable joins between components may actually be a positive thing.

Likewise other details are probably purposely simplified. Take the rifle, it's hardly what you could call an accurate historical representation - it's neigh on cartoonish in it's construction. And the shoes of the little soldier are like a pair of blocky clogs!

Now...It may be a bone of contention as to whether Black Hat are being clever and doing these things deliberately, or are just a little - er, how do I put this - 'naive' in their toy making, but it actually doesn't matter. The end result is appropriate.

There's plenty of routine file work to get ride of seams - you can see one of the main seams on the head in the photos - but again, if you are of a mind to recreate the traditional tin soldier look you may even want to leave in these seams. Remember the real thing was a factory cast and painted mass produced product, and things like seams and slap dash painting were the norm.

Trying to capture this authentic tin soldier look will be a challenge, but Black Hat's metal models have given me an excellent start with their model - it's now up to me to finish this model with an appropriately traditional paint job.

> You can view all the posts in this project here - link to all posts in this series.

Saturday 13 July 2013

They don't make 'em like this any more...


"Lieutenant-General Sir Adrian Paul Ghislain Carton de Wiart VC, KBE, CB, CMG, DSO (5 May 1880 – 5 June 1963), was a British Army officer of Belgian and Irish descent. He served in the Boer War, First World War, and Second World War; was shot in the face, head, stomach, ankle, leg, hip, and ear; survived a plane crash; tunneled out of a POW camp; and bit off his own fingers when a doctor refused to amputate them. He later said, "Frankly I had enjoyed the war." [Source: Wikipedia.]

...Now, that's my sort of chap!

Friday 12 July 2013

Wheely useful resin wheels

Poor man's 4.7 Naval Gun Part 6
I've put this project on the back-burner while I wait for my brother's resin casting experiments to bear fruit. Well, I received a intriguing little parcel from my bruv this morning full of little resin goodies...


To recap, I'm converting a diecast Cresant gun into a mock 4.7 Naval Gun and part of this was my scratch build of the early 1900s era solid wheels. However, I wanted to duplicate the originals as I knew I would need them again in other projects I have in mind.

My brother is experimenting with resin casting and very kindly duplicated my scratch built wheels - as well as some other items - and I think he's done a terrific job (easily comparable to some commercial resin models I have bought).


What else will I use them for? Well, aside from the gun itself, I am thinking about scratch building a steam gun tractor.

In the mean time this access to resin duplication opens up all sorts of possibilities - for example, I have just sent up a couple of heads with custom hats I have just made for my Molaterian infantry project.

This post is part of my 'Poor Man's 4.7 Naval Gun' project - the complete series of posts can be seen here.

Photo from my brother of the casting process.

Thursday 11 July 2013

Get a hat! Part 2

Having done the officer's hat it was time to attempt the tricky looking infantry soldiers hat. Based on the traditional Romanian 'capela' style field cap I found that this was a quite difficult shape for me to sculpt in Milliput.

Left: A reminder of what the Romanian 'Capela' hat looks like.

Now, as usual, white Milliput does not photograph easily (without setting up proper lighting), these snaps were the best I could do this morning with my trusty iPhone...


Now this is just my take on the Romanian capela, it's not strictly authentic (it's a bit too high). But my unintentional inaccuracy is - I think - quite pleasing really as it has the look of a authentic traditional hat, maybe just not the one I was going for!


I think I am happy to go with this look as a traditional Molaterian hat.

What next? Well, I now have to decapitate both my models and send the heads (and hats) up to my brother who is going to try and produce multiple copies for me in resin. The idea being that I then stick the copies on the rest of my AiP Russians, saving me a lit of conversion work.

Once painted I hope these won't look too bad.


Wednesday 10 July 2013

Want to get ahead, get a hat!

My first attempt at a hat with Milliput putty is this conversion of an AiP 1900 Russian officer to a Romanian officer (who will ultimately become a Molatero Light Infantry officer).


...On a side note I haven't quite decided what the collective term for a group of citizens from Molatero will be - Molaterians? (...Actually that was just off the top of my head, but I quite like it!) :)

OK then, my Molaterian infantry officer sports this rather dapper French style kepi, but of the more modern upright style as worn by turn of the century Romanian officers. This is a bit of a git to model in Milliput and I'm not all-together sure if I have the scale exactly right...It is a first effort.


Getting the darn thing symmetrical - working in 3 dimensions - is a challenge as each time I sanded one facet of the hat to get it straight or whatever I inevitably ended up sending another facet out of shape. So round and round I went!

The goal here if to produce a master which I can then send up to my brother so he can copy it in resin. I will undoubtedly need a few copies of this style of head/hat combo for various Molaterian officers in my army...

I'll have it copied as it is, pretty featureless - this is so I can customise the copies with different badges and decorations to represent different regiments. You might notice I gave my chap a better moustache as the AiP one was a bit feeble.

But now onto the far trickier Romanian infantry capella style hat! This will test my skills for sure.

Monday 8 July 2013

Burkish Infantry near readiness

There is slow progress in the readiness of my first regiment of my Grand Army of Molatero. The colonial contingent of Burkish Naval Infantry nears deployment...


All the basic painting is done, but now I have to go back over each figure to do the touching up - where I have gone over lines or been shaky in my painting - and add the finer details.

The last job will be the final coat of grass green on the bases before glossing. Still, things are moving forward.

Sunday 7 July 2013

Historical notes on Black Hat French Infantry

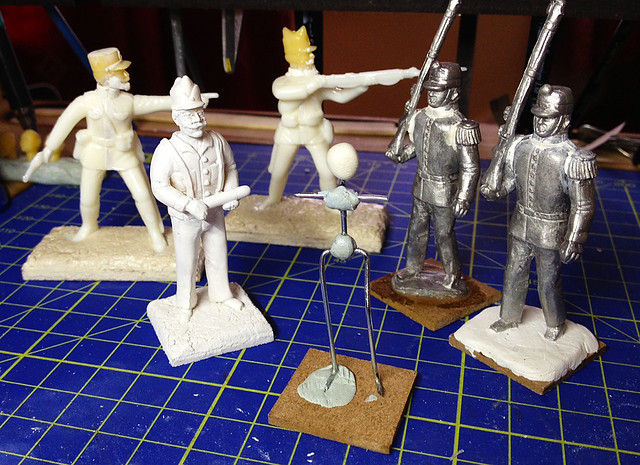
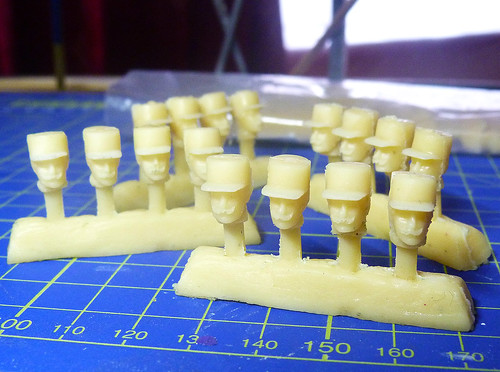
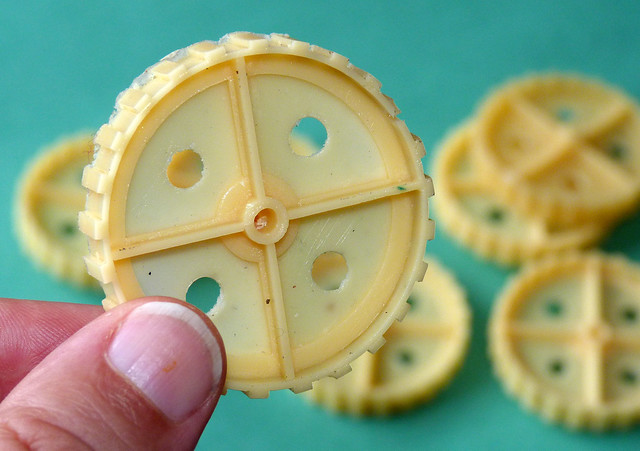
Having examined the general quality and components of my new Black Hat French infantry it was time to do a quick bit of research, primarily for the colours I should use to paint the uniforms.

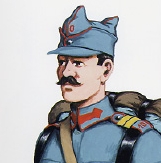
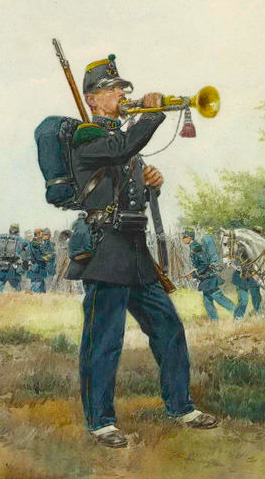
Left: Chasseur a pied. Bugler, full dress (1885). This illustration appeared in L'Armee Française by Jules Richard, illustrated by Édouard Detaille, first published in 1885. Source: Wikipedia

As usual my first port of call was the Osprey web site to see if there was a specific book that covered this unit. The bad news is that there is a bit of a gap in Osprey's inventory for the period of French military history I am interested in (1890/1900). This is due to the fact that Osprey is chiefly concerned with specific conflicts and campaigns.

The most important campaigns close to 1900 that are featured by Osprey's range are, of course, The Franco-Prussian War (1870-71) and then the First World War. There are a couple of books that cover French forces at the turn of the century - notably the Boxer Rebellion and a History of the Foreign Legion from 1872-1914 - but they don't really cover home regiments in any great detail but rather colonial interventions in Africa and Asia.

I am sure there are books somewhere that illustrate the French army during this period but I have a sneaking suspicion that they are probably French publications in French.

However, a search of the internet did net me some very nice historical illustration from my target period and also some photos of other toy soldiers by Hiriart of the very self-same infantry regiment that Black Hat have modelled.

Hiriart catalog set 1188 INFANTERIE DE LIGNE, 1890.
Source: Toy Soldier Forum
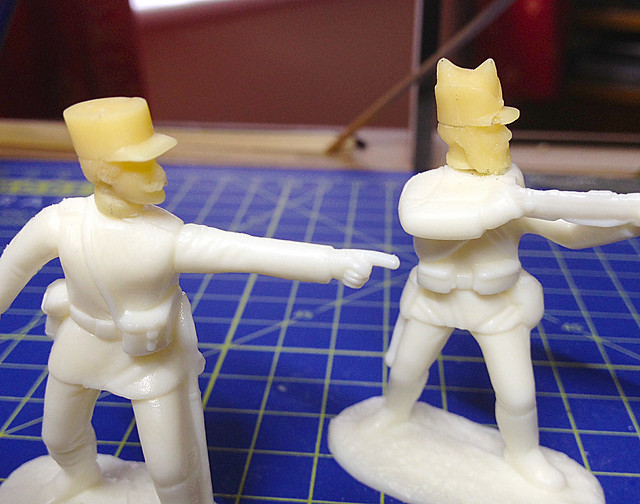
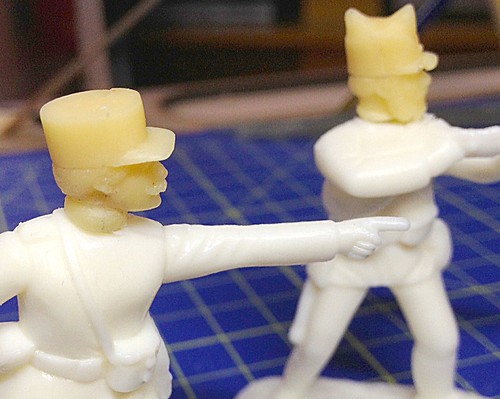
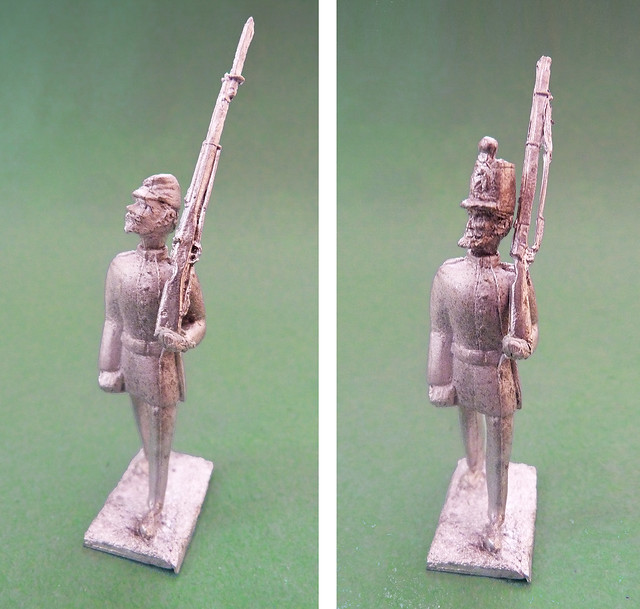
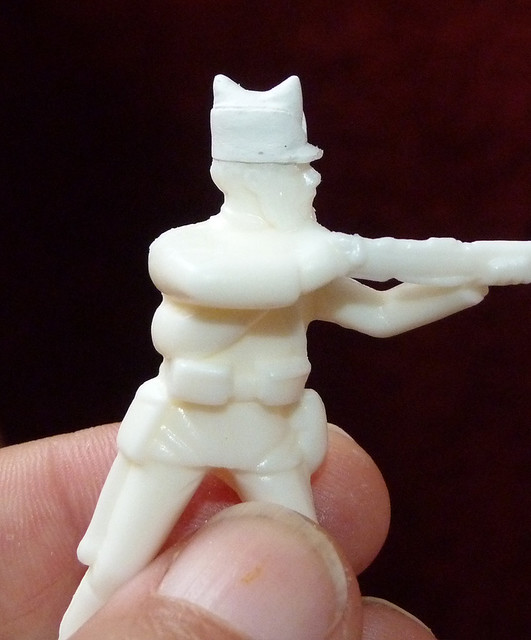
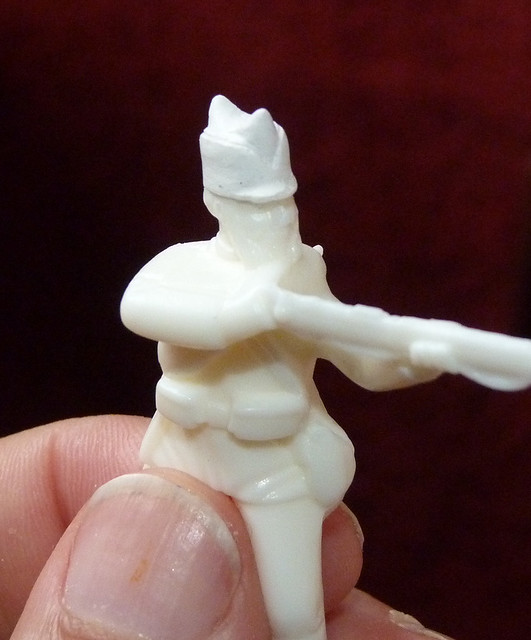
I am unable to pin down Black Hat's chosen French uniform exactly. Certainly it differs in it's look from the infantry of the line of the late 1890s, specifially in two specific details - the tunic buttons and, importantly, the unique French infantry hat.

Left: Contemporary hand Colored Lithograph from 1889 showing French Infantry of the Line.

To be fair to Black Hat the have neither said that their model is specifically Infanterie de Ligne, just that they are a rather generic 'French Infantry' and also they do not mention a period for their model.

If you look at French uniforms from 1890 to the beginning of the First World War there is a evolution in both items I mention - tunics did change, in some cases, from double breasted to single breasted, and the 'kepi' hats changed from the early form depicted in the attached plate to a more modern version which we are more familiar with from pictures of the Foreign Legion (more upright).

So, Black Hat's soldier might be an example which represents French uniforms closer to 1914 than 1900. But is this important - remembering that these are toy soldiers?

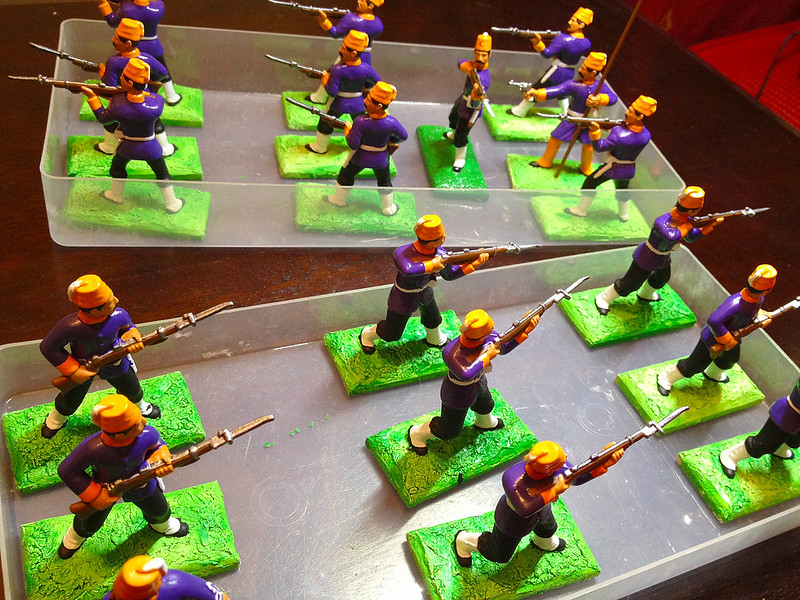
Well, probably not so much although questions about accuracy does make it difficult for you to pin down exactly what colour scheme to paint your soldiers (Black Hat gives no hints). The temptation is to paint your Frenchies a generic colour scheme similar to the pictures above, the Hiriart toy soldiers do seem to accurately depict the historical plate so may be a good template.

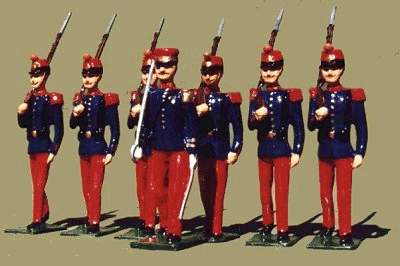
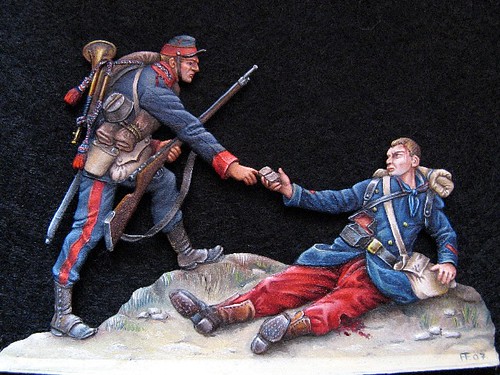
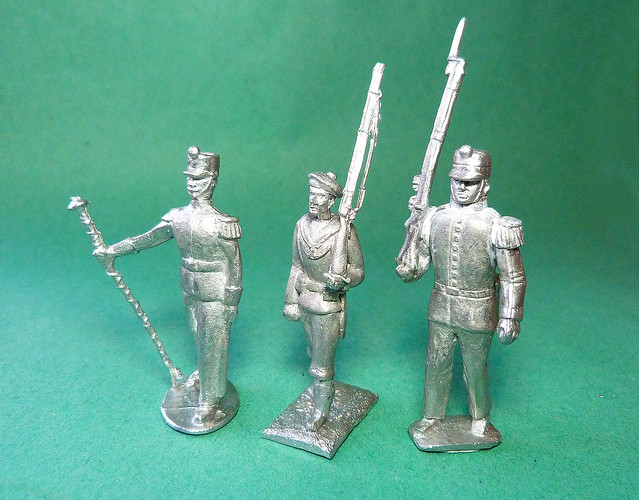
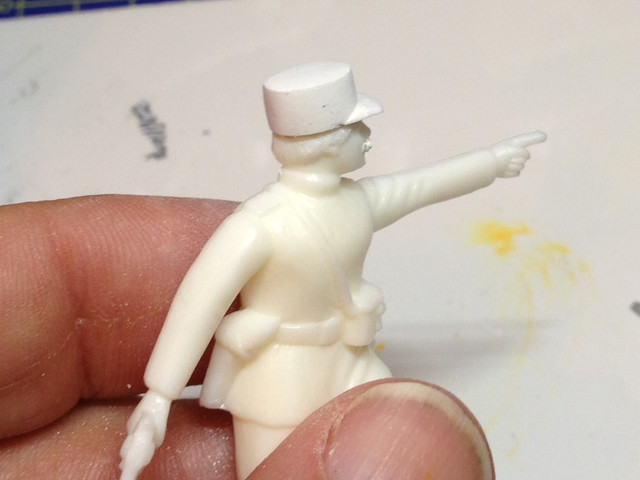
The one example of 'a' French uniform that is similar to the Black Hat
depiction is this set of toy soldiers from Soldier Pac. These apparently are
'recast from Britains' and so, I guess, may have been the inspiration for
the Black Hat ones.
I guess the only way to really know what Black Hat had in mind with their model is to email them and ask them, otherwise - unless you can track down an obscure French reference - you are left guessing!

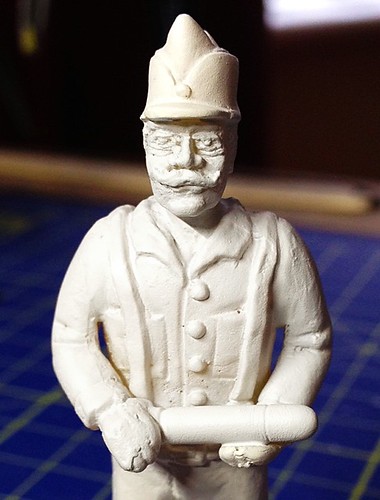
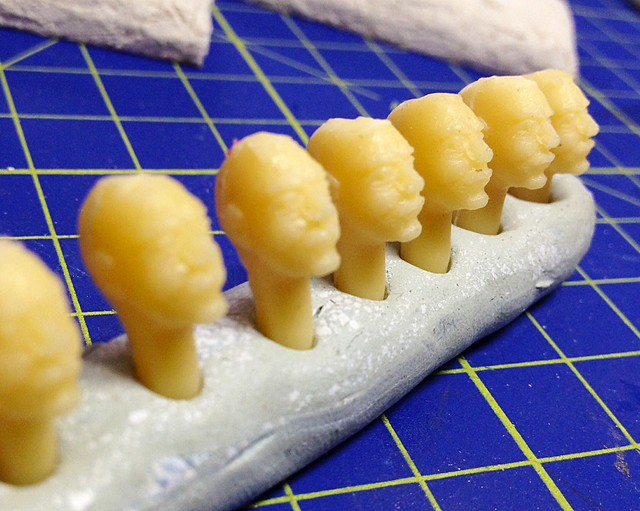
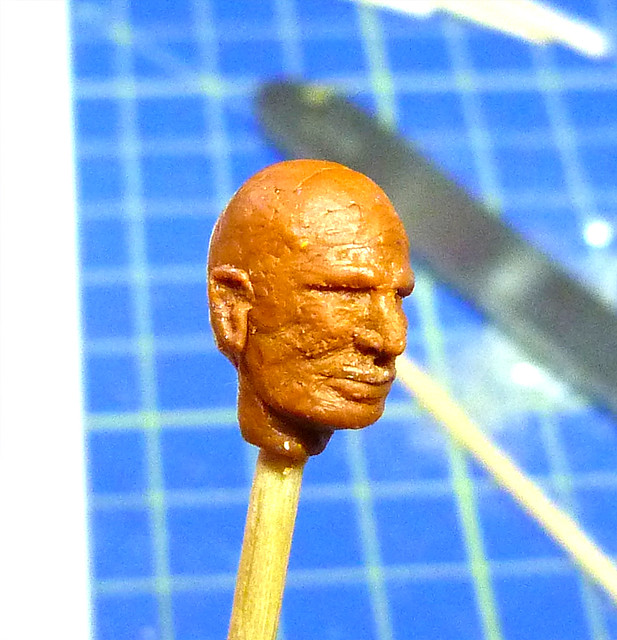
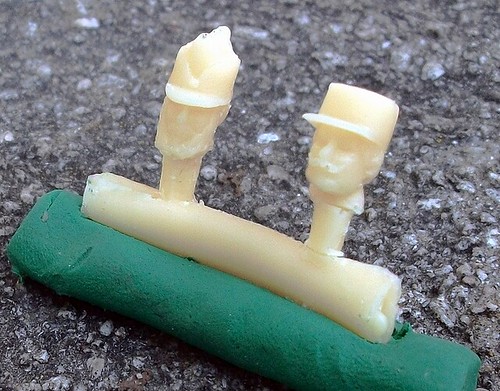
(One theory I have, looking at the Black Hat range of toy soldiers, is that they have cheated a little bit and used the same generic body for quite a few of their soldiers. They just change the heads (and hats) to depict specific regiments and nations.)

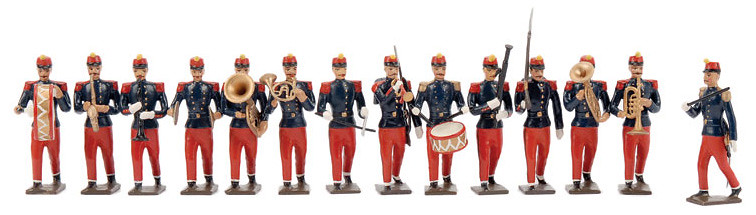
French Infantry Band in Full Dress, 1914. CBG Mignot - European Armies Of
World War One
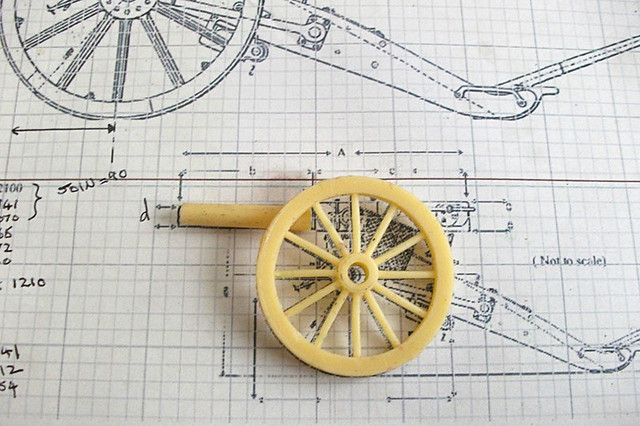
Magnificent old Britains French Field Artillery set. I just include this
because it's superb!
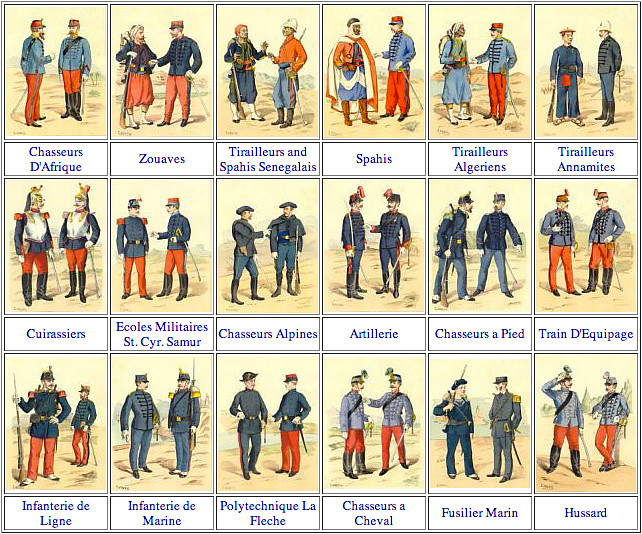
Contemporary Uniform Plates of the French Army 1889 Hand Colored
Lithographs. Click to enlarge. Source: www.warflag.com/
> You can view all the posts in this project here - link to all posts in this series.