Thursday 31 December 2020

New for 2021, 3D Printing!

 I better write this today as I can't see me doing much on Hogmanay... Not that I intend to drink that much booze tonight, it's just that I hope to spend a nice relaxing day with the wife watching old movies!

Anyway, I've already hinted at the new addition to my modelling tools, but I thought I'd add a bit more detail as this will be playing quite a big role in my model making in 2021...

Santa was very kind to me (a big 'thank you' to all my lovely family who contributed to this present) and a BIG package arrived on my doorstep just after Christmas Day. It was a FLASHFORGE ADVENTURER 3 3D printer...

The above photo shows the newly unboxed printer with some of the protective packing still in place. Believe me when I say that I soon had all that peeled off, unstuck and dispensed with in very short shrift! 😁

I won't go into the details of this printer, it's specs and why I chose it (just yet) but suffice to say that it's aimed at complete 3D printing 'noobs' like myself and, indeed, it was not very long before it knocked out my very first test print...

The end result of this was a cute little 'Bench' boat model - a standard model designed to test your printers set-up (every new 3D printer-er starts by printing this torture-test model)...

Despite it just being a generic test print 'Benchy' is kinda cute in it's own right and I even imagined that - scaled up and modified slightly - it might make a nice little boat for my 50mm peg figures! 😆

Anyway, so begins my adventure into 3D printing with my Adventurer 3 printer!

But before I leave things there you might be asking 'but why 3D printing'? Good question!

There are a lot of ideas I have for new (to me) modelling techniques that I want to try out this year. Different ways of putting my peg soldiers together and how to add different accessories and different kinds of models (like vehicles). The quickest and most convinient way of doing this for me - coming as I do from a plastic model-making background - is for my to prototype these new idea using a plastic printing method like 3D printing.

Using 3D software and this printer I can quickly try out new things and see how they might work without laboriously carving out little pieces of wood (which is quite messy)!

In fact, I can try out a lot of my initial idea in 3D software alone and only once satisfied - in principal - with the design do I need to go to print. So another new 'thing' for me this year will be to design my models using a 3D drawing application like TINKERCAD or BLENDER...


The above picture shows my early attempts to create a 3D version of a peg! Once I have a template for my pegs I can then start to work on 3D versions of the ideas that I have for accessories (This is the drawing of a full-sized dolly peg, but I'll also make a version of my 50mm 'half-sized' pegs as well).

And there we have it, bringing my peg making into the 21st century!

HOWEVER, I should say that I am not abandoning my more traditional wooden peg creations. I still very much enjoy the good old fashioned creative pleasure of making things by hand. The 3D printing - which is in a plastic material - is for very specific projects where traditional crafting is less suitable...

Imagine, for example, having to create a whole army of various but similar figures for a large scale war-game. A more streamlined production line process would be far more practical in this instance. Also, more complex models - like vehicles - would be far quicker to prototype virtually in 3D first in order to create a template for how exactly I would create them in wood.

So, quite aptly for New Year my new 'toy' nicely connects the old and the new!

HAPPY NEW YEAR!

Tuesday 29 December 2020

And Goodbye 2020 - Huzzah!

 A bit early I know, but today I completed what will be the final peg figures for the year as I completed the two remaining nutcrackers I had left to do from Christmas...

I am now having a little break from making figure over the holiday and intend to think about what I will be doing in 2021. Santa was very generous and my main present will be playing a part in how I will be progressing with my little hobby. Here's a quick hint...

Flashforge Adventurer 3 - First Calibration Print


Sunday 27 December 2020

Merry Christmas! The Grinch & Co...

 I know I'm a wee bit late, but - as some of you may know - I work in a hospital (Operating Theatre Domestic) and so like many key workers I was working on Christmas Day. Because of that my festivities have been a little delayed and all of a sudden it's the 27th! 😁

...So, the big question is - did I manage to get my nutcracker gifts completes in time?

Well, mostly!😏

First off, I did complete my Grinch (one down, 12 to go)...


I must just say that I'm a bit unhappy that I mixed styles with this one, it was an experiment that didn't entirely come of. Plonking a sculpted head onto my simplified peg style of body was perhaps a mistake? In future, if I want to model a caricature I should maybe sculpt the whole figure in order that the final figure has a consistent look.

Anyway, onto the next job, or I should say 'jobs' as I decided I really needed to pick up the pace. I had just a week to go before I handed out my gifts. I decided to work through the group two or three at a time...

At this point, my main attention was my 'lumberjack' as this was a gift
for a work colleague and had to be ready before the rest of my figures.

This turned out to not to be such a chore as it meant I could paint some of one figure and while that dried I could paint some parts of another. And so I went, back and forth, until I had a completed set - as usual I finished on the facial features before the slightly traumatic varnishing stage (more on that later).

I should explain at this point that, because of the rush to get these gifts ready in time, I did not have the luxury of being able to much about - in my usual half-arsed way - setting up a proper completion photo. Instead I had to be content with a rushed snap with my mobile phone! Still, the pics didn't turn out too bad.

I was actually quite pleased with the base I came up with for my lumberjack. It was a piece of a branch - a set of which I discovered at our local craft store. It seemed very appropriate! And weighed a good deal more than my usual small MDF bases!

About the bases. I realised, a little too late, that my small round (30mm x 3mm) MDF bases were not really such a good choice as these tall nutcracker figures are a little top heavy. The stability of the based figures came into question (I kept knocking them over with the slightest touch) and I had to think of an remedial modification.

What I came up with was to add a 30mm steel washer to the bottom of the MDF base. This extra weight added just a little extra weight and provided a little more stability to the model...


In future, I will have to rethink my base design for full sized peg figures and come up with a far more stable platform.

Anyway, time was ticking away - 19, 20, 21, 22, 23... 😲


I made a bit of a mess of recording the above models (I didn't photograph them in proper order), but I was in panic mode by this time. Christmas Eve and I still had two more models to complete. I mean, I hadn't even started painting them yet...


The last models are a pair of Christmas elves loosely based of my youngest daughter's favourite Christmas movie - 'Elf'. Though I have taken a bit of liberty and created a 'bad elf' and a 'good elf'.

However, while I'd love to tell you that there was a happy ending to this Christmas tale and that I managed to finished the last models by the skin of my teeth I'm afraid I can't. 😕

Christmas Eve arrived and I was starting to flag. As I mentioned I was still working and my energy was sapped. I made an effort and was still working at 11pm but I knew it was a lost cause as the major sticking point (literally) was the varnishing!

I have been applying a spray lacquer and aerosol paints are a little sensitive to temperatures. We've been having a cold wet snap and with my man-cave out of action I've been having to revert to spraying in our back yard. Not ideal. The varnish has been taken over-long to cure and remained tacky longer than usual, despite my placing the varnished figures near our radiators.

The upshot was that I knew I did not have a chance of completing the last two nutcrackers in time and this is how far I got by Christmas morning...


I still have the arms to complete before even getting to the dreaded varnishing. So, I had to accept defeat and settle for 6 nutcrackers each for my daughters instead of 7. I guess that's not a biggy, but I was annoyed at my own lack of planning. Next year I will definitely start my gift making a lot earlier!

The good news was that my daughters - Stacey and Kayleigh - were delighted  with what they received. And we all had a wonderful Christmas (despite the current lockdown restrictions).

I hope you all had as enjoyable festive season that I have. MERRY CHRISTMAS! 🎅

Sunday 20 December 2020

The Grinch - Part 2

 As usual, every year the time leading up to the Christmas period seems to drag and then - all of a sudden - we are on the final few days and time is flashing by... And I am struggling to complete my nutcracker gifts in time!

I did manage to make progress with my Ginch model, though I have had to simplify it's decoration in order that I can get some of my other Christmas gifts completed as well.

As a matter of fact, I am actually working of several projects simultaneously and am making several of the components in batches. I am making the arms for all my gift nutcrackers together and started by sketching out the poses I wanted for each figure and tracing the designs onto some leftover 3mm plywood tabs...

Once the arms were all drafted I took the tabs over to my Dremmel Moto-Saw (scroll saw) and cut them out. Here's the set of arms I made for my Grinch...

Had I had more time I was contemplating making some 3D sculpted arms - in fact, it crossed my mind to remove the peg legs and turn this figure into a proper model caricature - but I just didn't have the time to spend sculpting bits and pieces. So, I stuck to my flat 2D arms...

Maybe I will return to the idea of a fully sculpted character at some point in the future. But, in the meantime, I carry on as normal and so it was onto priming...

This completed gift set 1 of 3 I intend to get finished in time for Santa to distribute them! 😁 A bit ambitious, but left see if I can rise to the occasion.

Sunday 13 December 2020

Workbench Update Shot - Mid December

 Just a quicky. Things are really hoting up in the race to complete Christmas gifts in time (just a week and a bit to go)! Here's a snap of what's on my workbench showing how much I still have left to do...

I'm beginning to sweat a bit! 😬

Thursday 10 December 2020

The Grinch Peg Doll Part 1

 Part of my Christmas Nutcracker series of figures are some that aren't so traditional as I thought it would be nice to make some of my nutcrackers a bit more relatable to my kids (I still call them kids despite the fact they are in their late 20s)! 😁

One of my figures is based on the wonderful Jim Carey movie 'The Grinch', based on the book by Dr. Seuss. It's a terrific 'kids movie' and Christmas favourite and I thought it would make a smashing wee peg character.

I decided that this particular peg doll would be a little more of a caricature than some of my other simplified models and I began by sculpting a little more detailed face for it than I would normally do...


As usual, I am using MILLIPUT modelling putty to do my sculpting, it's my favourite medium for jobs like this. I like how - once you have mixed the two part elements - you can decide just how firm you want your putty by how long you leave it before you start to work with it - use it straight away for a very soft PlayDoh consistency or leave it to cure for a while for a harder 'cold plasticine' firmness (if that makes sense). 


As you can see I've gone a bit crazy with the level of features for the face, but once I started I found I couldn't stop! 😂 I just got a bit carried away. I did calm down a bit after I finished the head, however, and dialled down the level of detail for the rest of the model...


And the legs are basically the same as my normal full-sized peg dolls. The one quandary I have now is how to model the arms, do I go for my normal 'nutcracker' style of arm - 2D flat style hanging off a rod - or do I try and model something a little more 3D? Hmmmm...

Well, we shall see in part 2 of this project.

Sunday 6 December 2020

Sally & Jack 'Nutcracker' Dolls Complete

Some more Christmas gifts completed. Two sets based on Tim Burton's 'Nightmare Before Christmas' animated movie...

Two sets, one for each daughter! I actually wanted to do more
of the characters from the movie but I'm running out of time as
I have other projects to do before Christmas!


Phew! I knew I should have started my Xmas gift projects sooner! It's all a bit of a race now, my poor peg soldier projects are on the back burner until after the 25th. Apologies to those of you who are only interested in the military related projects! But needs must.

Thursday 3 December 2020

Show & Tell - Figure Painting Base

Very much caught up in various Christmas related gift-making projects at the moment - tick-tock, tick-tock, tick-tock - so time for blogging activity is at a premium. So, I have been testing out the idea of doing little 'show & tell' video shorts, very rough and ready recordings that don't demand a lot of preparation or production time. Hopefully, these little movies will fill the gap as it doesn't take too much time out my schedule to grab my iPhone camera and press 'record'!

I've already posted a couple of these mini-movies on the Peg Soldier Facebook Group as their appeal is very niche and they make little concession a 'general audience'. But I think I have the process working well enough, now, that I'm ready to start hosting these sort of videos on this blog.

This particular movie clip covers some thoughts about mounting peg figure projects on a grip or stand so that the figures are easier to paint. I hope you will find it useful and like this new medium...

Monday 23 November 2020

More Lovecraft Characters Completed

 In between Christmas gifts I'm still trying to get some of my own backlog of projects done. Among these were some H.P. Lovecraft RPG characters I was working on. I'm trying to build a varied 'cast' of characters and that means crafting low-level bit-players as well as 'stars'!

So, with each set I'm including either a general NPC (non-player character) or minion, you can never have too many minions. 😄 In this case I made a 'thug' to pit against my heroes...


If you are a Lovecraft movie fan you might appreciate the next character I added in this set, the 'mad surgeon'. Very loosely based on the cult classic 'B' movie 'Reanimator' my ghoulish saw-bones is a bit tongue in cheek - but, then, I had envisioned this figure being a ready for Halloween...

And finally, I've included a good old Lovecraftian stand-by protagonist - a learned university professor, someone steeped in the esoteric and occult. I've 'armed' him with a mystic tome and an amulet of sorts...

And there we go my cast grows ever bigger. The idea will be that as I play different Lovecraftian scenarios I can dip into my collection of figures to create an ensemble of appropriate peg players.

I've plenty more ideas for additional cast, but one this is for sure and that is I'll need a lot more supporting characters than lead roles. This'll be a long project!

Sunday 22 November 2020

Little Angels for Christmas

 Well, in amongst all the other stuff going on at the moment I managed to get a set of Christmas tree ornaments done. The theme here was a bit vague (they are a present for one of my wife's friends) but they are a loose mix of angels and fairies... Don't ask me! 😀

Anyways...Job done. Though, despite - to me - it being a bit weak as a project people seem to like them. Maybe I just don't get angels and fairies? 😂

Well, it maybe not my 'thing' but all making and painting is good practise and trying out new things and styles helps me build my flexibility. There are little problems to overcome and challenges even in simple characters like these that add to my experience and skill tool box...


And there you go. I'll have to take a snap of all six in the set together, but for now I'll have to quickly move on to my next Christmas project... The clock's ticking!

Monday 16 November 2020

Peg Nutcracker Guardsman Complete

 I managed to get another of my peg nutcracker figures done, though I'm beginning to wish I had started these earlier as Christmas looms ever larger on the horizon!

I'm pleased with this little fellow and I'm enjoying this particular project. The slight down side is that I have a lot more of these nutcracker figures to make in time for the 25th of December. Still, onward and upwards.

This character is based on the traditional toy soldier from the ballet 'Nutcracker', a suitably festive story. The uniform is fictional and I tried a new way of making a rifle, simplifying the construction even more. It's just made up of an elongated triangle of lolly stick for the stock and a piece of cocktail stick for the barrel - but I like this stylised shape in this instance as it is suitable toy 'pop gun' like.


Another slight change in my previous construction method for this kind of nutcracker peg is that I did not bother to sand down the 'shoulder' dowel, but left it protruding slightly. I think this looks quite good and it enhances the idea that this is a toy soldier. Less work for me to do! 😁

The only concern I have about this style of peg figure is - being very tall and thin - it's balance. I chose a 3mm thick, 25mm diameter MDF base for these figures and that only just does the job. After I complete this project I will have to think again about basing and stability and I may need to either look at enlarging the diameter of the base or weighting the base (I have been considering adding steel washers to the existing base to give it a bit of weight).

Still, you are always learning. As they are they should look very nice on a mantelpiece for the festive period. 


Friday 13 November 2020

French 'Chasseurs à pied', 1870 - Part 4

 A long, long time ago I began my Franco-Prussian War project only to then decide to have a hiatus from the hobby for some time. Now up and running again I now am in the position of not only working on new projects but also have several old moth balled projects to dust off - my French 'Chasseurs à pied' are one of these forgotten armies! 😃

Above: Painting 'French Soldiers in the Snow' by Paul Louis Narcisse Grolleron (c. 1880).
Grolleron produced a range of wonderful paintings depicting French troops of the 1870
war. This one caught my imagination and was the basis of my Chasseurs a pied.

It's actually a bit crazy that I stopped where I did with these soldiers as they were quite near completion. However, one of the reasons that I had not completed these sooner - having returned from my 'hobby holiday' - is that these figures were what I call my 'Mk. 1' peg soldier design and I had subsequently moved on to a different design...


Above: Comparison of my early 'Mk. 1' peg soldier construction (left)
with my current 'Mk.2' method (right).

I was of a mind to abandon this project and start again using my revised method of construction but - in the end - did not want to waste the work I had already done. It was a bit frustrating as I really like my newer method for making my soldiers, but I thought it would be a nice way to formally transition from the old to the new by completing this project as intended.

Anyway... Where had I got to? Here's a reminder of where I left off...

As I said, these models were so near completion! The principal job was to do all the outlining of detail - things like the arms and leg division, etc (things that were the very reason that I created my simplified Mk. 2 models , so I didn't have to spend time laboriously outlining things).

Ironically, I ended up producing my prototype Frenchman right along side my prototype Prussian! It's my habit to complete a single example of a unit's figure in order that I can check that I am happy with my colour choices and check for any potential problems before continuing with the rest of the unit's figures...

Indeed, I did come across a little issue, that being the outlining of detail that is base painted with dark colours. An example would be the outlining of the soldiers arms, normally I would outline in black but this just wouldn't show up very well against a dark blue. The solution - obviously enough - was to outline using a lighter version of the base colour, in this case a light blue.

In the above photo you will notice I had to outline (if that's really the appropriate term) the leg division line using a light blue. This is not a method that I am completely happy with and why I ended up changing the way I did the legs of my models.

Anyway, niggley bits out the way, it didn't take long to apply the final details and - finally - I added the facial features. Things like buttons and and eye-pupils were actually applied using acrylic pens.

This all leads to the varnishing. I continue to be a fan of the traditional glossy toy soldier and I think it actually helps produce a better looking peg figure. The application of a gloss layer smooths out some of the imperfections - rough textures - inherent in cheap mass-produced wooden pegs. If you look at the above picture you will notice a mottled texture on the Prussian soldier, the wood was particularly rough on this peg (so much so that even a fair amount of sanding could not get rid of it).

This is just part and parcel of using pegs for modelling, they are what they are. But varnishing helps alleviate most but the worse blemishes. And here's what we ended up with...


I'm pleased with the result and will crack on with the five remaining figures in this unit (plus the unit base). After that I have to decide which will be the next French regiment that I will model - I'm already had a lot of requests that I do a 'red trousered' infantry of the line! We shall see.

Link to all the posts in this 'Chasseurs à pied' project.

Thursday 12 November 2020

The Prussian Blues

[Operation Pickelhaube Part 5]

While making and painting a large selection of different peg projects at one time is interesting it does mean that everything is taking longer to do and each individual project is only progressing in small steps. So, sorry about that, it doesn't make for exciting blog posts! 😟

My Prussians are a case in point. Normally, were I *just* working on this Prussian set on it's own I would expect to have dealt with them over the course of a week or so. Sadly, my little Prussians are dragging on an on and my 'updates' are pretty lacklustre. 

Ah well, anyway, here's what I've been up...

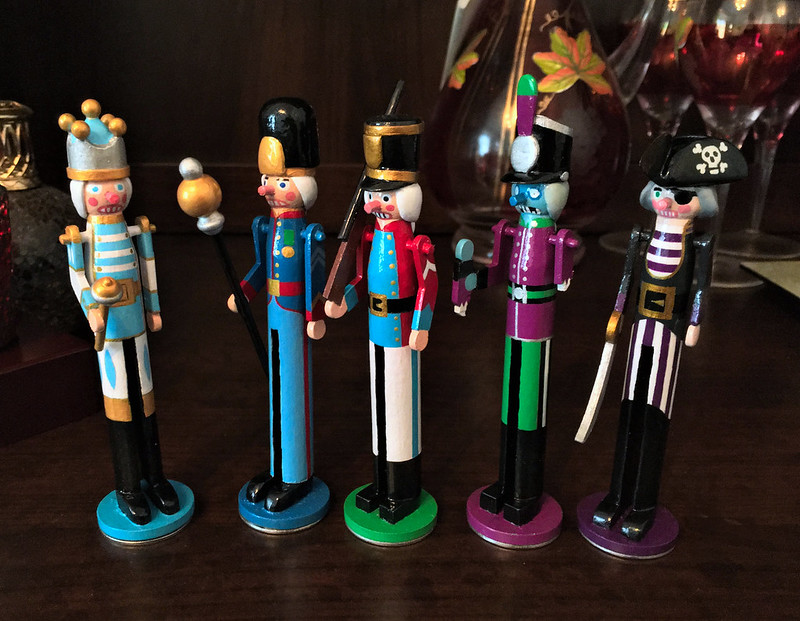
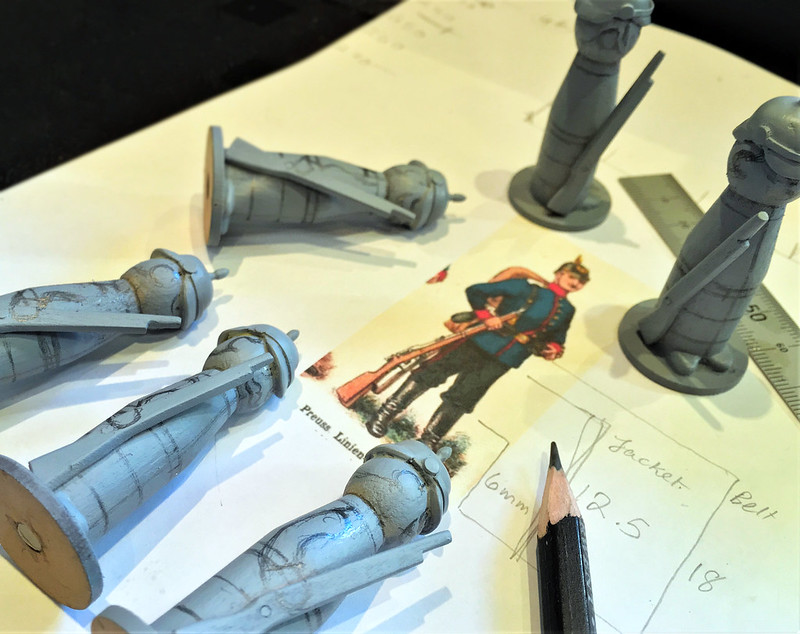
Having primed my figures I then had to decide on a uniform design - from reference - which I would replicate. Obliviously, I had a a design in mind from the start - which was the basis of my construction - but there were several colour options and even some disagreements about exact colour shades (as there always is in the world of military modelling)!

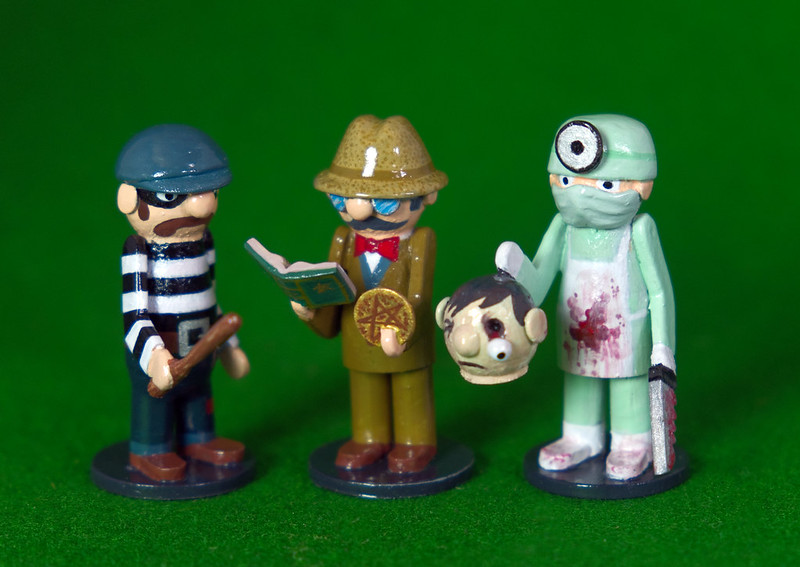
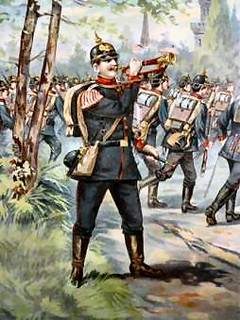
In the end, despite some doubt being voiced about the accuracy of the reference picture I chose to base my Prussian's uniform on (see middle figure bellow) I decided to use this as my template...

I have no other excuse for going for this 'look' other than I thought that it looked very smart! 😁 Although, for a brief moment I flitted with the idea of the light blue uniform ('Bavarian' according to the pictures titles) but in the end I plumped for the darker blue design.

So, let's pop some paint pots!

I always start by painting the flesh tones [using Valajo zzz] and work my way 'out'. So it's (usually something like) skin, hat and boots, trousers, then jacket, accessories (webbing and weapons) and then - finally - details like facial features and insignia...

As I have mentioned before, building up the colour areas from bottom to top gives you some latitude to clean up mistakes (like accidentally painting over into other areas). Believe me, I make a lot of mistakes and have to do plenty of touching up! 😁

About Types of Paints...
I should mention here that I am using acrylic (water based) modelling paints, because that is what I had to hand. This is OK if your peg models are for your own please of for display BUT if your are making your peg figure for use as toys for younger children then you should look into using child safe paints.

I'll be experimenting with a small range of child safe paints (like 'Painter's Touch' made by Rust-Oleum) for a test figure I will be making just to see what these type of paints are like to work with. The down side of converting to child safe painting is that I will have to purchase all new paints and it will take time - and some expense - to build up as good a range of colours that I have at the moment with my Vallejo collection. 😕

Aside from the Vallejo brand I like using Tamiya acrylics as they cover very well.
But what you decide to chose may very well depend on what range is most
readily available in your locale.

As I say, if you are making peg figures for your own pleasure - as I am - then you do not have to worry so much about this. Just bear this in mind if you are thinking of giving one of your models to a young child as a gift.

The Prussian Blues...
OK, moving one. Naturally the highlight of this unit's uniforms is the jacket colour - which is usually the defining recognition colour of any military unit. For the Prussians of this period we are talking [a] 'dark blue' and - indeed - Vallejo does have what it called a 'Prussian Blue' in it's range. HOWEVER, as usual, there is some debate among military modellers (as there usually is, because they like to be contrary) about what 'Prussian Blue' actually is! But, to be fair, if you look at the available reference illustrations it can varies quite a lot, as you can see in these two examples (both of which differ from the picture I am using as reference, see above)... 


...From a kind of charcoal grey-blue to and deep navy blue there's a bit of a discrepancy among illustrations. Even when I referred to the usually reliable fall-back - which is Osprey's Men at Arms books ('German Armies 1870-71') - I only managed to confuse myself further with a rendition of 'Prussian Blue' which was more of a rich Royal Blue! 😖

Will the real Prussian Blue stand up, please? 😄

So... For the sake of my own sanity - and recognising that my soldiers are toy soldiers and not museum quality display pieces - I'm just going to use Vallejo's Dark Prussian Blue straight out the bottle! One of the advantages of doing this is that it is then easy to replicate this exact uniform colour in the future should I want to do more Prussians.

[Side note: OK, I took the easy way out BUT there is method in my madness. I had already done some preliminary research for this project and a little problem I noted straight away was that most of the uniforms of the Franco-Prussian War - French or German Confederation - were dark blue! So there is a danger of not being easily able to discern one of my model units from another on the game table. So, if I can at least moderate the range of blues a bit there will at least be some welcome variation in uniform types. Not historically accurate, but they are just pegs soldiers!]

Back to the Painting...
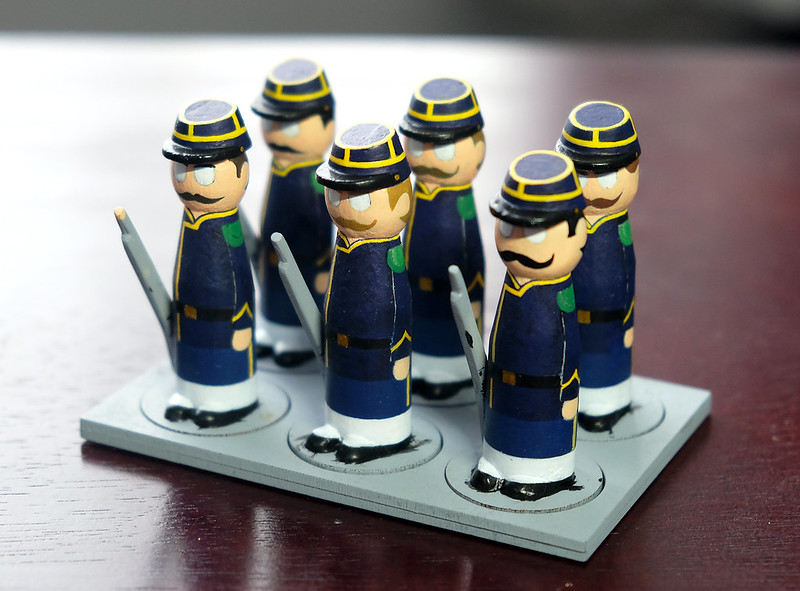
Working up through the layers of the uniform - repeating the process for each of the soldiers in the unit -  I slowly build up a completely painted figure. It can be a little laborious, but I am just doing six figure units due to the fact that I am utilising Bob Cordery's 'Portable Wargame' rules. I can only imagine how long it would take were I to make the larger units required by other traditional wargame rules! 😫

Above: Example of the 'Portable War Game' rules in action! You can see how
this small scale format is more akin to a board-game in it's use of a tile system
which can fit on a dining table (though it is scale-able). Likewise, the units in
use are representative, which means they include fewer numbers of individual
figures standing in for large regiments. Photo credit: John's Wargame Page Blog.

Phew! That scary thought to one side, I do find the repetitive nature of doing the same figure over and over quite relaxing. It's quite calming and takes my mind off the stresses of life - which is nice as we all go through some of the big challenges that are being thrown at us.

Beginning with the big areas I slowly move until I end up with the smallest detail and that's when things start to get tricky. These peg soldiers are of my original 'Mk. 1' style, which means most of the detail is painted on - from arms to belts and from piping, insignia and buttons - so things tend to get slower as you approach the end of the job. I usually end up painting on the face and the tricky bits like unit badges last, the cherry on the cake so to speak.

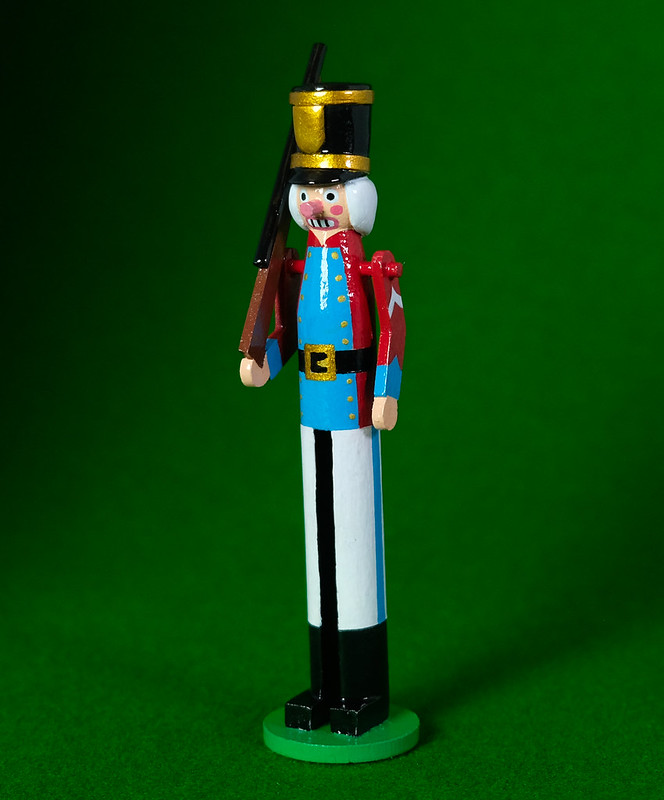
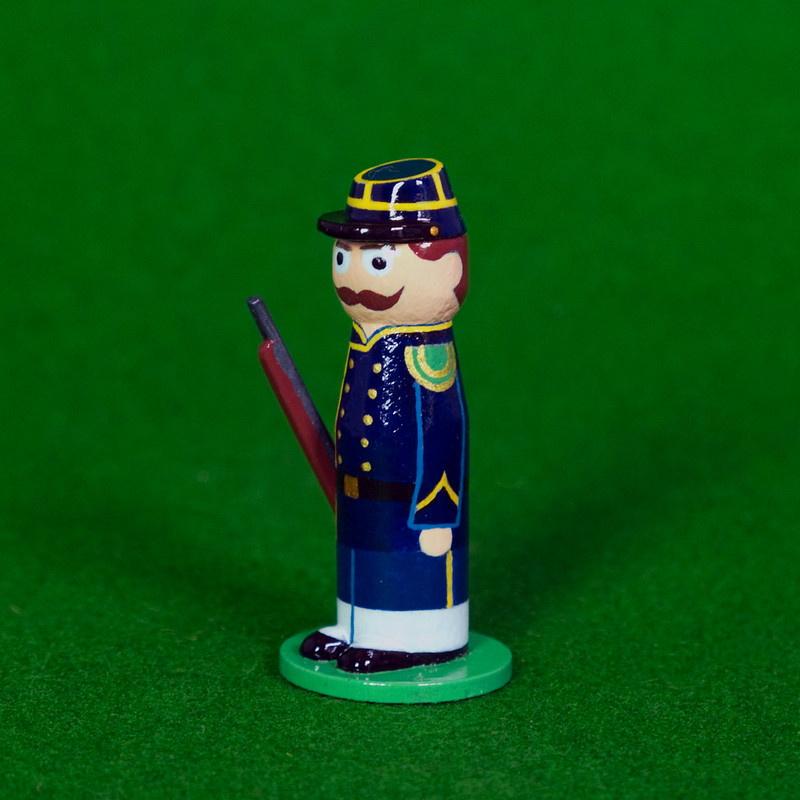
Above: I decided to go with a bluer blue for my Prussians, in line
with the original reference picture I chose (see top of page). 

(This laborious amount of detail is the reason I evolved my 'Mk. 2' figures with the addition of modelled accessories and added parts. So there is less intensive painting.)

Unfortunately, I had already started this project using my original peg soldier style, so I will have to continue with that format in order to get a consistent look. I am a bit OCD like that! 😉

The moment I put that last bit of paint on is sooooo satisfying! Yay! I tend to finish off the painting process by adding the facial features of my model, it seems appropriate as the face is what gives my little peg people their character. 

I should note at this point that for some of these tiny details  which I add last that I tend to use acrylic-based POSCA pens the nibs of which are great for applying little dots of paint...

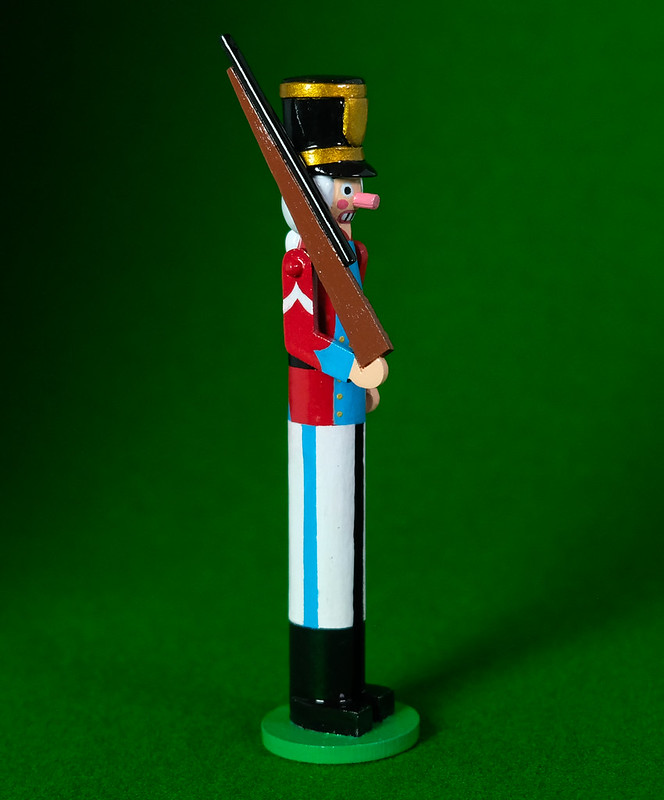
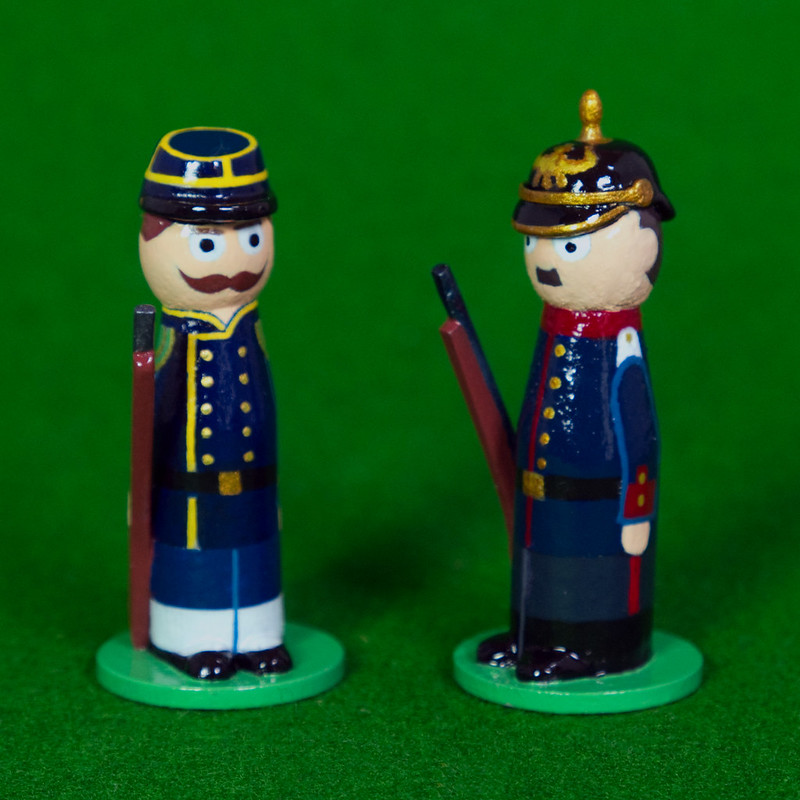
Above: Painting of my Prussian completed and compared to a French
counterpart. Both are now ready to varnish...

But that's not the end, there are jobs like the unit base to paint as well and then there is the application of the protective coat of varnish. The unit base is painted with the same grass green as my figures mini bases, I has flirted with the idea of painting the larger unit base with national colours to make unit identification easier (or at least painting the factions flag on the base). Alternatively, I guess I could have drilled a hole and fixed a national flag in the base? But, I kinda prefer the simpler, cleaner look of plain green

Varnishing is the absolutely final job and I find this a little stressful. I use a aerosol spray lacquer and just every so often things can go a bit wrong. Over-spraying and temperature can play their part in my fears of what can go wrong at the last moment.

Over-spraying is a danger as the misconception for novices is that spraying a think coat of gloss varnish will result in a commensurately high-gloss finish. Not so, over-spraying can lead to dripping where the excess gloss can runs down the model spoiling it. Worse, than that though is when the temperature is too cold or the weather too damp (if you spray outside) and the cold and moisture can adversely affect the gloss - you can also get sputtering - and I have had a couple of models end up with the varnish discolouring with a cloudy sheen.

So, varnishing must be done with care, patience and preparation. If you chose to spray on your varnish it should be done in a clean area of moderate temperature (preferable well ventilated). The coat should be applied in multiple light coats and not in one thick one. Spray a light coat and wait and then only apply another if you feel you need to.

Above all let your varnish dry (cure) properly. This may take up to a few days!

Cover your model after spraying to avoid dust settling on the wet varnish. There is nothing worse than having done a careful job making and painting your figure than getting a speck of dust right in the middle of a light area (so it's really obvious). I usually place my freshly varnished models under a box or clear food dome of some kind.

[I am currently planning to experiment with painting on my varnish coats rather than spraying. There are pros and cons to this change in my method of application.]

In Conclusion...
Well, that's the (my) painting process. I'm definitely not say this is 'the' way to paint your models as you have to develop your own painting strategy, but this is what is working for me at the moment.


Link: See the complete series of 'Operation Pickelhaube' project posts.