Saturday 28 September 2013

Back to square one...

OK, surgery over and I've made good the joins. So now I'm back to where I was a few days ago, with the basic figure ready to continue with the uniform details...

My figure next to a 1/32 Airfix soldier which I am using as
reference for scale.

I think it looks a bit odd at this stage, but maybe it will start to come together once more of the detail goes on...Hopefully!

Thursday 26 September 2013

Emergency surgery

And it was all going so well! But it turns out that my figure is too tall for the scale*, and unless I want a regiment of 6' 8" soldiers I had to something drastic...


I have removed a small section of each leg at the knee and I will shunt to two halves together - loosing my chap about 4 inches in scale height. Obviously I will have to reinforce the join with wire to make good the join. And then I will have to do some cosmetic putty work to hide the join.

Let's hope it all turns out well!

*You may wonder why I only just noticed why my figure was too tall. Well, my armature was a little tall, I admit, but this became more obvious when I started to add the layer of Milliput. I had underestimated how much mass was being added by my modelling putty. You live and learn (the trick seems to be making the armature slightly undersized to begin with).

Suits you Sir!

My progress in my body sculpt is slow, deliberately so. I'm just doing a very small bit at a time, stopping, sanding back and then continuing again. So, unfortunately, despite hard work I don't have that much to show you.

I'm starting to build up the upper body, readying it for the tunic...


I've been doing some research in the background and I'm thinking along the lines of a uniform based on Romanian infantry from about 1890-1900. But I want it to be suitably generic enough to be useful for a variety of nations from that period (by simply changing the hat).

One of the things that I will have to think about is how I intend to attach the arms and head. I will have to make some sort of socket or peg arrangement onto which I can place the interchangeable parts of my figure.


Now at the moment my little figure looks like he's in his long johns, but this is just the basic layer before I start to detail the clothing (I will add the boots last by the way).  So I'm concentrating on getting the surface nice and smooth at the moment.

Tuesday 24 September 2013

S.C.A.H.M.S. California Show 2011 Coverage - Sculpting Seminar

Very useful workshop tutorial on sculpting a 1/32 figure. First I've found that's any good...


Monday 23 September 2013

Pants

Well, hopefully not pants when I'm finished. Here we go...The start of my first complete 1/32 full figure sculpt. I just slap on a basic layer of Milliput to begin with, then carve and sand the shape back to how I want it.

As with the previous stages in this project I'm playing things rather by ear. I haven't really found a good manual or tutorial that sets out the sculpting process in depth. But in a way I would rather see if I can work it out myself.

...Fingers crossed!

Gilbert joins the team!

1/32 converted toy soldier
My 1/32 semi-scratch built come semi-converted Molaterian gun crew is starting to come together. The third member - Gilbert - has just come off the spray booth!

Gilbert's pose is a little more mundane as someone has to be working the gun! (It's not all beer and skittles in the Molaterian army!)

The paint job should be pretty quick and straight forward and then it's on to the final member of the crew, Cuthbert the Subaltern. As is the tradition in the army of Molatero he will be dressed slightly differently and be wearing the officer's kepi.

By this time people will be noticing the family resemblance between the crew members, so in my next project - my completely scratch build soldiers - I will be creating a set of alternative heads! :)

Saturday 21 September 2013

The art of toy soldiers in 42mm

There is a certain aesthetic that I imagine when I hear the term 'toy soldier' Funnily enough it's not the toys that I remember from when I was a child - predominantly Airfix or Timpo - but instead in my mind I harken back to a more earlier time of little tin men. Strange as I am not old enough to remember those day - although my father was.

Today I was doing my rounds of various FLW blogs when I came across a wonderful little picture - on the very enjoyable  'ARMY RED/WHITE AND OTHERS...' blog - which perfectly matched my perception of what a toy soldier should look like...


These beautiful little figures are from the 42mm Deutsche Homage range which are available from Irregular Miniatures. I think they are fantastic and really exemplify an antique toy soldier look. Here's some more examples...

These are gorgeous!


If only these were available in 54mm I would be over the moon (I am being strict with myself and am not lashing out on another scale format).

I would be overjoyed if my scratch build soldiers eventually turn out this charming. A big thank you to Tradgardmastare for highlighting the availability of these miniatures.

Friday 20 September 2013

Body building, FLW style

Very exciting morning for me as the postie dropped off a little package from my brother. It's my eagerly awaited resin castings of my 1/32 figure sculpture, plus my 'blank' heads to go with it...

The resin versions of my first 1/32 figure sculpt


My first scale figure creation
This handful of resin 'blanks' will keep me occupied for some time. They will form the basis of my very first completely original toy soldier figure. But, there is still a lot of work to do before I churn out my first toy soldier.

The next stage in my production will be to clothe the body in the uniform of my choice and then prepare the neck and shoulder joints for the addition of my scratch built arms and head. I will be drilling out sockets to take my head and arms and then will sent the result back up to my brother for the 'dressed' figure to be copied in resin.

In effect all these 'blanks' are just my working armatures, not finished figures. But they are the basis of my production line - the tools that allow me to work on my original creations.

The skull will have features added and arranged into a 'stick' of four or five variations. This will then be sent back up for duplication in resin as well so that I have a supply of heads to add to my soldiers. It's all very methodical but hopefully be worth all the hard work.

Long term I would like to think that I can make something of a decent quality that others might like to purchase (and in doing so self-fund my hobby). But that's perhaps wishful thinking.

Having said that my brother is beginning to think of metal casting, so you never know - in a year or so I maybe producing my own modest line of metal toy soldiers!


Sunday 15 September 2013

Albert, meet Hubert!

The painting was the easy part and didn't take long. So now I have my second gun crewman nearly complete...


Two more to do, another crewman and an officer and that will complete my 'berts!

Next: Cuthbert.

Thursday 12 September 2013

Molatarian gun crew - Hubert

Having completed 'Albert' - based on my scratch-built Mk. II head - I have now completed the second in my Molatarian artillery crew based on the Black Hat figure in combination with my home-made head.

Hubert is a veteran gunner and as such has his particular priorities when it comes to the efficient running of a gun team. Coffee and Goulash, that's what keeps a Molatarian field gun ticking over!

While Albert was the straight forward transplant of my Mk. II head onto Black Hat's metal artillery crew man Hubert is a little more ambitious in his construction. Again I have used the excellent metal Black Hat body but then scratch built arms and further customised my head to give the figure a bit of personality.

The coffee pot and cooking pot were scratch built from plastic tubing and Milliput I had to make new hands as we. The whiskers are Miliput and the pipe is a piece of brass wire bent into shape and finished off with - you guessed it - Milliput.

Of course Hubert suffers from the same basic flaw as Albert in that my Mk II head is a little over-sized for 1/32. But as they - there will be four crew eventually - will all be grouped together in an independent team I think I can get away with the big head!

Well, next stop - painting Hubert!


Tuesday 10 September 2013

Frankenstein's soldier - final

Well, got it done...


It's far from perfect, but as my first go at this sort of thing I'm fairly pleased. I need to study anatomy a bit more though, but this will do as a sculpting mannequin.

Now, off it goes up to my brother's to be copied in resin. Then I can add my head and make some arms for it...And give it a uniform of course! :)

...Oh! And by way of variety, I also made a 1/32 coffee pot! (Why? I will tell you later!)


Saturday 7 September 2013

Frankenstein's soldier 2

Creeping progress, but now at least it is starting to look like a human figure...


I did have to back-track a bit as I am still having problems scaling my sculpts properly. I had to unceremoniously chop down my little chaps legs! He is now the right height to be compatible with 1/32 Airfix or Armies in Plastic toy soldiers.

Next:...Well, obviously feet! :)

Thursday 5 September 2013

Frankenstein's soldier

I am finding my mini-sculpting project very rewarding, creatively. The stop/start approach is bringing up some very interesting shapes, at this stage I have a rather nice arty looking semi-abstract shape!

Only vaguely anatomically correct, I just need the basic look of the human
body here as I intend to cloth duplicates of this figure in due course. 

Sorry that this appears a bit 'off mission' if you are a FLW enthusiast, but hopefully the project of making your own toy soldier from scratch will be of some interest to you. Bear with me!

I should explain my strategy of what I'm attempting here: Like my earlier 'skull' sculpt I am NOT making a finished toy soldier here - but rather, at this stage, I am making the tools I need to make a finished toy soldier. So , when finished, this body sculpt will be sent up to my brother to duplicate in resin, and I will cloth the duplicates with the uniform of my choice.

Next: Finish off legs and feet and decide how I am doing the neck and shoulder/arm joints.

Wednesday 4 September 2013

First 1/32 figure sculpt begins

Although I have had my own wire armature done for a wee while now I have been rather cowardly putting off actually starting the sculpting stage of the project. Well, last night I took the plunge and began to mark out the main joints and muscle mass areas using some Milliput.

As you can see from my main photo I have been using the commercial '54mm' armatures as guides to the scale of my figure with one new addition - I picked up a Historex nude firgure to help me with my anatomy. This looks a bit weird and raised a smirk from the wife, but it will be very helpful as the armatures are closer to being skeletons and I wanted a better idea about how a fleshed out body would look.

One problem I found - and this seems to be a constant theme - is that although the Historex says that it's figure is 54mm I found this figure a little too large. But as a anatomical template it is still very useful.

I will probably take my time with this first full figure sculpt, adding the body mass in small layers. I have let this first basic areas I have done dry overnight and I will next start to fill in some of the limbs and trunk areas.


Sunday 1 September 2013

Fudge mountain (gun)

(Project 9 - A simple mountain gun conversion)
Er, best I could do for a title...What I mean is that I am fudging a piece of mountain artillery from the good old Britains 25 Pounder toy gun. My reason for doing this is because I wanted a firing model of a mountain gun for my Molatarian Jaegers but unfortunately I can't find a suitable existing model.

Well, there are plenty of toy 25 Pounders out there so converting one of these as a stand-in doesn't phase me, I'm hardly destroying a collectors item!

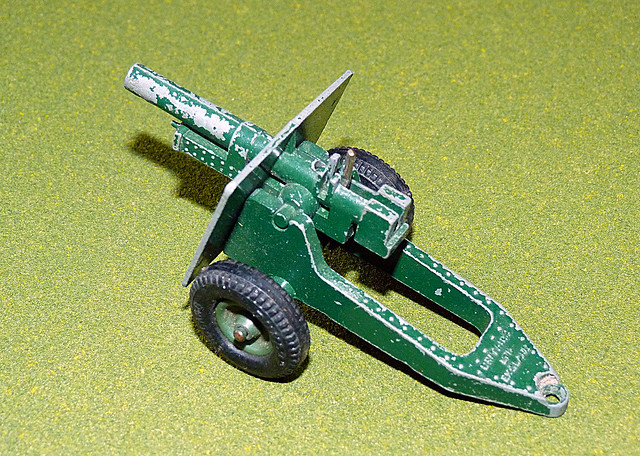
The original Britains 25 Ponder based on a World War 2 design, I want
to retro-grade this to look more 19th century.

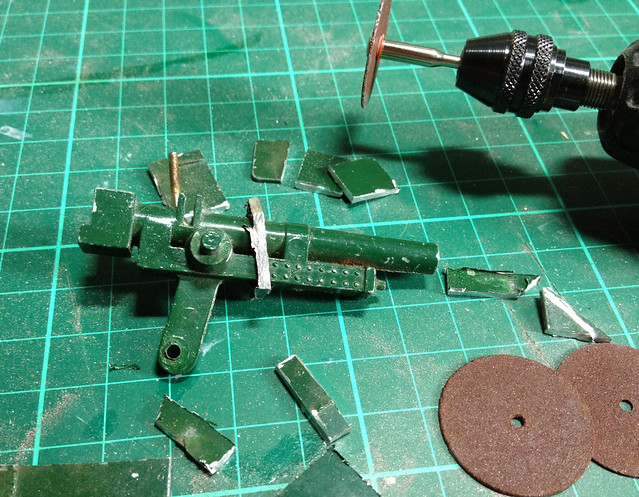
The conversion process is fairly straight forward, though may take a little time. First I want to remove the 25 Pounders shield and then make a new gun carriage for it to make it more appropriate to a gun of the late 19th Century. Therefore, the first step is to disassemble the Britains toy...


By the 1890s breech-loading guns had begun to be designed with recoil systems so not much needs to be done to the gun itself once the shield is gone, but the carriage is another thing. A lighter skeleton carriage will have to be made and older style wooden wheels attached. So, let's get that shield off...


Hard work even with my trusty Dremmel - take care, the metal gets VERY hot while cutting through it - but eventually you will get through it. Next I will have to smooth out the remaining shield vestiges and cut off the original axle attachment, another job for the Dremmel!

Next: In part two I will start to design a suitably period looking gun carriage and source some wheels.