Showing posts with label wooden toys. Show all posts

Monday, 16 November 2020

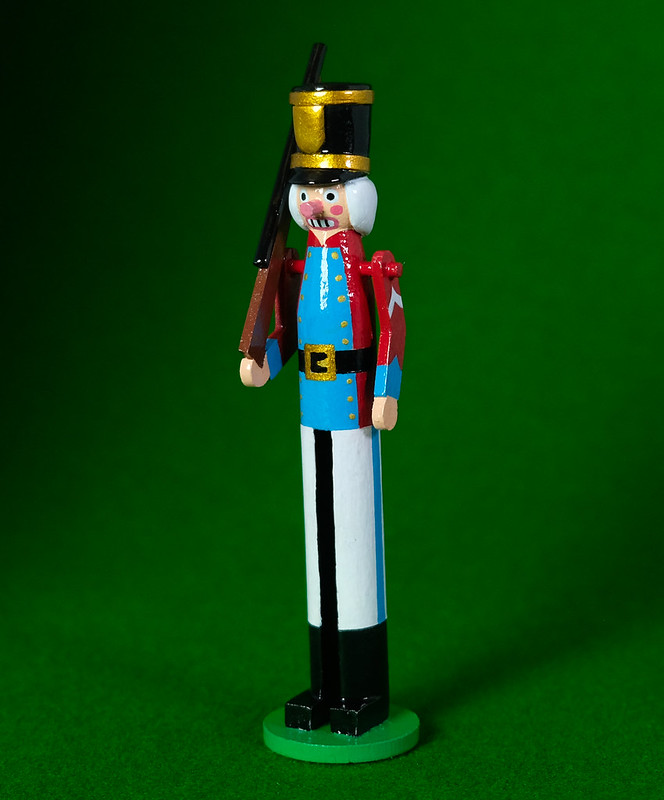
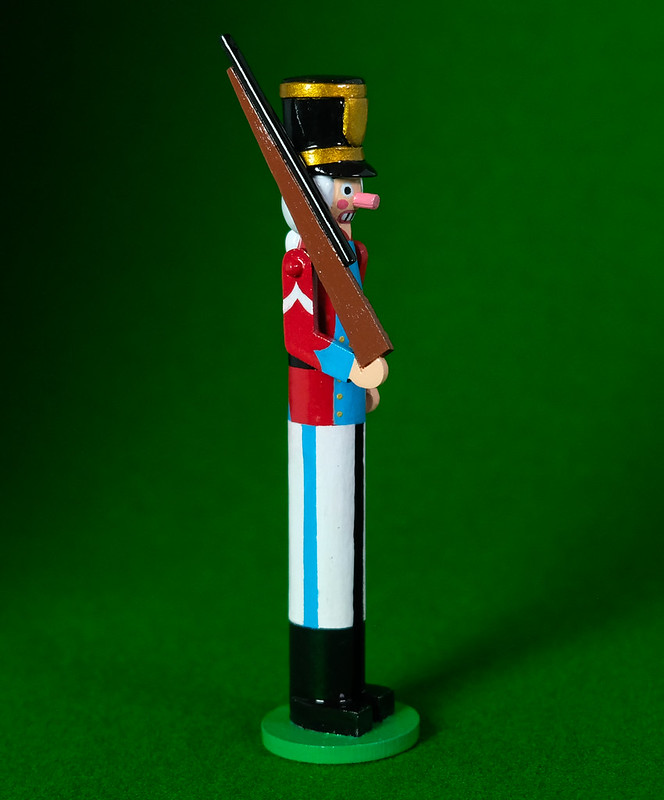
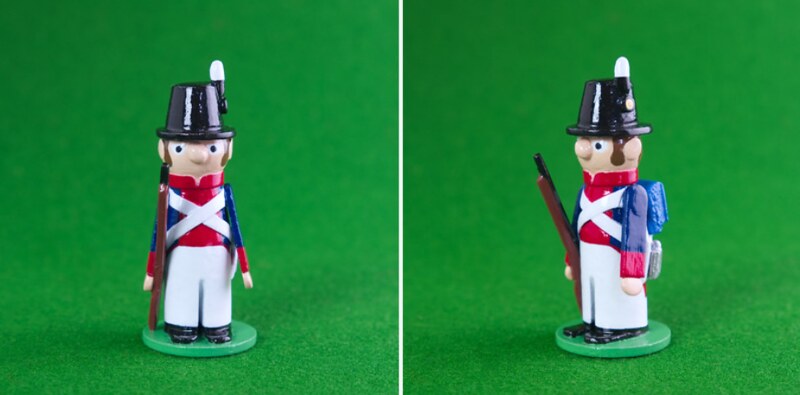
Peg Nutcracker Guardsman Complete

 I managed to get another of my peg nutcracker figures done, though I'm beginning to wish I had started these earlier as Christmas looms ever larger on the horizon!

I'm pleased with this little fellow and I'm enjoying this particular project. The slight down side is that I have a lot more of these nutcracker figures to make in time for the 25th of December. Still, onward and upwards.

This character is based on the traditional toy soldier from the ballet 'Nutcracker', a suitably festive story. The uniform is fictional and I tried a new way of making a rifle, simplifying the construction even more. It's just made up of an elongated triangle of lolly stick for the stock and a piece of cocktail stick for the barrel - but I like this stylised shape in this instance as it is suitable toy 'pop gun' like.


Another slight change in my previous construction method for this kind of nutcracker peg is that I did not bother to sand down the 'shoulder' dowel, but left it protruding slightly. I think this looks quite good and it enhances the idea that this is a toy soldier. Less work for me to do! 😁

The only concern I have about this style of peg figure is - being very tall and thin - it's balance. I chose a 3mm thick, 25mm diameter MDF base for these figures and that only just does the job. After I complete this project I will have to think again about basing and stability and I may need to either look at enlarging the diameter of the base or weighting the base (I have been considering adding steel washers to the existing base to give it a bit of weight).

Still, you are always learning. As they are they should look very nice on a mantelpiece for the festive period. 


Saturday, 17 October 2020

Operation Pickelhaube Part 3

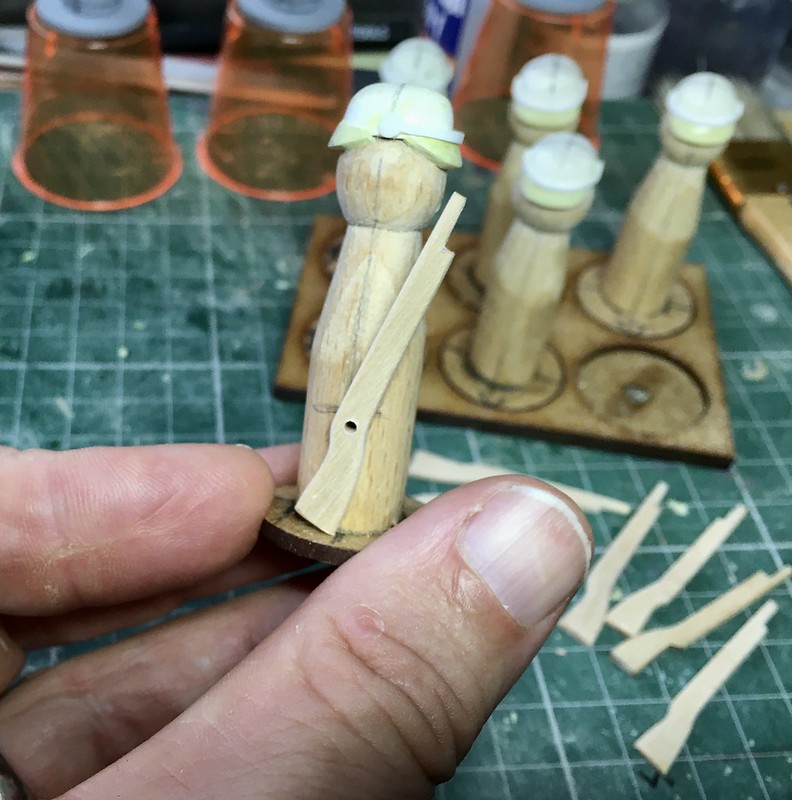
 Moving on with my little Prussians, it's time to add their rifles. I should say, I haven't gone for realism with these at all - in keeping with the rest of my simplified cartoon peg soldiers' look - and they are just recognisably rifles. They aren't modelled on the real Prussian rifles of the Franco-Prussian war - Dreyse "needle-gun" rifle - and are a bit over-sized, again because my soldiers are sort of cartoon figures.

Anyway, fixing the guns in place. Surprise - it ain't rocket science! πŸ˜‚

However, I do take the additional precaution of pinning my guns as well as gluing them as these are just the sort of additional objects that have a knack of getting snapped off, especially if your toy soldiers are for use in the rough and tumble of war-gaming.

I begin by applying a light dot of glue to the parts and then I attach the rifle in place. As these are what I call my 'Mk. 1' peg soldiers - and so things like arms and hands are simply painted on - I tend do go for the 'Order Arms' pose where the rifle sits on the ground and is held with the right hand. 

Once the glue sets and the rifle is fairly secure I then drill a small hole through the 'action' of the rifle right into the peg figure's body. This is where I will insert the pin so your drill needs to compliment the size of pin you are using...


The pins I use are 'Panel Pins' and are usually about 15-20mm long with a slightly enlarged 'head'. To accommodate the head - so that the pin doesn't show - you need to enlarge the hole top a wee bit, then I drip a little drop of glue into the hole and insert the pin...

Depending how deep I have drilled the pilot hole you might need to trim you panel pin to fit. You want to make it so that the head of the pin lays inside the counter-sunk hole you have made. If you make a good job of it you may not have to cover the pin head with filler to hide it...

And there you go, this should be nice and secure. I just have to add some detail to the Prussians' helmets and add some boots (just the toes) and that's the model complete. 😊

Incidentally, I came across a wonderful video of a reenactment of Prussian soldiers using their Dreyse "needle-gun" rifles in action against some unfortunate Austrian infantry armed with less advanced mussel loaders (during the Austro-Prussian War of 1866)...

When the Prussians met the French in battle four years later then did not have such a technological advantage as was shown in the above video. The French were armed with the Fusil modΓ¨le 1866 'Chasspot' rifle, which had several advantaged over the Prussian rifle. Sadly, as with so many of the French arms innovations of the 1870s this advantage was not enough to save the French and the German Confederation were the ultimate victors!

Tuesday, 6 October 2020

Peg Monoplane (Boeing P.26) Complete

 What with the Christmas gift-making schedule my Funny Little Soldier production has slowed down markedly at the moment. But I'm still trying hard to slip a wee military model in between the other work!

Today I completed my latest wooden peg aeroplane, my stylised take on the charming 1930s American Boeing P.26 pursuit aircraft...


The P.26 (or 'Peashooter' as it was nicknamed) was a little anachronistic even when it was first deployed by the US Army Air Corp, it's a bit shocking to think that just three years after the P.26 went into service the Germans had produced the Me109 and the British Hawker Hurricane was in the air!

Cute just couldn't cut it anymore!

I'd like to do some more 1930s monoplane fighters, maybe a Mitsubishi A5M or a Dewoitine D.500 or a PZL P.11?

Sunday, 20 September 2020

Peg Monoplane No. 1 Scheme & Decals

 My original idea for this little monoplane was for it to be the next addition to my Molatarian Air Force. It was going to have a purple and orange based colour scheme and emblems, BUT then...

As I mentioned in a previous post, this little aircraft's design is loosely based on the 1930's Boeing P. 26 pursuit fighter of the U.S. Army Air Force and - frankly - the historical schemes are so darn attractive that I found that I just could not persuade myself to do anything but one of these colourful designs. Here's an example...


Very pretty, and very typical of the era. So, you see, I couldn't resist having a crack at a real world scheme (maybe I can pretend it's on loan to the Molaterian Air Force). πŸ˜†

Well, the next thing was to transfer the scheme and it's lovely emblems onto the primed model ready to paint. I thought the easiest way to do this would be to trace the designs onto the plane using old fashioned carbon paper. But first I needed to create a suitably sized emblem template, this I did by drawing a copy using Affinity Designer (vector design software)...

The design drawn to the right size for the wings I convert it to a black outline and printed it out with guidelines to make sure I place it in the correct position on the model's wings...


I've never done a 'realistic' peg model aircraft before so I was a bit unsure how to go about doing all the detailed emblems and - indeed - how much to do (as this is a simplified model). So I decided to try a mix of masking and transferring the USAAF roundels and painting on the rest of the 'decals' straight on.

At the same time I painted on the two primary base colours of yellow and blue... (Can you tell that I'm making this up as I go along, as usual?)

Well, that's where I got to as I have so many projects on my workbench at the moment so I'm having to careful manage my time. The list of Christmas presents grows ever longer BUT I am making sure - for my own sanity - that I am doing some personal projects in between the 'jobs'! πŸ˜‰

Indeed, I should have some good old toy soldiers to show you again very soon!

Monday, 14 September 2020

Peg Monoplane No. 1 - Props & Stuff

 Next up on the wee plane to-do list is the stand. I want my little peg planes to be displayed in the flight mode - for possible use in tabletop gaming - and so I am adding some transparent flight stand (by Dropzone Commander and available from WaylandGames.co.uk). This entails fitting a small socket component into the underside of the fuselage of my model...


I drilled an appropriately sized hole and then inserted the socket into it on top of a blob of Green Stuff putty. I chose Green Stuff as it is slightly flexible even when dry so will allow the socket to flex a bit when the end of the flight stand is inserted into it (it's quite a tight fit)...

Next I primed the plane ready for painting using my usual Grey acrylic spray primer. At this point I usually notice any problems with any joints I have made or if there are any major bumps or dents in the model as the flat grey paint tends to make these easier to spot. If there are any dinks (and there was a couple) I filled and sand them and reapply a bit of primer.

That done and dry it's time to think about the plane's 'engine' and propeller. I left these until this point as I won't be able to fit them - or, at least, it would be perhaps better to fit them - once all the rest of the model is painted.

Unlike previous peg planes I fancied having this prop spin freely so I had to put some thought into how I was going to make this work. I had to think back to when I used to make plastic Airfix aircraft and how they went about making a spinning prop unit, and then I devised cunning plan...

I assembled all the little components I thought I might need to make my prop and sketched out a rough shape on a lolly stick!

The next bit was slightly tricky as I wanted my model propeller to have that slight twist in it that they do in real life. So what I did was to drop my lolly stick into a cup of warm water and leaf it to soak for a while, then I removed it an *carefully* twisted it and held it in place for a while (wish I had some sort of desk clamp to help with this). After a while - and as the wood dried out - the stick retains the twist...

Job done! Though I'm sure I could have done this more easily and made a better job if I had rigged up a pair of clamps... Sitting watching TV for an hour holding the lolly stick in this position wasn't the most entertaining way to spend your evening! πŸ˜†

Anyway, once I had the shape I wanted it was just a case of cutting out the propeller...

I was quite pleased with the result. My only misgivings were - ironically - just how nice the wooden propeller looked!  I couldn't help but thinking how nice it would have looked if treated with just a simple coat of clear varnish, which would have really brought out the grain. Had my plane been a WW1 fighter this would have looked superb, but - a little sadly - my 1930's P.26 inspired monoplane has a silver painted prop. 😟

Anyhoo... Prop made, now to start putting together the bits that will make it free spinning once attached to the fuselage...

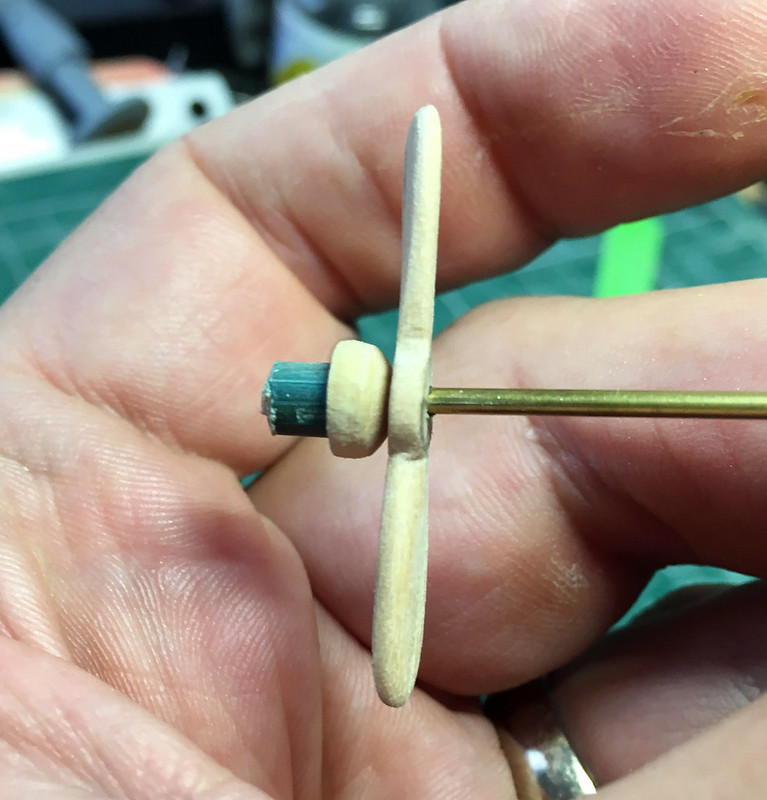
I decided to add a brass rod for a shaft as this would result in less friction and so would make free spinning much easier. The prop would be glued to the shaft and the faux engine piece would be glued to the inside of the engine cowel, in this way the shaft and propeller would spin freely around with the 'engine' holding the whole thing in place...

The shaft will be trimmed and a propeller spinner or cap glued in the end. However, all this will have to wait until the plane is painted, then we shall fit my contraption and see if it actually works. Fingers crossed, eh? πŸ˜‰

Edit: Could't resist - had to test fit the prop (minus spinner) and I think it looks rather spiffing! πŸ˜†

Next: Choosing a paint scheme and painting the model.

Sunday, 13 September 2020

What's On the Workbench? September 2020

 As I've mentioned, I have a lot going on at the moment and not all of it is the usual military toy related projects. Christmas is firmly at the back of my mind and several jobs are to do with getting some little gifts in the bag - but another new source of projects is jobs my wife is giving me for friends of hers!

Wedding cake 'toppers' for a family friend's daughter. I may be in
danger of creating a monster and I don't want to encourage this
sort of project!
πŸ‘Ž

I'm not really keen to take on 'commissions' yet - although the question has been asked of me several times. I'm a bit worried about a relaxing hobby becoming unintentionally a mini-business as there is a difference between doing things because you like to do them and having to do things because a customer want you to do them!

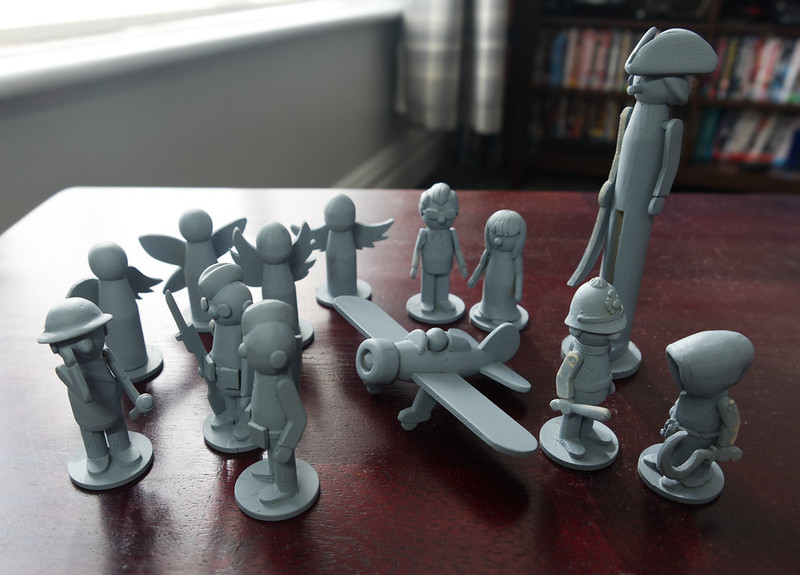
Anyway, I had a bit of a priming day today and as I had all my current jobs which were ready to be painted - I have more projects that are still in the construction phase - in the one place, I decided to take a 'group shot'! πŸ˜€

Tuesday, 1 September 2020

New Project - Peg Monoplane No. 1

 So much going on at the moment and it seems I am a bit of a victim of my own success! Yes, the requests for peg figure commissions have begun. In truth, I have already had a few enquiries about purchasing custom peg  models but so far I have kinda ignored the thought of this becoming a cottage sideline... The thought of a relaxing hobby becoming a business has not really appealed to me.

Anyway, that's my problem to figure out. In the meantime, I'm starting a new little plane model - as if I didn't have enough going on! πŸ˜‰

It'll be in the style of my previous little cartoon style bi-plane fighter - my 'Purple Baron'...


But this time I fancy trying out a different period. I have a particular liking for the aeronautic history of the early 1930s as it was a very exciting time, foreshadowing - as it did - the next World War with the Great Powers trying out their latest technological advances. Yet, at the same time, it was still a time of the romance of air travel and adventure!

In 1930 the bi-plane fighter was still queen of the sky and monoplane warplanes were still something of a novelty. Designs were quaintly crude and still included features that were soon to become obsolete - like open cockpits and fixed landing gear - but which lent these war-birds a certain cuteness. πŸ˜ƒ

For my first attempt at a peg monoplane I decided to use a particularly endearing American design as a template for my little model...

The Boeing P-26 "Peashooter" was the first American all-metal
production fighter aircraft and the first pursuit monoplane to enter
squadron service with the United States Army Air Corps. [Wikipedia

Making a Peg Plane...

Calling this a 'peg plane' is a little bit of a fib as I am starting the main bit of construction - the fuselage - will be done using a length of dowel rather than one of my usual beech dolly pegs. This is due to my decision to try out dowel as an economic alternative to pegs as dowel also offers the posibility of less waste cut-offs.

I begin by roughly sketching out the basic shape of the body of my plane on a section of dowel...


This is then roughly shaped using my rotary sanding machine, thinning the tube down to a point to create the tail of the plane. The length of the fuselage will be about 60mm, the effect being to shorten the overall size by squeezing it into a cartoon version of the real aircraft's dimensions (I believe the Japanese call this caricaturization of vehicles 'chibi' which is Japanese slang for 'something short).


Once I have the underlying shape I want it's time to work on some of the detail, like carving out the cockpit and adding the elongated flared headrest and the engine cowel...


With these rough shapes added they can then be smoothed down into their final shapes, blending them into - hopefully - a seamless and aerodynamic appearance. Additionally, I created a little pilot - or at least his head - using a small wooden bead, which I pinned in place...


It's starting to look like the P.26 now! The next job will be to work on the wings, but I'll leave it here for now and get on with some of my other 'production line'! πŸ˜‚

Saturday, 29 August 2020

Let's talk about the 'C' word - Christmas!

 I can almost hear some of you groaning, but hear me out...


This year - due to tight finances - I am making several gifts for my family and friends. Now, those of you who follow my blog (all two of you LOL) will know that I am NOT the fastest maker of models AND I easily get distracted by other things! πŸ˜†

...SO, in fact, starting to think about Christmas now is not too early. It actually might be a bit late considering what I have planned.

Now, the reason I include this subject on this blog is that my gifts have a toy soldier related theme as I want to make some mini versions of German traditional nutcrackers!

Funnily enough, making mini peg versions of these popular festive ornaments is exactly how I got into the whole peg soldier making in the first place...


I followed an online tutorial for this prototype - you can find the instructions over at Kate's Creative Space - and although it turned out OK there were a couple of things I wasn't happy with.

First of all, the flock 'hair' was a pain in the ass. No matter how well you try to glue it down it molts and I reckon that eventually the poor old soldier will go bald! πŸ˜‚ Also, I wasn't altogether enamoured with the hanging and/or standing methods (the standing 'ring' came from a special craft set specifically intended to allow you to make free-standing peg ornaments).

Back to the Drawing Board - My Mk. II Nutcrackers

I've had plenty of time to mull over how to make a better mini nutcracker, especially as I have been learning a lot over the year making all my experimental peg soldiers.

The main change I made in my construction was to sculpt the 'hair' using Milliput putty, in this way I was able to create specific hair-dos to suit the kind of soldier I was making (or period of uniform). My nutcrackers are mainly 18th century inspired so there's a lot of powdered wigs with pony-tails! 😁

The next thing I changed was the simple hat design, one thing I have really enjoyed making for my experimental figures was ever increasingly complex hat designs. So, I've gone a wee bit mad and created some 'interesting' military headgear for my new nutcrackers...

Above: A Guardsman Officer and a Jaeger (huntsman)

Above: A King and a Pirate... Yarrrr!

Above: The French Old Guard? :)

As you can see, there quite a variety here ALTHOUGH the wife spoilt my fun a bit by saying 'well, they aren't very Chrismassy though are they?'. πŸ˜‘ So I guess I'll be adding a couple of extras (a Santa and a snowman maybe), this way I can make two sets of four which I can box up as nice ornamental gift sets for both my daughters.

Anyway, aside from these big changes to the original prototype design I also decided to add a smaller modification which I hope makes them all the more charming and 'toy soldier'-like... A nose!

This is just a simple wooden rod made from a section of cocktail stick, but I think it makes a big difference and is a nice improvement. 😊

And that's it for now, except - on a non-soldier related note - that among the other gifts I am crafting are some other festive peg figures for Christmas tree ornaments. In this case I'm making a set of Christmas angels and (for some reason) fairies!

Sunday, 9 August 2020

Back from Hospital!

 Bah! Another short visit to hospital (nothing too serious - but it needed sorting) and so yet another knock to my schedule! πŸ˜•

Today, being Sunday, I had a bit of a relax and tinkered about with various projects on my little workbench (though the good news is that my main full-sized man-cave work area is nearly back in action). It's all a bit of a mish-mash of little jobs but I thought I'd post up some pics...

Above: Lots going on here, some soldiers and some RPG figures plus different
accessory mini-projects.

The military related figures are a series I am working on based on the classic 'Dad's Army' TV show. I am just putting together three pegs representing The Warden (boooo!), Sargent Wilson and Corporal 'They Don't Like It Up 'Em' Jones...

One other thing worth mentioning is a new tool I am using which compliments my little mobile workbench tray (which I use when I want to work in the lounge in front of the TV). My usual electric rotary tool is my trusty Dremmel Model 3000 (wired 130wt) tool BUT - while superb - this multi-tool is a little cumbersome and too powerful for small modelling and crafts really.

So, I ordered one of those very cheap rechargeable Chinese knock-off versions of a Dremmel. While these have a poor rating for their intended use (general light DIY) their low power is exactly right for working with light woods and plastics. Also, being wireless it's very easy to use and control one handed for small intricate jobs...

The tool is so light that you can easily use it like a pen to inscribe or engrave - something I just cannot do with my lump of a Dremmel (without attaching a separate accessory). It charges via USB - which is great - and it holds a charge for quite some time. A good purchase! (£24.99 from Amazon.)

It's nice to be back home! πŸ‘

Friday, 24 July 2020

Ta-dah! A Gaggle of Peg Figures

I've complete my latest batch of peg figure test models, so I've kinda jumped from the priming phase - covered in my lat post in this series - straight to the finished models in a single bound! Can't say if this is a good of a bad thing - it certainly means there's been a little longer wait between posts though.

However, I did snap one quick photo of the painting process in progress...


I found it quite relaxing to be working on multiple figures in a sort of production line manner, although they were not all identical. It was also very interesting to see how the slight design and construction modifications I had made to each of these test figures worked out as paint was applied. There were very definitely things that worked and things that didn't, but that's why we do tests isn't it? πŸ˜„

Anyway, without further ado let's look at the finished models and talk about what I learned from them...

Figure 1: US Militiaman, War of 1812...

Continuing my original intention that any peg figure experimental model would be based on historical US army uniforms (this rule has already been open to bending, as you will see), my first test is a militiaman from the almost forgotten British-American war of 1812 (another win for the Yanks)!


There were a few new ideas I was trying out with this model with a view to simplifying some of the methods I used in my early peg soldiers.

The main thing I tried out was cutting a gap in the lower peg to make separate legs (instead of the simple painted on line I previously used). This may seem a little strange if you consider that I already cut off the dolly peg 'legs' to make this smaller 50mm tall peg doll, but this is a much narrower dividing gap than the original peg pins.

The thinking here is twofold; I find painting a simple line to represent the legs a little tedious (especially if I have several figures to do) and also I wanted to see if an actual physical gap would look more effective (i.e. look better). Believe it or not, it's actually quicker and easier for me to saw this cut while constructing the figure than it is for me to carefully paint on a neat, thin line!

Other new effects used here include the nose! Yep, I'm trying out a cartoon hooter. πŸ˜€

This is simply a blob of Milliput modelling putty stuck onto the centre of the face. Again, this is both for quickness (another thing I don't now have to carefully paint or draw on) and to add some three dimensional interest. I'm constantly thinking about the times I have to construct multiple figures in a hurry, small changes like this add up and mean I can produce figures in shorter amounts of time.

And finally, I have opted to use the lolly-stick arms - once again (sorry) instead of painting on the arms. This make painting a doddle for me as I don't have to expend time carefully outlining 2D features but instead I let 3D add-ons do the work.

Figure 2: 'Perry Mason', 1930s Private Detective...

As well as trying out new construction techniques I also wanted to experiment with some new themes for my models. While I do immensely enjoy making peg soldiers I thought that switching themes might broaden my skill set and keep thinks interesting.

And so... Because I am currently enjoying HBO's 'Perry Mason' reboot so much I really fancied a crack at doing a classic noire hard-boiled detective figure! πŸ˜€


As with my 1812 figure I used the divided legs technique, in this case because I wanted my detective to be wearing 1930s style baggy trousers with turn-ups and just painting these on just didn't seem as evocative enough. I needed to model this look.

Next, I went for the lolly-stick style of arms but upped the technique a bit by cutting bent arms out of a thin sheet of wood. Additionally, I tried out adding an object - the revolver - to the component. This posed it's own problems as I ummed and ahhhed about the scale, but in the end, I decided to go for an oversized 'cartoon' (what fantasy modellers call 'heroic') scale.

And finally, there's the facial features. I am quite happy with the idea of adding a nose in 3D rather than painting one on. While the eyes and mouth  (which I now hate) were done in the simplest way I could think of in an attempt at a minimalist look... I don't think I will be doing this again! 😞

Figure 3: Pippin Fort Cadet...

This figure is actually a bit of a joke aimed at myself. When I posted up some photos of my peg figures to a Facebook group one of the comments I received was that my little peeps looked like they belonged in 'Camberwick Green' (you have to be a certain age to understand this critique)!


The classic children's' TV series from the 1960s was popular viewing and aired regularly well into the 1970s (and beyond) and has subsequently gained 'cult' TV status.

Whether it was the googly-eyed cartoon faces of my figures of just the simplified bobble-headed style I don't know, but I though 'what the hell' and for a laugh I decided to go full 'Pippin Fort' with my next peg soldier! But, anyway, the comment tickled me and as I was a fan of the show and so...


The big change here is that I cut down the peg 'body' and added a couple of wooden dowel pieces for the legs. Again, this was to do with the fact that I have become increasingly unhappy with my original method of indicating legs by just painting a line down the middle to indicate the separation.

My simplified shoes also got a make over by using some Milliput putty to create a chunkier boot.

For the facial features I returned to painting in the whites of the eyes, although - as with Camberwick Green - I made the eyes completely circular instead of my normal half-circle shape.

The arms are, once again bent cut-outs, though I chose to make the rifle holding a two-piece component this time. It was just easier (maybe if I had a CNC or MDF laser cutting machine I would have created a one-piece version).

Figure 4: Dad's Army's Captain Manwaring...

Classic TV nostalgia grabbed me and I decided to make another old British small screen character. This was a bit difficult as I am a massive 1960s and 1970s British TV series and so choosing one out of so many characters to model was a real quandary.

So...Which show? Hopefully you'll guess...


Yes? No? ...Well, it's supposed to be Captain Mainwaring from 'Dad's Army'. πŸ˜‰

I'm not sure if this counts as a caricature as it's only a passing resemblance, but this is the first time I've tried to recreate a specific character.

The major new technique here is the creation of a rounded lower body to which I have attached a couple of dowel legs. A touch of realism for the body...Just. I'm kinda liking the proper legs idea, not because I am trying to make my peg figures 'more realistic' but because it opens up a lot of possibilities for poses AND it's more satisfying than just a painted line.

The spectacles was a surprise 'win' - these would have normally been painted on but adding more appropriate 3D decoration seems to be the way I am going. But not too much!

Summing Up What I Have Learned...

Story short, my peg figures are not evolving. While I do really like some of the new techniques I've tried out here I still actually like my original way of doing things as well. So, no, this isn't an evolution it's more about finding new ways of doing different types of models for different types of projects. Sometimes my peg soldiers are toys, sometimes they are ornaments. Does that make sense?

I'll modify my techniques depending on what I'm trying to achieve. More detailed for 'caricatures' and my original simplified style for 'trinkets' (I'll elaborate what I mean by trinkets in a later post).

So, what did I like (and not like)?

I liked the dowel legs (for appropriate jobs), they give me the chance to model specific poses and slimmer body types for refined female characters (my original one-piece peg body can look a wee bit plump, especially towards the bottom).

The bent arms (for want of a better name for them) are also nice and open up options for more dynamic poses. To be honest, the painted on arms of my original figures were my least favourite part of my peg soldiers. Not because of their look but because they were a pain to paint on. One of the things I wanted to try out was faster way of creating the figures and I found that laboriously painting a whole unit of arms was a bit tedious!

The method of cutting out the arm with an object in one single piece interests me, I like how streamlined the flat component is. A two-piece equivalent would be a little awkward, I think. Though, I did like having the flat arm and the rifle in two separate bits, go figure. (Horses for courses again.)

Noses... Yes or no? ...Maybe, depending! 😁

I don't think the same fat rounded nose I did (made out of a blob of Milliput, btw) is suitable for every figure. I mean, what happens if I do a slim character or a female? It just wouldn't look right. So I like the nose idea in principal but I think I will have to modify the nose shape for specific body types.

Finally, facial features. I definitely didn't like the 'Perry Mason' simplified features (they were bloomin' awful). In fact, this is the one thing that I think I did better the way I originally painted them with the half-circle eyes. But the mouth poses a conundrum, I'm afraid I'll have to do some more tests to find a satisfactory way of doing this.

My original way of doing eyes and the rounded version for my Pippin Fort
cadet. I may just revert to doing my eyes the original way but may do them
slightly smaller. I also liked omitting a mouth, that works well.

All in all, I've enjoyed this experiment and I have learned a few new tricks. Let's see if I can apply what I've learned to a 'live' project! 😊