Next up on the wee plane to-do list is the stand. I want my little peg planes to be displayed in the flight mode - for possible use in tabletop gaming - and so I am adding some transparent flight stand (by Dropzone Commander and available from WaylandGames.co.uk). This entails fitting a small socket component into the underside of the fuselage of my model...


I drilled an appropriately sized hole and then inserted the socket into it on top of a blob of Green Stuff putty. I chose Green Stuff as it is slightly flexible even when dry so will allow the socket to flex a bit when the end of the flight stand is inserted into it (it's quite a tight fit)...

Next I primed the plane ready for painting using my usual Grey acrylic spray primer. At this point I usually notice any problems with any joints I have made or if there are any major bumps or dents in the model as the flat grey paint tends to make these easier to spot. If there are any dinks (and there was a couple) I filled and sand them and reapply a bit of primer.
That done and dry it's time to think about the plane's 'engine' and propeller. I left these until this point as I won't be able to fit them - or, at least, it would be perhaps better to fit them - once all the rest of the model is painted.
Unlike previous peg planes I fancied having this prop spin freely so I had to put some thought into how I was going to make this work. I had to think back to when I used to make plastic Airfix aircraft and how they went about making a spinning prop unit, and then I devised cunning plan...

I assembled all the little components I thought I might need to make my prop and sketched out a rough shape on a lolly stick!
The next bit was slightly tricky as I wanted my model propeller to have that slight twist in it that they do in real life. So what I did was to drop my lolly stick into a cup of warm water and leaf it to soak for a while, then I removed it an *carefully* twisted it and held it in place for a while (wish I had some sort of desk clamp to help with this). After a while - and as the wood dried out - the stick retains the twist...


Job done! Though I'm sure I could have done this more easily and made a better job if I had rigged up a pair of clamps... Sitting watching TV for an hour holding the lolly stick in this position wasn't the most entertaining way to spend your evening! 😆
Anyway, once I had the shape I wanted it was just a case of cutting out the propeller...

I was quite pleased with the result. My only misgivings were - ironically - just how nice the wooden propeller looked! I couldn't help but thinking how nice it would have looked if treated with just a simple coat of clear varnish, which would have really brought out the grain. Had my plane been a WW1 fighter this would have looked superb, but - a little sadly - my 1930's P.26 inspired monoplane has a silver painted prop. 😟
Anyhoo... Prop made, now to start putting together the bits that will make it free spinning once attached to the fuselage...

I decided to add a brass rod for a shaft as this would result in less friction and so would make free spinning much easier. The prop would be glued to the shaft and the faux engine piece would be glued to the inside of the engine cowel, in this way the shaft and propeller would spin freely around with the 'engine' holding the whole thing in place...
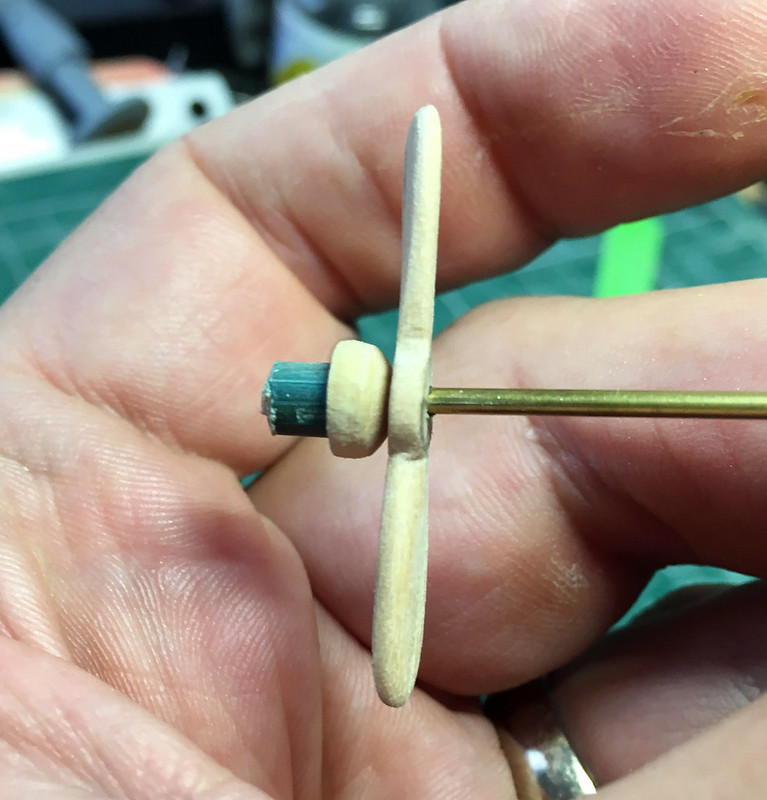
The shaft will be trimmed and a propeller spinner or cap glued in the end. However, all this will have to wait until the plane is painted, then we shall fit my contraption and see if it actually works. Fingers crossed, eh? 😉
Edit: Could't resist - had to test fit the prop (minus spinner) and I think it looks rather spiffing! 😆

Next: Choosing a paint scheme and painting the model.
No comments:
Post a Comment