Tuesday 27 March 2018

What's Going On Update

Not a lot of completion, but a lot of tinkering at the moment! Several 'peg soldier' projects going on at the same time including:

• Franco-Prussian War prototypes for a Portable Wargame setup...Mainly trying to figure out a way to easily replicate unit headdresses!


• How to make a peg cavalry?! Trying a few random wooden components in order to make some horses for my 48mm peg soldiers.


• ...Even more hats! Yes, you can't have too many military hats, so I'm experimenting with Milliput putty to see what I can make.


• And, finally, do I go 'big'? I bought some of the commercial wooden 'blanks' (fake peg figures), which are a slightly larger scale than my 48mm (traditional dolly peg) soldiers.


So...As I said, a lot going on. This whole peg soldier thing is a little addictive! :)

Sunday 18 March 2018

Painting a Peg Soldier

Well, it's Sunday evening (that last bit of relaxation before the work week starts all over again) and I've managed to find time to blaze through - 'blaze' for me that is - my first commission. So, this seems a nice opportunity to do a little photo walk-through of the process (without my usual waffle)!


All that's left is the varnishing.

Saturday 17 March 2018

Portable Wargame Project - Bases

Having been impressed with Mike Lewis's Portable War-game demonstration game, I thought I'd like combine my current peg-soldier making with some unit making. I'd love to see a whole unit of my peg-soldiers together. So...

I found some nice laser cut MDF bases - in a wide range of sizes and shapes - at Warbases.co.uk.


I've chosen some regimental trays that follow the unit composition as used in Mike's demo (6 troops per infantry unit) so got some 2 x 3 25mm circular base trays to go with a few packs of 25mm bases.

Additionally, I thought I would try out magnetising the trays and bases. Though, stupidly, I bought 3mm deep trays when I've been using - and am happy with - 2mm deep bases (so I had to order some 2mm trays, what an idiot).


Anyway, this will be a first so I hope the magnetising works out, and anyway it'll make storing and transporting the units easier. (The 5mm x 2mm Neodymium rare earth magnets are also available from Warbases.co.uk.)


I have it in mind that I'd like to try out a Franco-Prussian War themed game...All I have to do now it make the peg-soldiers!

Thursday 15 March 2018

First Commission - Peg Grenadier

Funny things just happen sometimes. No sooner had I started my latest toy soldier efforts than I had a request to make one up specially on commission.

I was asked to reproduce my initial '42mm' peg Grenadier...So, off we go again! :)


Reproducing an exact copy of one of these peg soldiers does highlight some interesting issues which should be given some consideration, especially if you intend to make a miniature army.

Take the rifles, for example. For an 'army' I will have to make exact copies of the simplified rifle shape so I will have to come up with a easy way to replicate these shapes. Initially, for my prototype, I carved the rifle out of a wooden lolli stick and I don't fancy doing that every time (and that's not the only part I will have to duplicate; there's the hats as well).

Hhhhhmmmmmm...

Anyway, on with the 'job'! LOL (Really flattered somebody likes my stuff!)

Sunday 11 March 2018

Mini-Nutcracker Soldier - Part 2

I'm playing this - as with most everything I do - somewhat by ear. So far I have refined my design for the mini-nutcracker soldier by sketching the figure's proportions onto the pegs that I am using. In the following photo you can see my first attempt on the left - which had balanced proportions - compared to my final attempt with more stretched and stylised proportions...


I have attached the hat and hanging thread on my final design. It actually took a while and several tests to find the 'right' sort of thread to use with this (my original idea of using thin wire just didn't look right).

Additionally, I have these pegs sitting in the custom ring stands. Although I mean these are Xmas tree decorations, I kinda like the idea that they could also be places on the mantlepiece if I so desire (so alternative versions I have on the drawing board are a candleholder or place name holder for the Xmas dinner table).

Priming and Painting
As this is my first test of the nutcracker style of wooden soldier - especially in this miniaturised form - this is where things could go a bit wrong! In fact, I'm pretty sure they will as I will be experimenting  with my own ways of doing things like the facial features...I am not altogether confident. :)


It's bit frustrating that I will only know what has 'worked' once I finish this model, so I have to persevere and carry on to the end. Then I can use what has worked on the next model.

(I'm maybe being a little impatient here!) :)

Anyway, the uniform design is a fantasy 'toy soldier' one (nothing historic about this one) and I'm still using my Vallejo paints. The cheaper craft acrylics I have are OK, but don't apply quite as smoothly as the slightly more expensive modelling ones. I think I will try out some furniture paint next, but in the meantime I have a wide range of Vallejo colours so I will stick with them.

The next tricky issue will be how to make the hair...

The real Christmas Nutcracker Soldiers have a distinctive mop of white 'hair', and the tutorial I have for the mini peg version suggests that you use 'fluff' (soft-toy stuffing flock) to create the rather crazy looking 'powdered wig' look of a 17th century soldier. I was lucky here, as we have a family dog who has a intense grudge against soft toys and so we have a regular supply of newly toy innards to hand!

Left: A traditional Nutcracker Soldier displaying a head of hair. From what I remember this was 'fake fur', which poses the question of how I recreate a similar effect on a smaller scale?

I just had to give some thought on how best to stick the fluff to the peg-soldier. In the end, I decided to finish painting and then apply the gloss varnish to the model *except* on the part of the head that the 'hair' will be attached.

There'll be no beard. I just had the feeling that gluing fluff on for facial hair would end up looking like the nutcracker was foaming at the mouth! :)


 I would then use PVA glue to stick on patches of fluff until the bald scalp was covered. The tutorial suggests to stick on more than you need, initially, and then trim the hair into a neater style when the glue drys...


I have to admit, I'm not really a fan of the fluffy hair (it's difficult to stick on securely, and too loose and fibrous and pulls out far too easily) so for my next test I may try out something a little different - solid stylised hair. I found a picture of a full-sized nutcracker with this sort of hair-do...


This would entail my making the hair out of modelling putty (Milliput) which sounds like a lot of work, but if I wanted to reproduce lots of these I would probably cast and mould copies from resin.

But, now, the finished mini-nutcracker test model...

Obviously, I've had to stand the soldier up using a ring base, but it would
look far better hanging from a Christmas tree, as intended (I just wasn't
willing to put up a tree just for this photo)! :)

I have a few niggles with this prototype, but it's nearly there so I'm confident I'll rectify the problems with my next attempt. It's all good and I'm getting better with each new test model.

Anyway, onto the next project test...

Next up: More 'Midi' Peg Soldiers (my mid-sized pegs, but in historical uniforms).

Wednesday 7 March 2018

The Portable Wargame Rule Book

I've been hearing things about this simple rule system for a few months now and it sort of piqued my curiosity. You see I'm not a ver good war gamer, I struggle with most rule systems even if they are advertised as being 'easy and quick to learn'. I just seem to have a mental block (it's the same with D&D, try as I might - and I'd love to play it - my brain just zones out when someone starts to explain to me the rules)...

Anyway, I happened upon a piece on the 'Little Wars Revisited' blog where they had setup a demonstration game based on Bob Cordery’s 'Poratable Wargame' rules...I was captivated!

The chaps from the 'Little Wars Revisited' blog setup a wonderful rendition of the
Portable War-game at the Cavalier Wargames Show in Tonbridge, Kent in Feb 2018.
 The figures were 54mm scale and the scenery was scratch built...Superb!
Picture credit: Mike Lewis - the 'Little Wars Revisited' Blog

I immediately did some Googling and found 'The Portable War-game Website' which give a very nice little history of the development of the rules as we as the rules themselves...


Although this resource is all you might need to get the gist of the rules and get you started, I am a bit of a traditionalist and like a book sat in from of me when learning new things. So I nipped over to Amazon and blew a Fiver on Bob Cordery's book on his game. This arrived today...


I was pleased to note that the book fleshes out some of the concepts discussed on the website, and - furthermore - gives some very interesting 'game reports' which show the rules in action.

Another nice thing is that these rules aren't just for the 'Funny Little Wars' (19th Century Armies) enthusiast, the rules cover various different types of warfare from several different historical periods. Really the rules are just a framework from which you can customise and include your own interests - there is no reason, for example, that you cannot conduct a science fiction or fantasy warfare battle using Bob's rules.

However, I am - it so happens - interested in 19th Century military campaigning and the idea of a short format game which is able to fit on the dinning room table appeals to me. I also like the idea - discussed in the book - that the rules can be modified to facilitate solo play!

I'd really like to make a couple of 'peg' armies and have them battle it out using these rules.

Tuesday 6 March 2018

Peg Soldier Mk.III - Nutcracker

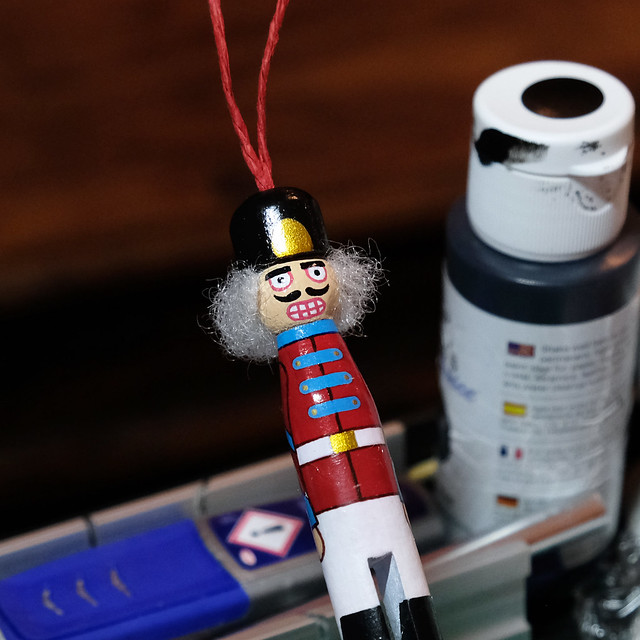
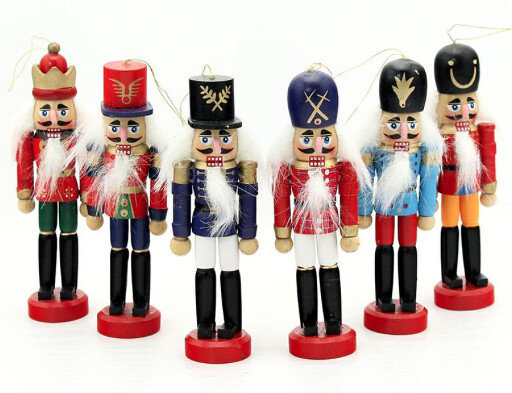
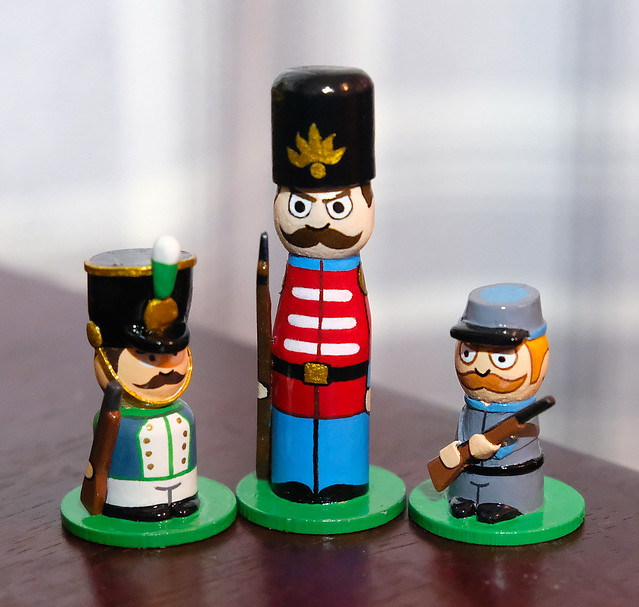
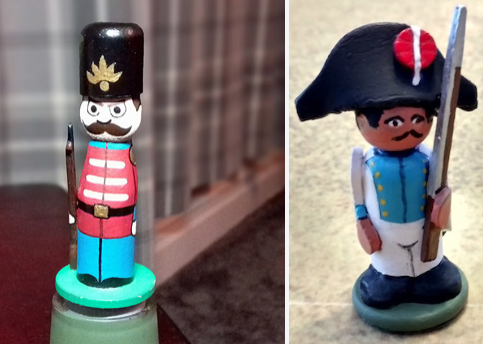
As much as I would like to bang on with more of my shorter peg soldiers (really would like to do a 'regiment') I will adhere to my original plan and make a 'nutcracker' style soldier. In fact, these Christmas themed little decorations are the whole reason I got into the whole wooden toy soldier project in the first place.

As my kids get older (they are in their mid-20s now) it does get harder and harder to know just what to give them at Christmas, so I have been trying to come up with ideas for little gifts I can actually make for them. My youngest daughter is a real Christmas fan and loves all those little trimmings and touches that go into decorating the home at the festive season...And she 
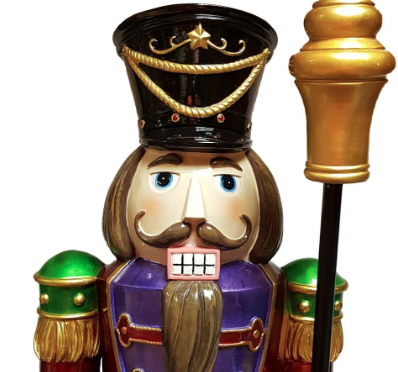
particularly loves traditional Christmas nutcrackers...


Now, obviously, I'm not ready to take on such an advanced woodworking project! But, I happened to see a few examples of some mini-nutcracker tree decorations and was really taken by these designs...


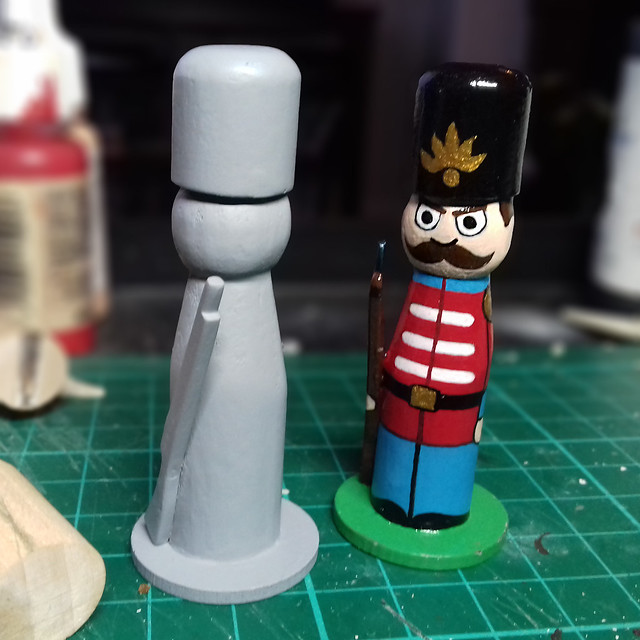
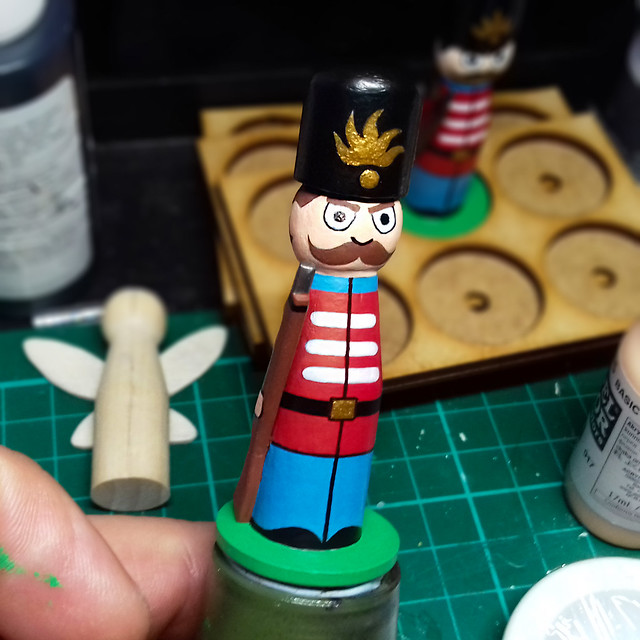
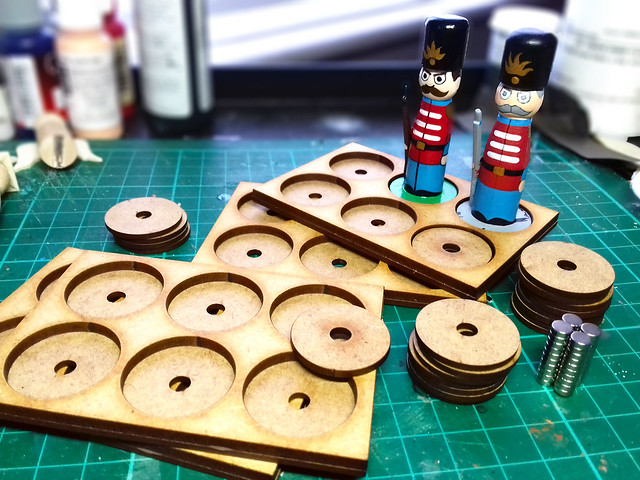
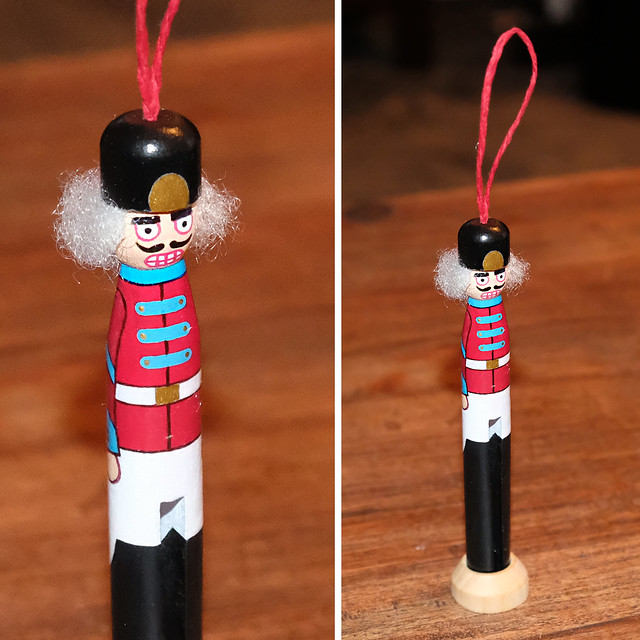
In this case, naturally, these models use the full dolly peg and have stylised long 'legs' and a body roughly the same height as the previous peg tests that I have done. These are very simplified models without even arms, but do have a 'hair' and a hat that contains the decoration string.

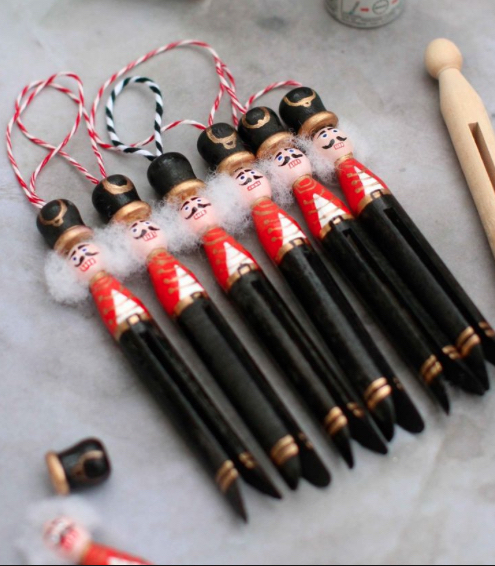
The mini-nutcrackers I reference above have a full tutorial that can be found here: Kate's Creative Space - Nutcracker Peg Doll Decorations

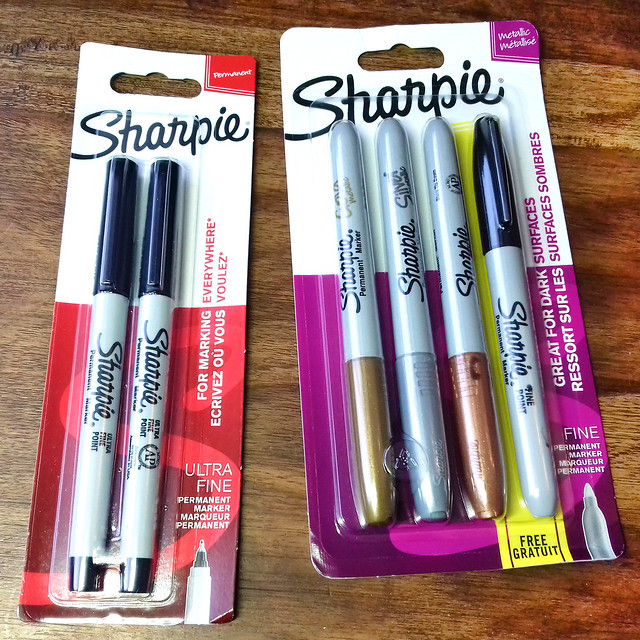
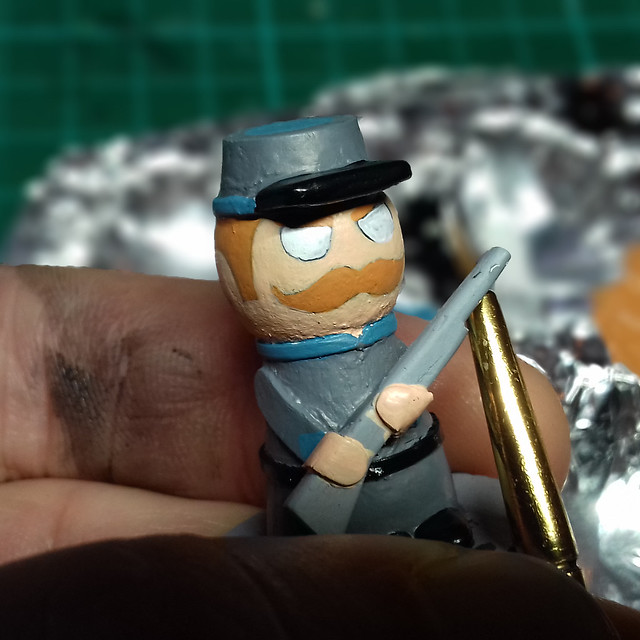
Although, these are not gaming figures they are useful practise for me as I still have to work out my painting process properly, particularly as I had some problems with the pens and the paints I have been using. The main snag was that I did not have proper permanent ink markers, well I have solved this issue now with the purchase of some thin-nibbed and metallic Sharpie pens...


Hopefully these will draw well over acrylic paints and not run if they come into contact with wet paint. The metallic will be useful for drawing fiddly details like buttons and buckles.

Making a Hat
While the tutorial I referenced make mention of small candle stick holders which it used for the peg doll's hats, I cannot seem to source these in the UK so I will have to come up with my own design for a hat.

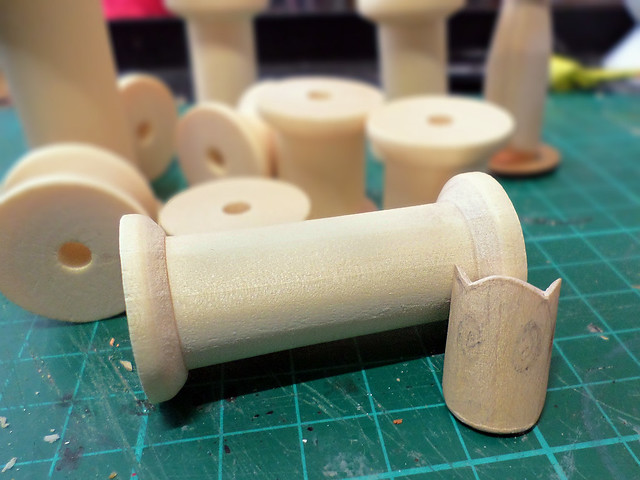
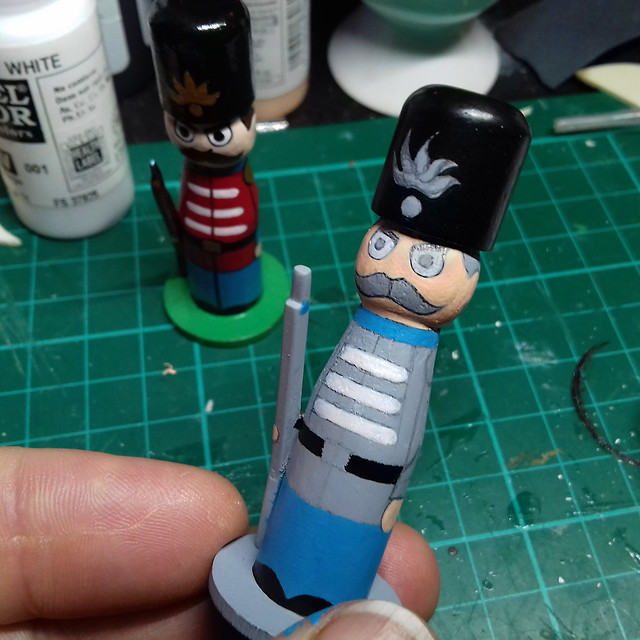
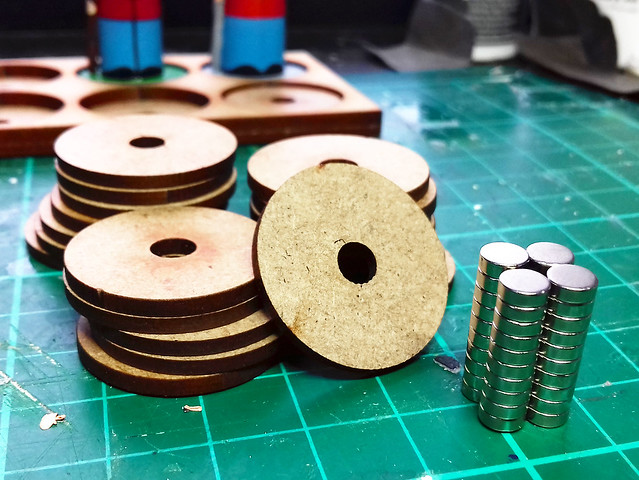
I did have a look around for an alternative wooden items that I could use as a soldier's hat - and considered things like wooden beads - I am after very specific shapes ('busby' or bearskin type hats, and slightly more pointed Victorian 'home service' helmets, and finally soft hats like 'slouch' hats and kepis) so decided to use the same sort of approach that I used with my last test soldier and modify left over sections of cylindrical pegs. Now I have a circular sander I have some additional flexibility in creating my own wooden shapes...


And, as you can see, I have also been looking round for any other objects that I could use as headgear for my pegs. In this case, I found that the needle cover from my diabetic insulin 'pen' makes a rather natty top hat when cut down! :)

Which Peg?
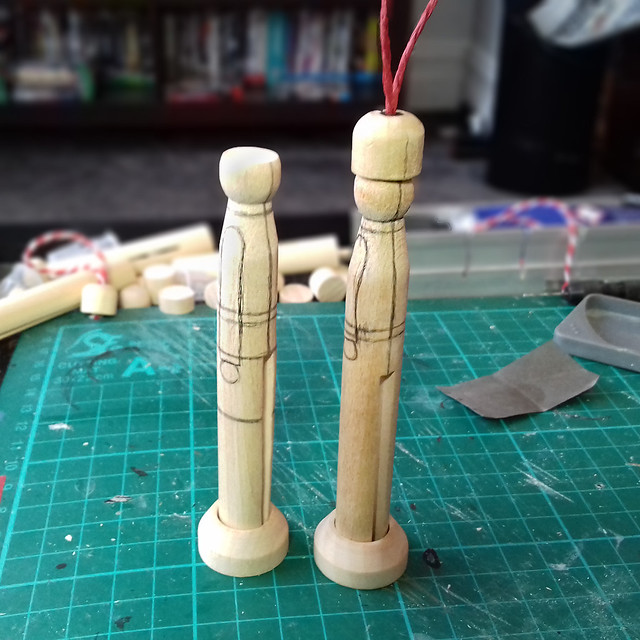
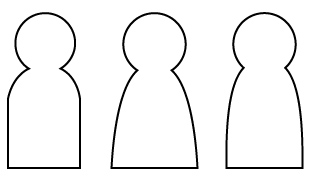
I have two different styles of the 'Dolly Peg'. A real peg, the 'body' of which is gently tapered, and a custom craft 'dolly peg' blank, which has a higher and more rounder 'shoulder'...


The nutcracker tutorial I found uses a real (tapered) peg, but I suppose the rounded shoulder version looks a little more like the real nutcracker wooden ornaments. I could mix and match, for variation, but I would have to shorten the real peg's legs somewhat to make both style of pegs the same height.

We shall see...

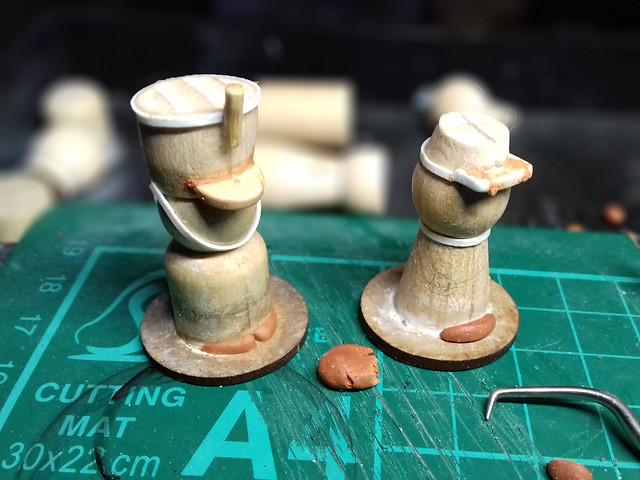
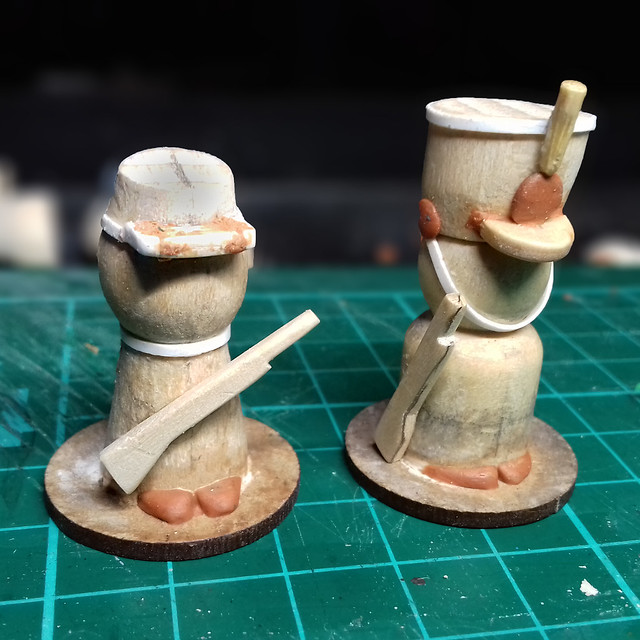
To get started I shall try out the tapered peg. So, it's back to the sander for a bit of a hair cut!


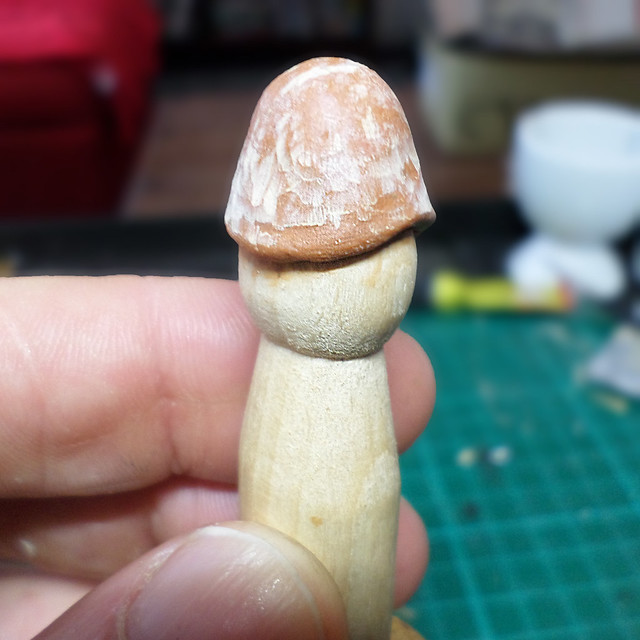
On my previous peg tests I had to saw off the top of the peg's 'head', laborious (with my small hand saw) and uneven work, but with my new sander I can flatten the head perfectly straight and with great ease. This now makes a lovely level platform for the hats I have made. I think I will try out the stylised 'busby'.

Now, bear in mind that this will be a Christmas tree decoration - to be hung from a branch - so I will have to attach a loop of wire or cord. The most secure way to do this may be to drill a small hole down through the centre of the hat through which I can thread the loop (knotted underneath for a security)...


Now, unfortunately, I do not have a drill press (yet) so I had to hand drill the hole through the wooden hat and hope that I had gotten it nice and straight through the middle. As it tuned out, I didn't do too bad a job...But a drill-press accessory for my Dremel multi-tool is top of next months pay-day shopping list!

All I have to do now if thread some of my festive thread through the hole and knot it underneath (and for extra strength I will probably add a drop of superglue). I'll colour the hole black before I do so with some ink, so the bare wood colour doesn't show once the busby is painted black later.

Down to the nitty-gritty...
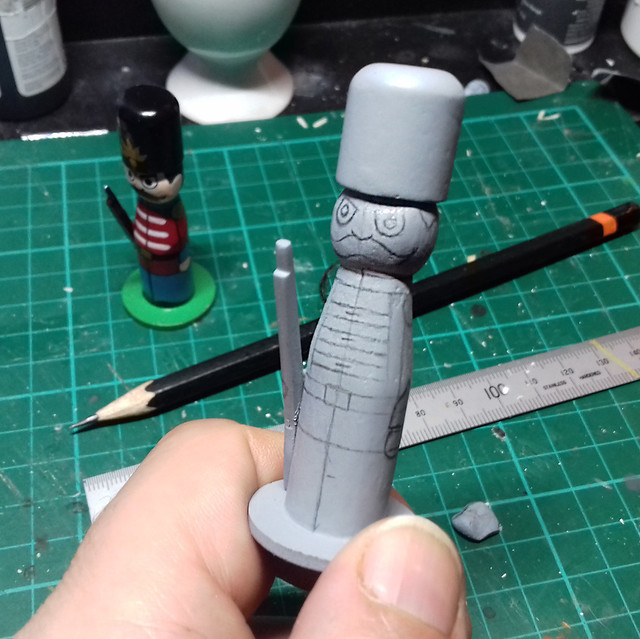
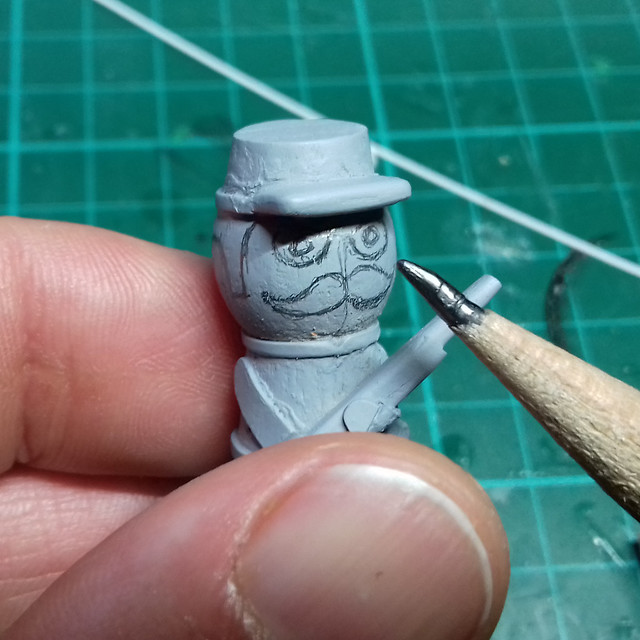
Let's get started creating out soldier's uniform. I start this by doing some sketches on the bare peg. I want to work out how I am going to design the uniform while stretching the proportions to work with the exceptionally tall and thin peg body...


This is just my initial thinking. I'll need to re-sketch the final design onto the prime coated peg, but at this point I want to decide on how stretched - or shrunken - features will be. Do I make a very small body (and arms) in comparison to the very long legs? Or do I try and balance the features equally?

I'll probably erase and re-sketch this figure drawing several times before I settle on the final design!

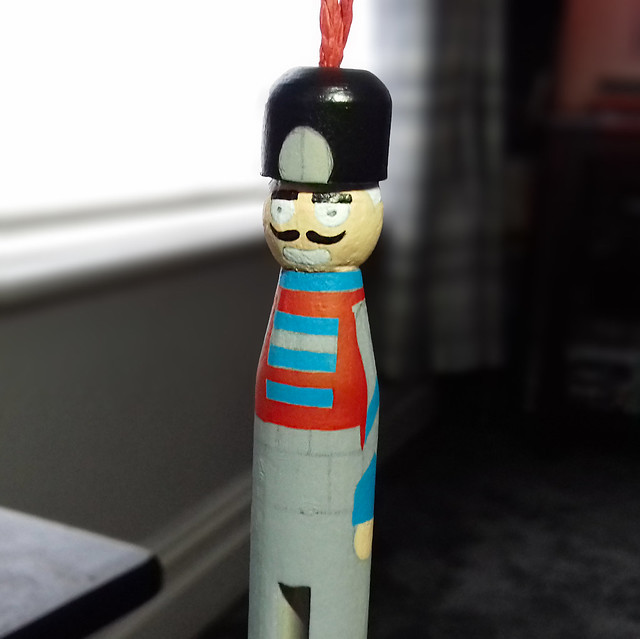
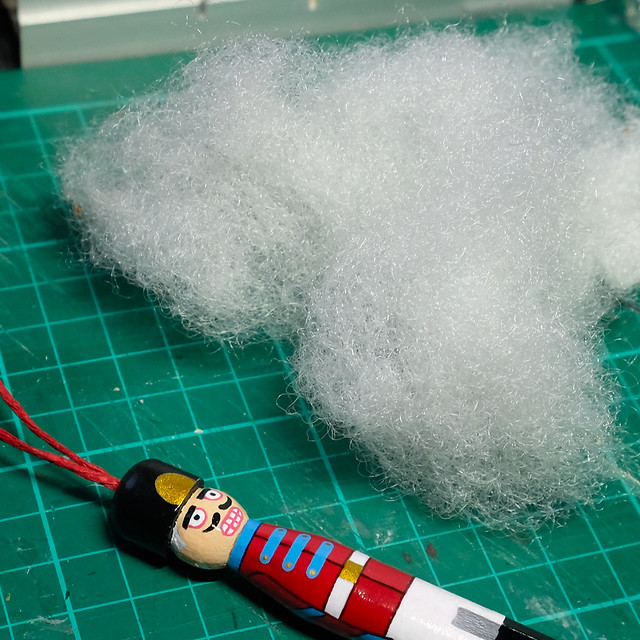
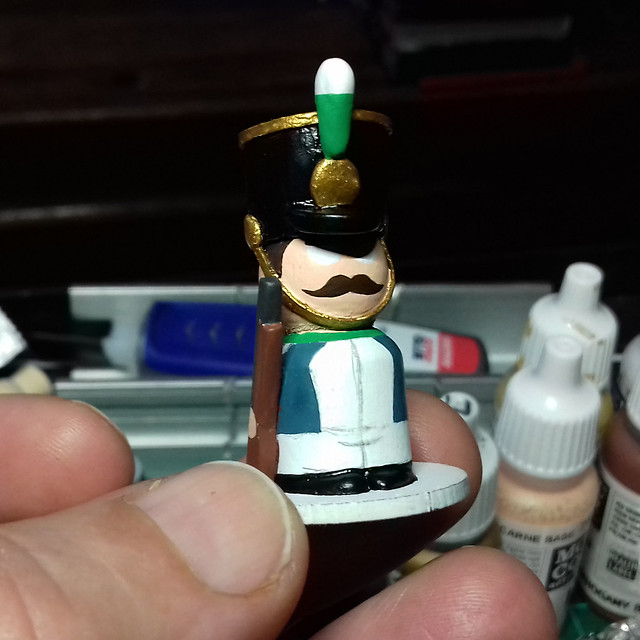
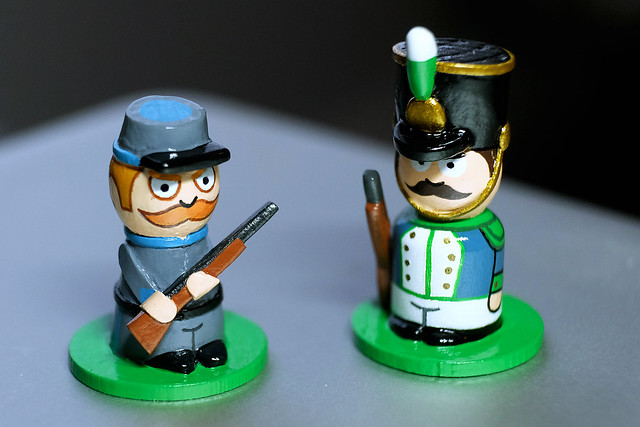
Next: I paint my test nutcracker.

Sunday 4 March 2018

28mm Pawn Starts - Part 3

Painting...
As you can imagine, this is pretty straight forward and not highly intensive. Unlike other types of wargaming or figure painting there's no thought of shading or highlighting or other special effects. It's just nice blocks of flat colour, which delights the graphic designer in me!

But, even before that, there's the priming (grey for the Confederate and white for the Napoleonic) and then onto the sketching of the features...


I'm still using my normal modelling acrylics, but I'm looking at other more cost effective alternatives. Next model I do I may try furniture paint, which comes in bigger pots. But anyway, in the meantime, it's on with the small pots...


As you can see, there's a great chance to compare the 'arms versus no arms' technique for making these mini-figures. I still haven't made my mind up yet, but - obviously - the 'arms' do make a greater amount of poses viable. The 'no-arms' technique limits you a little to what you can realistically (or rather 'believably') represent without the gun just magically hanging on the body without being visibly supported by something...I'm a bit 'OCD' like that. Still, 'no-arms' is a simpler and quicker and if you have to make a 'regiment' of these figures that might be the better solution.

Back to painting...I was a bit disappointed wth the the-nibbed black Sharpie I bought, it still had trouble drawing cleanly on top of acrylic paint. I ended up outlining with a paintbrush, so back to wobbly lines again.

The Sharpie Metallic pens worked great, though, for buttons. I don't know if it's a different type of ink, but they don't seem to have any problem with the acrylic paint at all.


So...Looking at the finished figures, which do I prefer?

Well, as much as I think 'Johnny Reb' is a more dynamic and believable pose - and as much as I cringe at my wobbly line drawing - I think I like the simplicity of my little Frenchman.

This all seaways quite nicely into the next of my peg projects - the Christmas Nutcracker soldier - as the French soldier has a lot more of the techniques that I will use on my next peg figure.

One last thing, I am pleased with how the feet turned out BUT I will have t remember to mount the peg a little further back on the circular base so that the figure looks central. And of the two, I like the way I did the Frenchman's shoes better.


Saturday 3 March 2018

Pawn Stars - Part 2 'B'!

The thing about modelling last thing at night is you always seem to end up thinking you are disappointed with what you did, only to come down the next morning to think 'actually, that's not that bad'! This is, perhaps, one of those cases...

Basically, I couldn't resist tinkering after I posted up the last blog post in this series. I know I said that these little pawns are perhaps too small for proper arms, but as they are experiments I thought 'dang it, I'm going to experiment'. And so, I made some arms.


As you can see, I still haven't made fully rounded '3-D' arms for my little 'Johnny Reb', instead I tried out something suitably 'low profile'. They are simply strips of styrene with separate little tabs wrapped over the gun for 'hands'.

Thinking more about it, I maybe could have foregone the hand tabs and simply painted them on the gun, to save even more time and effort.

In any event, they make the 'port arms' pose a little more believable (rather than just having the musket hanging there magically all by itself).

(Oh, PS...I have left my French soldier without these arms so I can compare the effects.)

Friday 2 March 2018

28mm Pawn Starts - Part 2

I should have gotten these done in one sitting really, they are that simple...But wives and lives, ah well. Anyhow, on with the mini-pawns and I have to figure out how many details I will be adding.

Two details that I definitely want to add are guns and 'feet'. After my last peg soldier I felt a bit unhappy with the way I had done (or rather not done) the feet, as I just painted them on. So I wanted to see if there was a very simple way I could give the impression of feet without spending too much time. I considered small rectangles of matchsticks or bits of cocktail sticks, but in the end had a play with some small pieces of Milliput modelling putty...


This sounds a bit more labour intensive than it really is. I like Milliput, and moulding a couple of tiny balls of putty into little 'toecaps' didn't take me very long at all. Obviously, if I can find a simple pre-fabricated alternative to this then I will go for that in the future, but for these prototypes this will do.

Next, guns. though I was pretty happy with the simple wooden musket shape I made for my last peg soldier. But I wanted to see if I could simplify that design even further, so I tried cutting the gun shape out of a lolly stick, in one piece...


This is just a few cuts with a craft knife, then a quick rub over with some fine sand paper to round off the edges. The lolly stick wood is quite hard really so the end product is quite sturdy and shouldn't break. I'm pleased with the look, but - as was pointed out to me - I might not be so pleased having to make the guns for a full regiment!

Call to Arms!
What to do about arms...Not weapons, but the dangly things that hang from your shoulders! Do I try to make some simplified limbs or just paint them on like I did with my first peg soldier?

On the left is my peg soldier with minimalist painted on arms, and on the right
is a lovely peg soldier by Dale at Wooden Warriors with some simplified arms.
In the end, I decided that my 'mini-pawns' were just a little too small to justify separate arms and that the painted on approach would suit my mini-pawns better. (Though, I think I will try arms on my next  larger peg soldier experiment.)

This, then, left me wondering about how I should attach the musket. I fixed the gun in an 'at ease' position at the side of my first peg soldier (a simple solution) but I wanted to try something different. So, for my Confederate infantryman I thought I might have a go at 'port arms', with the musket held across the chest...


This will make it very interesting when it comes to my painting his arms in! (Fingers crossed I can pull this off.)

Finally, prior to the actual painting, you'll notice that I have experimented with adding extra bits of detail using Milliput and styrene strips. Nothing drastic, just some extra decoration.

Next: Painting.

Thursday 1 March 2018

Pawn Stars in 28mm.

Sorry about the title! Actually, this isn't the post I meant to be next in this series on 'peg doll soldiers'. But I couldn't resist having a go at these little chaps as they are so quick and easy to produce.

The term 'pawn' or 'pawn doll' came to me from Dale, over at Wooden Warriors, and it's such an appropriate description of these diminutive peg doll variants that I think I will pinch it. :)

Variations in the 'pawn' shape. If you search online you will find ready-made
'peg doll' blanks in many different sizes which adhere to this style. Some are
quite big and others have over-sized heads.

Essentially, all this model is is a 'sawn off' (literally) peg doll, roughly 28mm in height - although I'm not sure I would say it was '28mm scale' because of the stylised cartoon proportions. Graphically, it's a very simplified style, again very 'cartoony' but would be a lot of fun for tabletop gaming (particularly RPG).

Anyway, on with the show...

First of all, I cut down a couple of pegs of two slightly different designs, one a true 'dolly peg' (slightly tapered) and the other a custom peg doll blank (with a higher, more rounded, 'shoulder')...

Two 28mm 'pawns' (front) with one of my other 48mm style peg blanks for
comparison. Of course, these don't really adhere to standard scales.

So, onto the basing. Again, I am using a 25mm MDF gaming base, not just because that's what I happen to have to hand, but also because I want to use something that's a 'standard' size. I might have just got away with standard 15mm circular bases, but I like a bit of 'breathing space' around my based models. Going for a standard size also means I can take advantage of the available accessories, like unit movement trays...

(I could also consider whether I might want to make my bases magnetised...But, that's not important at the moment.)

Unlike my last 'peg soldier' - which was a fantasy 'toy solder' - I fancied trying to create some mini-historical figures. I want to see how minimalist I can go and yet still have a viable gaming piece. So, still no arms and other additional 'realistic' features, but I will give some emphasis to the hats.

Military hats have always been an important way of identifying particular regiments, therefore, if I do little else, a nice big hat should set the right martial tone! So, let's make some hats...


The historic uniforms I had in mind are a French Napoleonic and an ACW Confederate soldier (just because I have never painted these types of soldier before). Obviously, these won't be museum quality renditions, they will be more like cartoon versions with the details grossly simplified.

The most immediate issue is how to make the hats a little more accurate. As you can see I have made the principal shapes of the two hats out of basic geometric shape (made of parts of my left over pegs). But, what they need now is some peaks and the easiest way I can think of to make these is to glue wooden peaks on which I will make out of sections of popsicle sticks...

Left: The Confederate kepi hat. Right: French Imperial Guard hat.
To ensure that the join is strong I drilled a small hole in both hat and peak and popped in a small piece of brass rod. I then superglued all the parts together, once dry they seemed quite sturdy.

Next: Arming my soldiers...