Wednesday 28 October 2020

Little update

 Well there's not much coming off the production line at the moment, mainly because I have a stupid amount of part-made projects on the go! My own fault. 😏

Anyway, just so you don't think that I'm just sat here doing nothing except enjoying our new La-Z-Boy recliner and eating cakes here's a couple of snaps of said production line...


Aside from the above - there are other primed models waiting to be painted as well - I am scribbling down a few more ideas of things I'd like to add to the scarily huge list! At the top of this list (for now) is some lovely new reference material I found over on the 'Warfare in the Age of Steam' blog of some Franco-Prussian War Bavarian troops...

So, while not much seems to be going on in reality things are quite hectic in the world of little wooden toy soldiers! 😁

Saturday 24 October 2020

Peg Nutcracker - Old Guard Construction


Christmas is firmly in the forefront of my mind now. As I am on a very restricted income these days I am trying to make a lot of my gifts, hopefully my family will enjoy the fact that I have made an effort (or they might think that I am just a big cheapskate)! πŸ˜‚

Anyway, I am making a couple of sets of mini-nutcrackers which are loosely based on those traditional German fireside ornaments (see pic left) - here's a link to the real things, but prepare yourself for a bit of a shock as some of the prices are eye-watering: Erzgebirge Palace.com - Nutcrackers [Opens in new window.]

I've already completed my 'Pantomime Private' model and that went fairly well, so I'm moving on to something a little more traditional now with a Nutcracker Soldier. To recap (as I did some basic prep with a half-dozen dolly pegs for this series) I began by dressing the basic peg with some period hairstyles...

In a earlier experiment I did where I tried to work out how I would make a mini-nutcracker I followed the real example and did the hair using some synthetic flock to represent the faux fur hair. But this did not work out well and actually started moulting with little tufts of flock coming off. So I decided to sculpt the hair-pieces using good old Milliput putty.

Once the hair was on I then moved on to making various hats for my different nutcracker types. Here you can see the basic shape of my guardsman's hat (right), although they were not attached permanently at this point...

I then moved on to creating the shoulders and arms for my soldier. I drilled a hole though the upper body of the peg so I could pass a piece of dowel (a barbecue skewer) through...


And then I added the feet and a base to the peg (having sawn off the tips of the peg's prongs so they were flat). The boots were made of a couple of blocks of decorative moulding wood and I decided not to shape them as he is a regular soldier and leave him with big army clod-hopper boots! πŸ˜„

[I'm using Evo-Stik Impact Instant Contact Adhesive for these jobs. It's really strong and I don't end up sticking my fingers together like I used to do when I used super glue! It's also more economical.]

Finally, I made the arms and rifle. The arms were my usual flat designs cut out of some 2mm sheets of plywood. At this point there was a lot of head scratching as I was unsure exactly how I should go about how to design and attach the gun. 

With my short (50mm tall) peg soldiers I usually just make a proportionally sided rifle and stick it to the side of the peg in a grounded arms pose BUT because my nutcrackers have those long lanky legs a rifle to do a similar pose would be ridiculously long (I know, I tried it) and out of proportion to the soldiers body.

So, I decided to go for a 'sloped arms' pose instead, with the size of the rifle in proportion to the body of the nutcracker...

I also changed the design of how I usually do my rifles. Instead of carving out a stylised rifle shape from a single piece of lolly stick I made a two-piece stylised toy 'popgun' out of a elongated triangle of lolly stick and a length of barbecue skewer! I really wanted to emphasise the toy nature of this soldier.

And here is the completed nutcracker...

Generally I quite happy with the design ALTHOUGH something is still niggling me about the very crude way that I attached the rifle to the left arm. I may have to go back to the drawing board with that and come up with a more elegant solution.

But - in essence - this is the construction process for the soldier. Once I have solved the rifle problem I will them move on to priming the nutcracker ready for painting.

Friday 23 October 2020

Operation Pickelhaube Part 4

 ...And we get to the last part of the construction of my peg Prussians! 

Funnily enough, I've left one of the most distinctive parts of the Prussian's uniform to last- the Spitze....Er, that's the spike on the helmet! 😊

After a quick think I decided on a good old cocktail stick for the spike,cocktail sticks are great! So, I began by drilling a pilot hole in the top of the helmet to attach my fake spike...


The hole prepared - the exact diameter of a cocktail stick - I began to whittle my little spike. I cut a length of the stick (about 7mm) and glued it into the hole with about 4mm protruding.

Once the glue was dry and the top of the stick was firmly held in place I *carefully* sanded a rounded point to the spike.Then I *gently* filed this into a sort of acorn shape. Remember, these figures are caricatures so it doesn't have to be exact nor does everyone have to be identical - just a rough approximation.

I'm quite pleased with the helmets, though still a little confused about whether this shape of Picklehaulbe is accurate to 1870 - reference illustrations varied, some suggesting that an older taller version was in use and some suggesting that this latter flatter one was. Still, as I say, this is just a caricature and not a 'display model'.

The final job was the addition of the boots. I reverted to my older technique of using Milliput putty to create the toes of the boots. All of this series of models for my Franco-Prussian War set are of what I call my 'Mk. 1 peg soldier' style, as I later changed the way I modelled shoes to a quicker and easier method.

That done and dried it's time to prime the models ready for painting!

Sunday 18 October 2020

Streaming or Videoing my Work?

 I've dipped my toe in the water of video tutorials before (just a bit) and the idea appeals to me as while still photos of model making processes is OK they are only moments in time. Often the important parts - which I am often asked about - were the moment before or the moment after the moment I took the photo! πŸ˜–

Being able to see the full flow of the crafting of a model seems to be a lot more instructional, indeed I myself prefer watching other model makers videos when I want to learn how to do something.

I've already experimented in the past (secretly) with 'top down' video composition so I can see how small models look in frame and to work out how to light them and investigate issues like focus and exposure...

I still hadn't got the lighting quite right, but I'm happy that the focus and resolution is correct and that viewers can make out the detail (important for craft tutorial videos, of course).

Hopefully, the idea of tutorial videos will appeal and if things go well enough I might even push the boat out with some live streaming 'how tos'!

Any comments?

Saturday 17 October 2020

Operation Pickelhaube Part 3

 Moving on with my little Prussians, it's time to add their rifles. I should say, I haven't gone for realism with these at all - in keeping with the rest of my simplified cartoon peg soldiers' look - and they are just recognisably rifles. They aren't modelled on the real Prussian rifles of the Franco-Prussian war - Dreyse "needle-gun" rifle - and are a bit over-sized, again because my soldiers are sort of cartoon figures.

Anyway, fixing the guns in place. Surprise - it ain't rocket science! πŸ˜‚

However, I do take the additional precaution of pinning my guns as well as gluing them as these are just the sort of additional objects that have a knack of getting snapped off, especially if your toy soldiers are for use in the rough and tumble of war-gaming.

I begin by applying a light dot of glue to the parts and then I attach the rifle in place. As these are what I call my 'Mk. 1' peg soldiers - and so things like arms and hands are simply painted on - I tend do go for the 'Order Arms' pose where the rifle sits on the ground and is held with the right hand. 

Once the glue sets and the rifle is fairly secure I then drill a small hole through the 'action' of the rifle right into the peg figure's body. This is where I will insert the pin so your drill needs to compliment the size of pin you are using...


The pins I use are 'Panel Pins' and are usually about 15-20mm long with a slightly enlarged 'head'. To accommodate the head - so that the pin doesn't show - you need to enlarge the hole top a wee bit, then I drip a little drop of glue into the hole and insert the pin...

Depending how deep I have drilled the pilot hole you might need to trim you panel pin to fit. You want to make it so that the head of the pin lays inside the counter-sunk hole you have made. If you make a good job of it you may not have to cover the pin head with filler to hide it...

And there you go, this should be nice and secure. I just have to add some detail to the Prussians' helmets and add some boots (just the toes) and that's the model complete. 😊

Incidentally, I came across a wonderful video of a reenactment of Prussian soldiers using their Dreyse "needle-gun" rifles in action against some unfortunate Austrian infantry armed with less advanced mussel loaders (during the Austro-Prussian War of 1866)...

When the Prussians met the French in battle four years later then did not have such a technological advantage as was shown in the above video. The French were armed with the Fusil modΓ¨le 1866 'Chasspot' rifle, which had several advantaged over the Prussian rifle. Sadly, as with so many of the French arms innovations of the 1870s this advantage was not enough to save the French and the German Confederation were the ultimate victors!

Wednesday 14 October 2020

New Peg Soldier Making FaceBook Group!

 Just a quick heads-up to the fact that I have created a new FaceBook group for anyone interested in peg soldiers or peg soldier making or wooden figures in general!

I'm a bit hyped about this new group as it only went live a few days ago but already has 42 members. People are a bit shy as yet BUT some have already gotten brave and started posting up some wonderful examples of what they are working on...

Made by Dan Allen

Made by John Fidler

Made by Joe McLaren

Made by Kenneth Van Pelt

Please check out the group, even if you just want to see some lovely pictures of little wooden toy soldiers and what-not!

Link: PEG SOLDIER FACEBOOK GROUP - This is a Private Group so you simply apply to join. No biggy - it's just to stop spammers!

Tuesday 13 October 2020

Basic Tools for Making Peg Soldiers (And Other Figures Too)

 I've been asked a lot - well, a few times...emmm, actually twice 😏 - what basic tool you would need to make peg soldiers (or other figures too)! So, I thought I'd put together a few photos of the *basic* tools that I started out with, as well as a few additional conveniences that I added to my hobby tool box. [I'll follow this post up with another about the more advanced tools later.]

SO, let's begin...

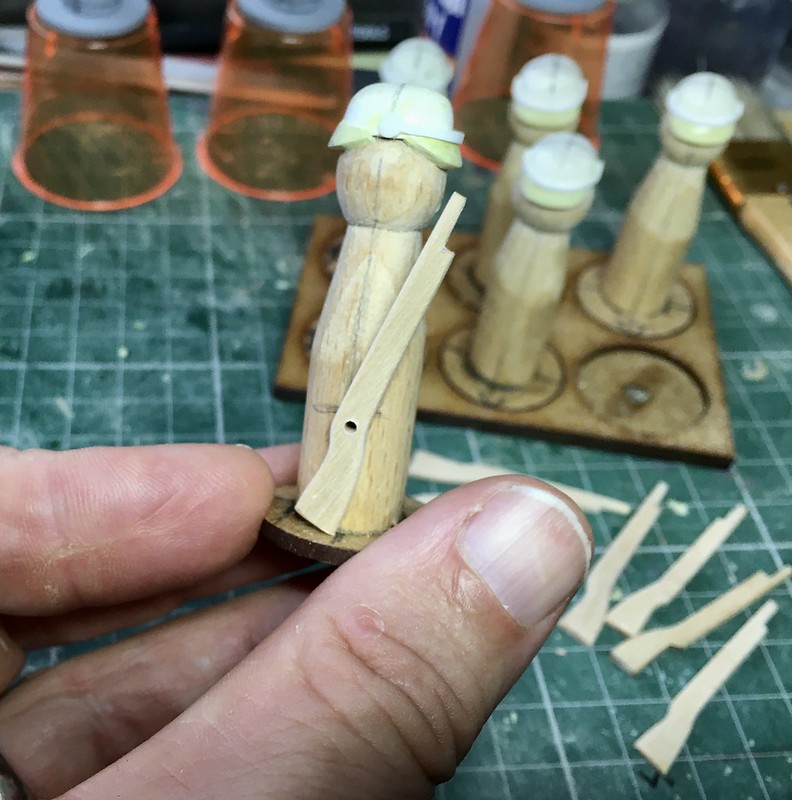
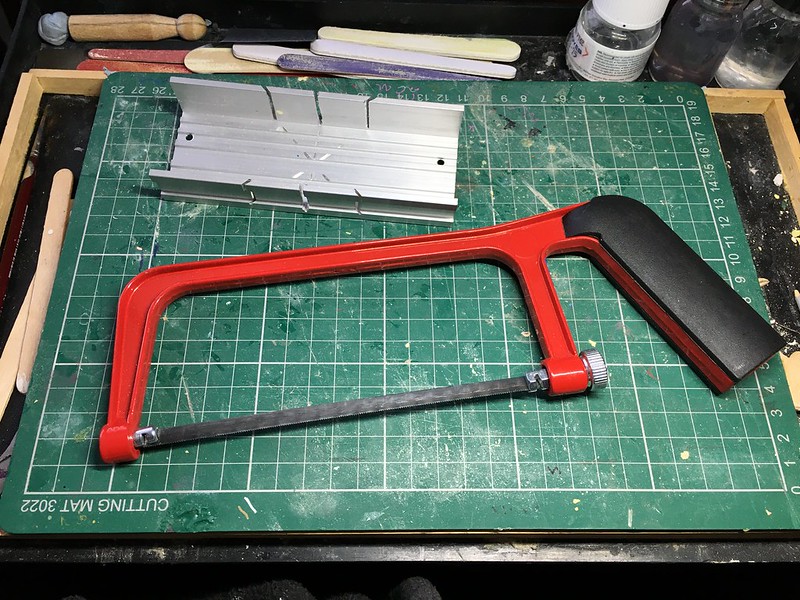
As you have probably noticed I like half size peg figures (about 50mm), which means I end up having to cut down the full sized dolly peg by half! Obviously, then, one of the important basic tools for me was a small saw and I bought a cheap hacksaw set at the local budget hardware store...

The above saw came with a aluminium mitre block for cutting angles, which is kinda handy to have. This cost about a fiver so it won't break the bank. (Even if you prefer to make your figures using teh whole height of the dolly peg this saw will come in handy. I regularly saw the top of the 'head' off my pegs so that I can put little hats on them!)

Next up are the shaping, trimming and sanding tools I use. When I started out I just used a craft knife and some emery boards, but as time went on I added tome other useful items like files and various types of sand paper (fine and course)...

Again, most of these are budget items, the emery board come in large packs which I purchase from 'PoundLand'! 😁

However, before I ever put saw, file or craft knife to peg I always mark out my design ideas on the peg itself so I know how I am going to create my little figure. So I have various pens and pencils to draft out details and I also have a few different types of rulers - mostly metal - for measuring and for using as cutting guides...

Something I eventually added to my tool kit was a selection of hand drills and various small drill bits. I use these to drill pilot holes for when I am pinning components to my peg figures. These aren't crucial for starting out, but you will find them useful as your figures develop and become more complex.

And Finally, and this is a bit of a biggy... Glues.

Ya need to stick those little fellas together! And while, in the beginning, I settled for a simple super glue (any brand would do) I eventually graduate to a proper impact adhesive (Evo-Stick), That said, super glue is still part of my tool kit as sometimes I need a fast acting spot weld just to hold something in place temporarily OR I find superglue can act as a liquid filler which can smooth out gaps...

Once again, as I progressed in my hobby, I found that I had need for some specialist fillers and modelling putties. Filling gaps developed into sculpting small objects, which - in turn - eveloved into my sculpting larger objects! My go-to medium for sculpting (and filling) is Milliput).

So, there you go - these are my basic tools and - really - your don't need all of these to dip your toe in the water. But, if like me, you eventually get hooked by the hobby you will undoubtedly add many more specialist tools (but, again, you don't need to).

I'll talk about more advanced tools in a separate post and I will also do another post about painting the figures.

Monday 12 October 2020

Operation Pickelhaube Part 2

 I shocked that this particular project has been on the back-burner since MAY 2018! What the heck have I been doing? πŸ˜•πŸ˜‚

Just to recap, this is part of my Franco-Prussian War 1870-71 (Wikipedia link) war-gaming set and is the first of three North German Confederation infantry 'regiments', this being soldiers of The Kingdom of Prussia...

Above: The uniform I'm going for for this peg regiment is the middle
illustration, which I believe is 'Infantry of the Line'.

Now, when I left off I had just made the basic peg body and I have created a set of simple bowl shapes out of Milliput putty for the distinctive Prussian helmets (pickelhaube). All I had to do to finish these was to attach the front and rear peaks, but that's where the project went into a hiatus!

Fast forward to 2020 and I dusted off my little Prussian pegs and got the project rolling again. To begin with, though, I wanted to get these little chaps into formation which meant creating a magnetised unit base for them...


The MDF bases I bought for this project have small holes already cut into them so you can fit 4mm diameter (2mm depth) magnets into them. So, it was simply a case of super-gluing the little round magnets into the holes on the unit base and the holes in the round figure bases to have a nice wooble-free and easily transportable unit.

One this I would say is that I always set my magnets up in a specific polarity, to do this I have a magnet glued to a lolly stick with 'THIS WAY UP' written on it so that all my magnets face the same way. 

Anyway, moving on...

Originally I had it in mind to simply add a couple of half-moon shaped pieces of wood (cut from lolly sticks) to act as the peaks of the helmets BUT this didn't really work out for me. When you look at the real pickelhaube your notice that the peaks don't really stick out and are more flush with the front and back of the head...


My wooden peaks stuck out too much - and yes I know my figures are a bit cartoony so you will be saying 'whats does it matter as long as it's sorta similar', well, it kinda mattered to me (OCD kicks in)...

AND SO...

I did an about turn and decided to sculpt the peaks from Milliput putty, and here's the result (before the putty hardened and any cleaning up was done)...

These rough peaks will be sanded and shaped to look more like my reference photo, but this once again brings up an issue which has niggled me for a while - that of how to make repeatable complex shapes for my peg soldiers?

Carving of sculpting each individual hat or other item of equipment for half-a dozen of more soldiers is a bit of a pain in the posterior. It was monotonous and time consuming enough just doing this six and I don't want to spend all my time making little hats or whatever, can you imagine just how much time that would add up to when creating a complete war game army! Yikes! 😲

I'm going to have to put some serious thought into how I tackle this issue in the future. To be fair, I've already mulled the problem over a bit and my first thought was that I should purchase a resin casting set so I can make moulds of certain parts so I can build up a stock of items and thus make unit construction a quicker process. But this is 2020, after all, and resin casting seems a bit passe! LOL

So, maybe it;s finally time I get with the 21st century and buy myself a little 3D printer? Hmmmmm... (To be continued.)

Saturday 10 October 2020

Peg Pirate Complete - Yaaaar!

 Quick project update for my Christmas Mini-Nutcracker series of models - I've completed the first in the set. Here's my festive pirate (and no, don't ask me why I have made a pirate as a Christmas ornament - I'll just say that my older daughter is not into the whole kitchy Christmas thing)...

I was fairly please with the outcome, though there were a few issues that I will correct with the rest of the nutcracker series (going to have to revisit my choice of varnish). Hope you like him, I shall call him Stew - Stew the Pirate, Yaaaarrrr!

Tuesday 6 October 2020

Peg Monoplane (Boeing P.26) Complete

 What with the Christmas gift-making schedule my Funny Little Soldier production has slowed down markedly at the moment. But I'm still trying hard to slip a wee military model in between the other work!

Today I completed my latest wooden peg aeroplane, my stylised take on the charming 1930s American Boeing P.26 pursuit aircraft...


The P.26 (or 'Peashooter' as it was nicknamed) was a little anachronistic even when it was first deployed by the US Army Air Corp, it's a bit shocking to think that just three years after the P.26 went into service the Germans had produced the Me109 and the British Hawker Hurricane was in the air!

Cute just couldn't cut it anymore!

I'd like to do some more 1930s monoplane fighters, maybe a Mitsubishi A5M or a Dewoitine D.500 or a PZL P.11?