Showing posts with label Christmas. Show all posts

Tuesday, 29 December 2020

And Goodbye 2020 - Huzzah!

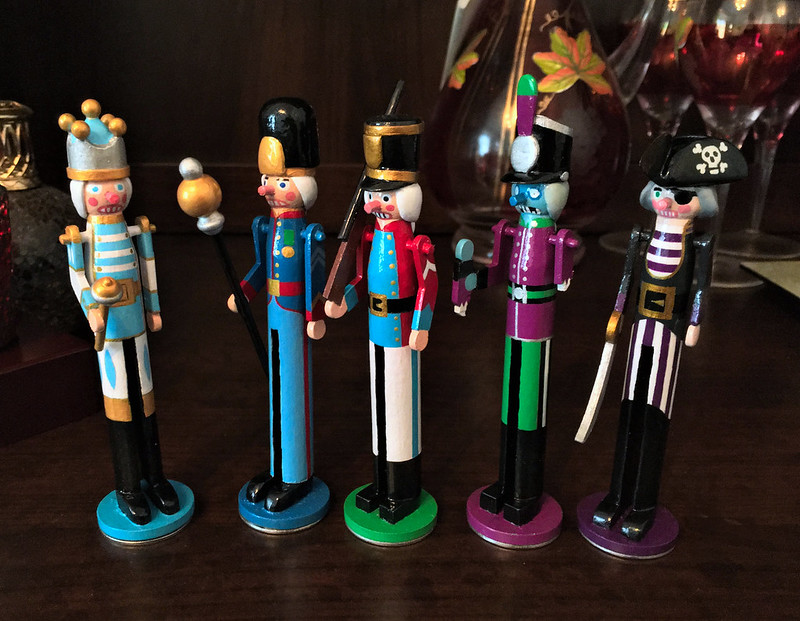
 A bit early I know, but today I completed what will be the final peg figures for the year as I completed the two remaining nutcrackers I had left to do from Christmas...

I am now having a little break from making figure over the holiday and intend to think about what I will be doing in 2021. Santa was very generous and my main present will be playing a part in how I will be progressing with my little hobby. Here's a quick hint...

Flashforge Adventurer 3 - First Calibration Print


Sunday, 27 December 2020

Merry Christmas! The Grinch & Co...

 I know I'm a wee bit late, but - as some of you may know - I work in a hospital (Operating Theatre Domestic) and so like many key workers I was working on Christmas Day. Because of that my festivities have been a little delayed and all of a sudden it's the 27th! 😁

...So, the big question is - did I manage to get my nutcracker gifts completes in time?

Well, mostly!😏

First off, I did complete my Grinch (one down, 12 to go)...


I must just say that I'm a bit unhappy that I mixed styles with this one, it was an experiment that didn't entirely come of. Plonking a sculpted head onto my simplified peg style of body was perhaps a mistake? In future, if I want to model a caricature I should maybe sculpt the whole figure in order that the final figure has a consistent look.

Anyway, onto the next job, or I should say 'jobs' as I decided I really needed to pick up the pace. I had just a week to go before I handed out my gifts. I decided to work through the group two or three at a time...

At this point, my main attention was my 'lumberjack' as this was a gift
for a work colleague and had to be ready before the rest of my figures.

This turned out to not to be such a chore as it meant I could paint some of one figure and while that dried I could paint some parts of another. And so I went, back and forth, until I had a completed set - as usual I finished on the facial features before the slightly traumatic varnishing stage (more on that later).

I should explain at this point that, because of the rush to get these gifts ready in time, I did not have the luxury of being able to much about - in my usual half-arsed way - setting up a proper completion photo. Instead I had to be content with a rushed snap with my mobile phone! Still, the pics didn't turn out too bad.

I was actually quite pleased with the base I came up with for my lumberjack. It was a piece of a branch - a set of which I discovered at our local craft store. It seemed very appropriate! And weighed a good deal more than my usual small MDF bases!

About the bases. I realised, a little too late, that my small round (30mm x 3mm) MDF bases were not really such a good choice as these tall nutcracker figures are a little top heavy. The stability of the based figures came into question (I kept knocking them over with the slightest touch) and I had to think of an remedial modification.

What I came up with was to add a 30mm steel washer to the bottom of the MDF base. This extra weight added just a little extra weight and provided a little more stability to the model...


In future, I will have to rethink my base design for full sized peg figures and come up with a far more stable platform.

Anyway, time was ticking away - 19, 20, 21, 22, 23... 😲


I made a bit of a mess of recording the above models (I didn't photograph them in proper order), but I was in panic mode by this time. Christmas Eve and I still had two more models to complete. I mean, I hadn't even started painting them yet...


The last models are a pair of Christmas elves loosely based of my youngest daughter's favourite Christmas movie - 'Elf'. Though I have taken a bit of liberty and created a 'bad elf' and a 'good elf'.

However, while I'd love to tell you that there was a happy ending to this Christmas tale and that I managed to finished the last models by the skin of my teeth I'm afraid I can't. 😕

Christmas Eve arrived and I was starting to flag. As I mentioned I was still working and my energy was sapped. I made an effort and was still working at 11pm but I knew it was a lost cause as the major sticking point (literally) was the varnishing!

I have been applying a spray lacquer and aerosol paints are a little sensitive to temperatures. We've been having a cold wet snap and with my man-cave out of action I've been having to revert to spraying in our back yard. Not ideal. The varnish has been taken over-long to cure and remained tacky longer than usual, despite my placing the varnished figures near our radiators.

The upshot was that I knew I did not have a chance of completing the last two nutcrackers in time and this is how far I got by Christmas morning...


I still have the arms to complete before even getting to the dreaded varnishing. So, I had to accept defeat and settle for 6 nutcrackers each for my daughters instead of 7. I guess that's not a biggy, but I was annoyed at my own lack of planning. Next year I will definitely start my gift making a lot earlier!

The good news was that my daughters - Stacey and Kayleigh - were delighted  with what they received. And we all had a wonderful Christmas (despite the current lockdown restrictions).

I hope you all had as enjoyable festive season that I have. MERRY CHRISTMAS! 🎅

Sunday, 20 December 2020

The Grinch - Part 2

 As usual, every year the time leading up to the Christmas period seems to drag and then - all of a sudden - we are on the final few days and time is flashing by... And I am struggling to complete my nutcracker gifts in time!

I did manage to make progress with my Ginch model, though I have had to simplify it's decoration in order that I can get some of my other Christmas gifts completed as well.

As a matter of fact, I am actually working of several projects simultaneously and am making several of the components in batches. I am making the arms for all my gift nutcrackers together and started by sketching out the poses I wanted for each figure and tracing the designs onto some leftover 3mm plywood tabs...

Once the arms were all drafted I took the tabs over to my Dremmel Moto-Saw (scroll saw) and cut them out. Here's the set of arms I made for my Grinch...

Had I had more time I was contemplating making some 3D sculpted arms - in fact, it crossed my mind to remove the peg legs and turn this figure into a proper model caricature - but I just didn't have the time to spend sculpting bits and pieces. So, I stuck to my flat 2D arms...

Maybe I will return to the idea of a fully sculpted character at some point in the future. But, in the meantime, I carry on as normal and so it was onto priming...

This completed gift set 1 of 3 I intend to get finished in time for Santa to distribute them! 😁 A bit ambitious, but left see if I can rise to the occasion.

Sunday, 13 December 2020

Workbench Update Shot - Mid December

 Just a quicky. Things are really hoting up in the race to complete Christmas gifts in time (just a week and a bit to go)! Here's a snap of what's on my workbench showing how much I still have left to do...

I'm beginning to sweat a bit! 😬

Thursday, 10 December 2020

The Grinch Peg Doll Part 1

 Part of my Christmas Nutcracker series of figures are some that aren't so traditional as I thought it would be nice to make some of my nutcrackers a bit more relatable to my kids (I still call them kids despite the fact they are in their late 20s)! 😁

One of my figures is based on the wonderful Jim Carey movie 'The Grinch', based on the book by Dr. Seuss. It's a terrific 'kids movie' and Christmas favourite and I thought it would make a smashing wee peg character.

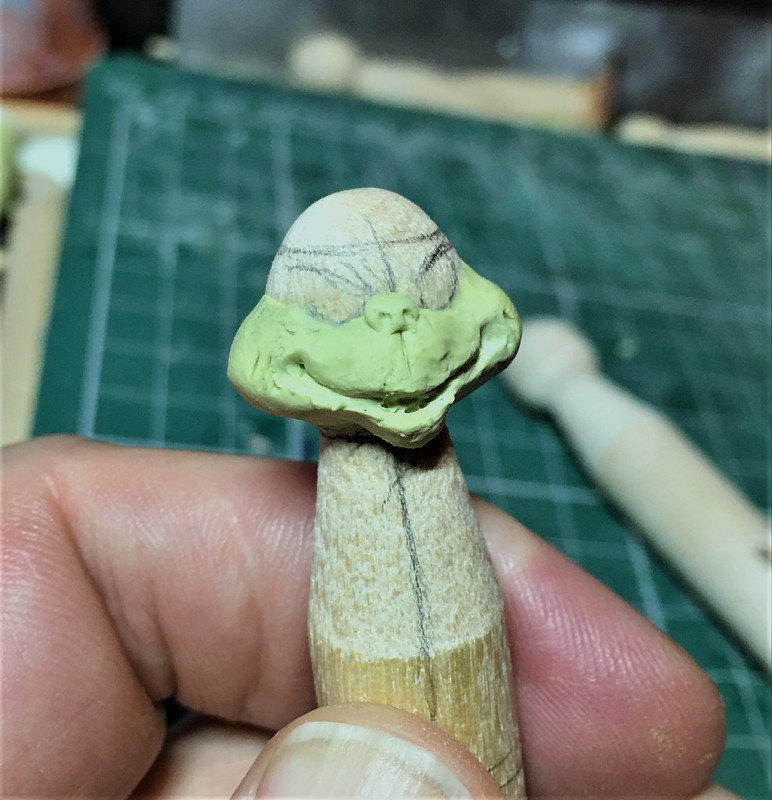
I decided that this particular peg doll would be a little more of a caricature than some of my other simplified models and I began by sculpting a little more detailed face for it than I would normally do...


As usual, I am using MILLIPUT modelling putty to do my sculpting, it's my favourite medium for jobs like this. I like how - once you have mixed the two part elements - you can decide just how firm you want your putty by how long you leave it before you start to work with it - use it straight away for a very soft PlayDoh consistency or leave it to cure for a while for a harder 'cold plasticine' firmness (if that makes sense). 


As you can see I've gone a bit crazy with the level of features for the face, but once I started I found I couldn't stop! 😂 I just got a bit carried away. I did calm down a bit after I finished the head, however, and dialled down the level of detail for the rest of the model...


And the legs are basically the same as my normal full-sized peg dolls. The one quandary I have now is how to model the arms, do I go for my normal 'nutcracker' style of arm - 2D flat style hanging off a rod - or do I try and model something a little more 3D? Hmmmm...

Well, we shall see in part 2 of this project.

Sunday, 22 November 2020

Little Angels for Christmas

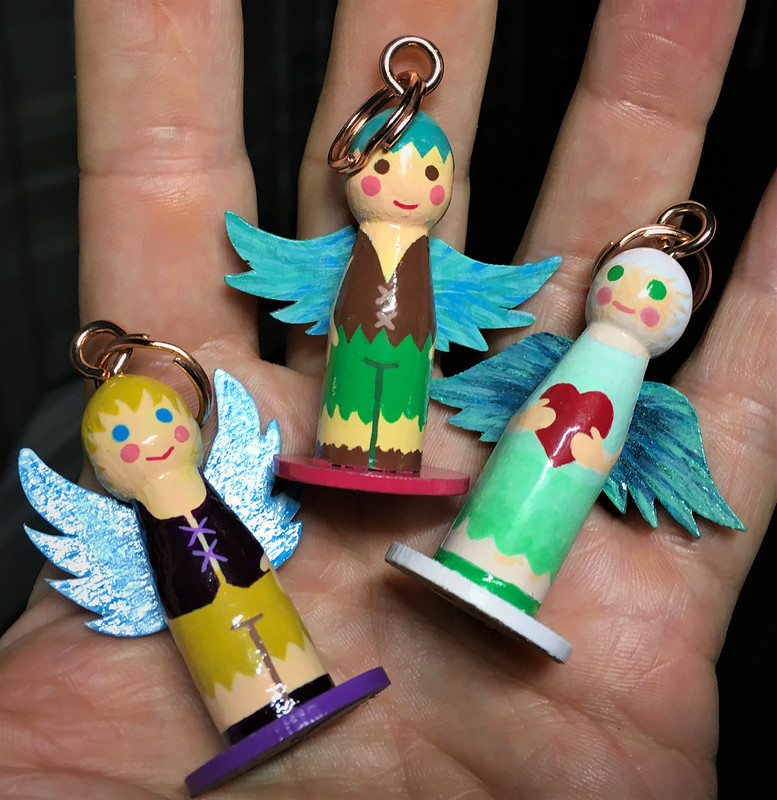
 Well, in amongst all the other stuff going on at the moment I managed to get a set of Christmas tree ornaments done. The theme here was a bit vague (they are a present for one of my wife's friends) but they are a loose mix of angels and fairies... Don't ask me! 😀

Anyways...Job done. Though, despite - to me - it being a bit weak as a project people seem to like them. Maybe I just don't get angels and fairies? 😂

Well, it maybe not my 'thing' but all making and painting is good practise and trying out new things and styles helps me build my flexibility. There are little problems to overcome and challenges even in simple characters like these that add to my experience and skill tool box...


And there you go. I'll have to take a snap of all six in the set together, but for now I'll have to quickly move on to my next Christmas project... The clock's ticking!

Monday, 16 November 2020

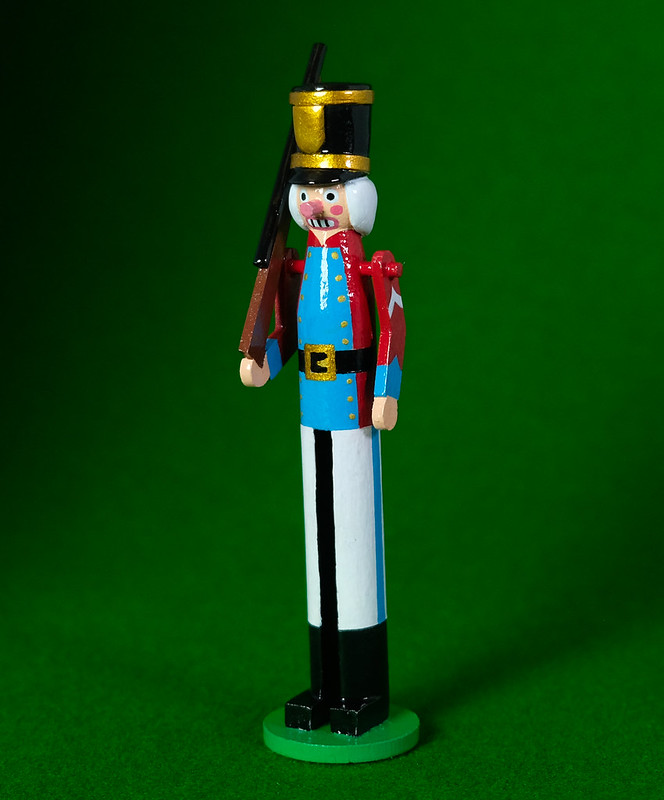
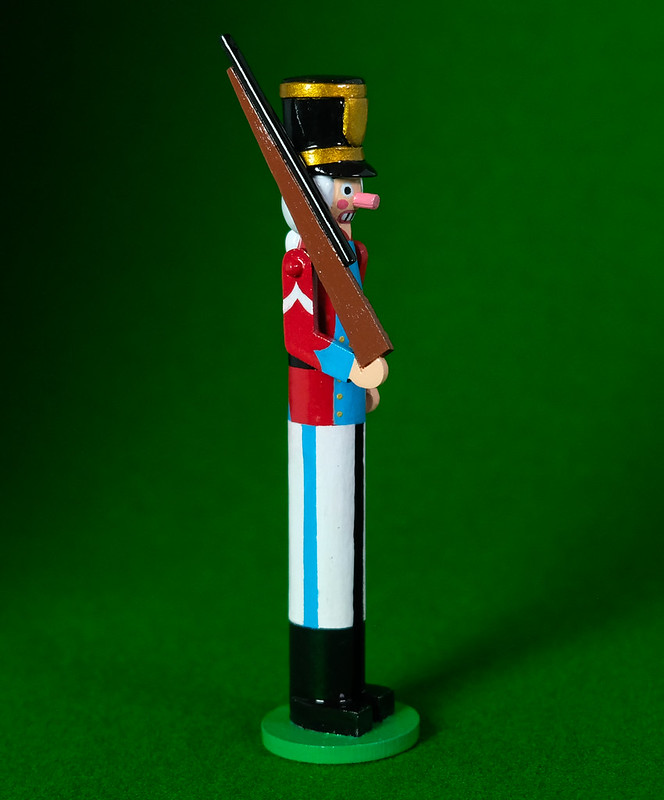
Peg Nutcracker Guardsman Complete

 I managed to get another of my peg nutcracker figures done, though I'm beginning to wish I had started these earlier as Christmas looms ever larger on the horizon!

I'm pleased with this little fellow and I'm enjoying this particular project. The slight down side is that I have a lot more of these nutcracker figures to make in time for the 25th of December. Still, onward and upwards.

This character is based on the traditional toy soldier from the ballet 'Nutcracker', a suitably festive story. The uniform is fictional and I tried a new way of making a rifle, simplifying the construction even more. It's just made up of an elongated triangle of lolly stick for the stock and a piece of cocktail stick for the barrel - but I like this stylised shape in this instance as it is suitable toy 'pop gun' like.


Another slight change in my previous construction method for this kind of nutcracker peg is that I did not bother to sand down the 'shoulder' dowel, but left it protruding slightly. I think this looks quite good and it enhances the idea that this is a toy soldier. Less work for me to do! 😁

The only concern I have about this style of peg figure is - being very tall and thin - it's balance. I chose a 3mm thick, 25mm diameter MDF base for these figures and that only just does the job. After I complete this project I will have to think again about basing and stability and I may need to either look at enlarging the diameter of the base or weighting the base (I have been considering adding steel washers to the existing base to give it a bit of weight).

Still, you are always learning. As they are they should look very nice on a mantelpiece for the festive period. 


Saturday, 29 August 2020

Let's talk about the 'C' word - Christmas!

 I can almost hear some of you groaning, but hear me out...


This year - due to tight finances - I am making several gifts for my family and friends. Now, those of you who follow my blog (all two of you LOL) will know that I am NOT the fastest maker of models AND I easily get distracted by other things! 😆

...SO, in fact, starting to think about Christmas now is not too early. It actually might be a bit late considering what I have planned.

Now, the reason I include this subject on this blog is that my gifts have a toy soldier related theme as I want to make some mini versions of German traditional nutcrackers!

Funnily enough, making mini peg versions of these popular festive ornaments is exactly how I got into the whole peg soldier making in the first place...


I followed an online tutorial for this prototype - you can find the instructions over at Kate's Creative Space - and although it turned out OK there were a couple of things I wasn't happy with.

First of all, the flock 'hair' was a pain in the ass. No matter how well you try to glue it down it molts and I reckon that eventually the poor old soldier will go bald! 😂 Also, I wasn't altogether enamoured with the hanging and/or standing methods (the standing 'ring' came from a special craft set specifically intended to allow you to make free-standing peg ornaments).

Back to the Drawing Board - My Mk. II Nutcrackers

I've had plenty of time to mull over how to make a better mini nutcracker, especially as I have been learning a lot over the year making all my experimental peg soldiers.

The main change I made in my construction was to sculpt the 'hair' using Milliput putty, in this way I was able to create specific hair-dos to suit the kind of soldier I was making (or period of uniform). My nutcrackers are mainly 18th century inspired so there's a lot of powdered wigs with pony-tails! 😁

The next thing I changed was the simple hat design, one thing I have really enjoyed making for my experimental figures was ever increasingly complex hat designs. So, I've gone a wee bit mad and created some 'interesting' military headgear for my new nutcrackers...

Above: A Guardsman Officer and a Jaeger (huntsman)

Above: A King and a Pirate... Yarrrr!

Above: The French Old Guard? :)

As you can see, there quite a variety here ALTHOUGH the wife spoilt my fun a bit by saying 'well, they aren't very Chrismassy though are they?'. 😑 So I guess I'll be adding a couple of extras (a Santa and a snowman maybe), this way I can make two sets of four which I can box up as nice ornamental gift sets for both my daughters.

Anyway, aside from these big changes to the original prototype design I also decided to add a smaller modification which I hope makes them all the more charming and 'toy soldier'-like... A nose!

This is just a simple wooden rod made from a section of cocktail stick, but I think it makes a big difference and is a nice improvement. 😊

And that's it for now, except - on a non-soldier related note - that among the other gifts I am crafting are some other festive peg figures for Christmas tree ornaments. In this case I'm making a set of Christmas angels and (for some reason) fairies!