Yep, doing a unit of figures (even a small one) is taking time, so I reckon it will still take something like another week of spare time to finish my first 'Invasion Mars, 1899' unit. Sorry, I'm a slow painter.
I have made some progress on the fiddly steampunk gun models that I had designs - I think I overstretched my design ability here - and I got them to print out OK. I just have to remove the supporting sprues and clean them up...
So, what am I also working on that might be mildly interesting to talk about in the mean time?
Well, my youngest daughter and I have been making a start on our DIY Christmas gifts and one of the ideas we had was based on some little wooden mantlepiece ornaments that we found... (Bear with me)...
What we wanted to do was build our own slightly more detailed versions of these Christmassy ornaments and put some lights in them to decorate out front rooms. So I came up with a prototype of my own...
NOW... What has this to do with toy soldiers? Well, at some point I did want to war game with my soldiers and this would entail making some battlefield terrain and furnishings - like buildings and what-not.
So, this festive novelty is actually an interesting experiment in what I can archive if I want to build some scale buildings. And it's been an interesting exercise.
Scale-wise I reckon that this prototype is around either 20mm or 28mm or somewhere in between. While I might struggle to make something in 50/54mm - my printer having a smaller print area - I think I could do something for my peg figures if I print the models out in parts.
I was very pleased by the level of detail and textures I could get out of my printer and I can imagine some of the possibilities for various types of battlefield accessories...
I've given up on 'part numbers' for these posts as I'm working on a couple of related 'regiments' at the same time!😁
So, the story so far...
After getting my recent creative diversions out of the way I have returned to my 'Invasion Mars, 1899' project by starting to paint my first 'regiment' of British for the campaign. These are my heavy assault infantry - Grenadier Guards - with the Mk. 1 (diving suit) space clobber!
It's nice to see a unit of my peg soldiers in progress, it reminds me of why I started this blog in the first place (even if they are not Molatarian infantry)!
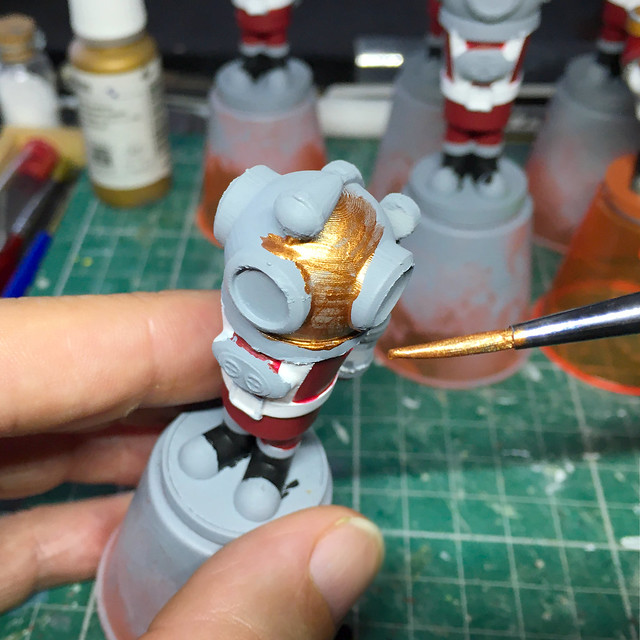
The scarlet I am using for the suits is Vallajo's 'Gory Red', crimson was a bit to bright for my liking and this more muted red is more to my liking though it's a bit of a pain to paint with and needs a couple of coats to get good coverage. Still, it's worth it.
I'm gone for a coppery brass for the diving helmets and again - just my luck - this paint is a bit of a pain to use as well...
It's going to be a bit of a slow slog to work my way through these five figures in order to complete the unit AND I haven't even completed the 3D printing of the arms yet! The delay here was due to my fancy-nancy 'space rifle' design which is turning out to be a pain to print properly. I think I got a bit over-ambitious for the scale and should have stuck to my super simplified design ethos of my earlier peg soldiers' weapons.
Anyway, in the end I managed to get a passable print, though it still needs some cleaning up...
Above: Hard to tell what's going on when all the print supports are on but hopefully it will do the job once it's cleaned-up!
And in the meantime... While scratching my head over my Grenadiers' guns I cracked on with the prototype for my second British unit - a Light Infantry trooper in a Mk. 2 suit...
You can get an idea from the above pick how the space rifles should turn out as I have primed the arms for this little chap. And while I had my red paint out I made a start on painting his uniform.
In all I hope to make three British infantry units (of six soldiers each), the Grenadiers, a Light Foot and a Marine detachment. I'm going for six in a unit as in this 50mm scale and using a version of the Portable Wargame rules for a small table 'battlefield' this will keep the overall numbers manageable for a game.
Aside from the infantry there will also be a section of 'cavalry' (steam mechs) and a artillery section (one gun). The mechs will pose quite a challenge as they will be quite big.
And that's all for today, it's just banging on with these figures in a little painting production line!
I'm gone a bit 'off-piste' over the past week or so (not by choice really). I have had to comply to a few friend & family requests and this has cut into my valuable toy soldier making schedule.
However, you have to look on the bright side and think of these unrelated project as 'opportunities for good practice' (I say that through gritted teeth). 😒
So, what have I been up to? And here, I'm not going to try and fool you into believing they were all relatable to my toy soldier hobby...
First of all, I was given a stone garden ornament that the mother-in-law wanted painting up to look like their pet dog. Somehow because I 'paint models' that means I am an expert in doing anything vaguely 'creative'...
I could not conceive of any part of this 'project' that could positively impact on my peg model making except that by doing the wife a 'favour' (order) she would cut me some slack for a while. And that's about it, so I did it.
The second little job was - at least - my idea. I wanted to make a little gift for my work colleague (we are both NHS operating theatre domestics) as she has been very supportive as we have worked throughout this pandemic.
She happens to have a couple of donkeys on her bit of land and when she saw the 3D models I had been making she mentioned she would love to have a 'little donkey'! I was happy to do this as she has really mad a bit of a stressful 12 months bearable and has got me through the times when my own health issues have plagued me at work. So, I made her a little Eeyore (from 'Winnie the Pooh')...
This was definitely worth taking the time away from toy soldiers to do, especially when she was so pleased when I presented it to her! 😁
And finally...
Now, this was very useful! I've been wanting to have a go at 3D modelling slightly more feature detailed figures which would involve some slightly more complicated 3D modelling using the TINKERCAD software I have been using lately.
Along-side my super simple 'pegs' I wanted to experiment with the possibility of making larger one-off display models of historic soldiers but which would still be modelled in a cartoon format. Trouble is that I needed some sort of initial project idea to spur me on to trying out the idea...
As it happened, another work colleague asked me whether I could 'make one of these' and showed me a blurry photo of his football team's mascot! He supports Barnsley FC and they have a mascot called 'Tony Tyke' (really) and so after doing a bit of research I had a play with TinkerCad and knocked up a rough approximation of Toby!
I decided to start with the head as that was the most identifiable part of the mascot and feature rich element of a model...
It took a while but I managed to put together something that looked a little like Toby, well dog-like anyway! My friend was very happy with this design so I forged on with the rest of the body...
Getting the right pose was a bit fiddly as this was the first time I had tried anything like this, but after several iterations and modifications I managed to come up with a pose I was happy with...
Now, how does this relate to toy soldiers? Well, having worked out a fairly OK anatomy of a cartoon figure - albeit a footballer, in this case - I could now see how I might further modify this into any other figure that I might like. I reckon it might be an easy project to alter this into a uniformed mascot, varying the head into something appropriate for a particular regiment - a bulldog for a US Marine, for example, or a French Bulldog for a Foreign Legionnaire!
You see where I'm going?
Again, I apologise that this post seems a little left field BUT these distractions - particularly Toby - have given me some ideas for future toy soldier projects that I think will be very interesting indeed!
As mentioned in the previous post, I am well on the way to making my first British unit for my 'Invasion Mars, 1899' project. This unit is a 'heavy' infantry Grenadier unit - an elite with special weapons - so I next wanted to start on my more basic 'light' infantry.
I had in mind something along the lines of the idea of 'Zulu on Mars' when it came to designing the light infantry figures, using the 1879 pattern of uniform worn by the British at the Battle of Rorke's Drift. Taking this as a basis I would then modify the original design to give it a more Steampunk look!
Luckily for me this is already a pretty popular theme and there is a reasonable amount of reference and ideas knocking about on the internet and in print and even in popular media...
British infantry on Mars! Doctor Who, series 36, episode nine – Empress of Mars
For me the most iconic bit of the uniform has to be the British Army's 'Foreign Service pith helmet, so I wanted this to be at the heart of my design. But unlike some early science fiction I did not want to endow Mars with a earth-like atmosphere, so this helmet would have to be modified into some sort of environmental protection.
Using TINKERCAD as my 3D modelling software of choice (at the moment, until I can get to grips with something more sophisticated) I quickly mucked about with some shapes until I got something approximating my idea. I won't lie, the helmet was a bit of a bitch to do and it took me a while to get something that I was happy with...
There was then a lot of tinkering around with sizes. I always tend to over-size things when I free-hand my designs and the first attempt at the helmet was way too big in proportion to the body and when compared to the Grenadiers I did...
Back to the drawing board and I rescaled the helmet a couple of times until I think I hit the 'Goldilocks' zone. Yes, it still is a little over-sized but that's part of my cartoon style and also so that it works as a 'space helmet'...
The next issue was the design of the 'space gun', again I didn't want to do what some game miniature designers have done and simply make a Martini-Henry rifle (as used in 'Zulu') for a science-fiction figure. I don't know about the effects of ballistics in space or what effects a different gravity has on projectiles but I'm sure a 'one gun suits all' (space and differing gravities) would mean some special considerations...
So, I went for a fanciful Steampunk design with an unspecified firing mechanism - could be a rail gun, could be a ray gun sorta thingy that would suit all situations! 😂
Sorry this is upside-down, but the above picture show how I orientate my objects for 3D printing for the best quality.
Design Done - The Printing Begins! Now the nerve wracking bit, although I am starting t gain a little confidence with my 3D printing workflow. The primary concern is print quality and how to orientate designs on the print bed to get the best print I can.
There is actually two concerns, orientation and whether to add supports. In the above picture of my space gun I orientate the arm and gun component in such a wat that I get the smoothest print quality on the main straight line (the upper arm). There were several options but I decided this offered the most advantages. Others might disagree.
Supports are the second - but related - consideration. I might orientate my model so that I can minimise the use of supports (supports being scaffolding that supports over-hanging elements of the model). So it turns into a bit of a puzzle working out which way to place the component to get the best quality with the least support! 😵
Here I have orientated the body & legs in the vertical BUT I have, then, had to add a lot of tree-like supports to aid in the printing of the helmet over-hang.
Yes, it's all a bit crazy, but after a time it becomes second nature and you eventually just 'know' instinctively what's going to cause problems in a particular model. Er, mostly!
Print done I then carefully compare it to the other model I have made in the series, my Grenadier. As mentioned above, my first attempt at my new helmet resulted in it being obviously over-large when compared to my Grenadier's 'diving helmet'. But this latest print turned out to be proportionally correct (I think)...
Above: Checking mutual proportions, but also notice that I have added my 'magnetisation' system to the bases, steel washers! LOL
Well, this is all going swimmingly! Er, except.......!
On fitting the arms to the body I noticed that the arm holding the gun didn't fit properly due to the splayed feet I had done. It's not noticeable in this photo due to the angle I took it, but believe me that the arms are not fitting the way that they should be...
...Back to the drawing board again! This is what prototypes figures are for though, working out all the kinks before running off a whole unit of figures. In this case I had to go back into TinkerCad and alter the angle of the feet so there was more space for the gun to sit on the base properly...
And that's it for now. A very good start I think (?), I'm quite pleased with my design for a Steampunk soldier and I'm really enjoying this series. AND it's actually taking me back to the original idea for this blog which was to do wargame armies (rather than the single figures I have been doing for a long time).
I may even get round - eventually - to doing the FLW Molatero army I intended to do in the first place! 😁