Showing posts with label peg doll. Show all posts

Sunday, 28 March 2021

Peg Figures Batch Complete - Mixed Bag

 Well, I got this little mixed bag of characters completed. Mixed is the key word here, as I have mixed feelings about this latest series of 3D printed 'pegs'. 😕

Three out of the four are original prototypes which were early 3D test prints, one of them - the musician - was THE first print and so I'm not altogether happy with them. Still, rather than consign them to the scraps bin I thought they might be interesting practise models for my painting.

The final figure is a new print that I made for my Lovecraftian 'Assault on Innsmouth' set. He is a salty seadog who is ready to repel boarder! Yar! (Any similarity to one Captain Haddock is purely coincidental! 😄

Anyway, here's the finish pics, enjoy...

'Private Toot' - An early prototype, but useful practise for a potential Christmas
tree ornament. Hence the Christmas colours!

'Mr. Clank' - Again, a sort of Christmas ornament inspired figure. I'm trying to decide
on what kind of figures to include in a Xmas ornament box set.

'Winter Soldier' - Yes, this could be another Christmas themed figure. But, I just
wanted to get back to doing traditional soldier models again!

And for my Lovecraft series, here's a salty seadog - one of the Innsmouth townsfolks!

As I mentioned in the 'Winter Soldier' caption, I desperately want to get back into making some traditional soldiers again (along side my Lovecratian themed figures). But, as you can see, I am already starting to plan for next Christmas as I hope to make even more of the family presents myself this year.

Sunday, 24 January 2021

Wood versus Plastic! Crafting Versus Printing.

 Ok, so a bit of a talking point came up after I posted up my intension to 3D print some of my toy soldiers rather than my 'usual' technique of crafting the peg soldiers out of wooden dolly pegs. Some people were clearly not entirely happy about the idea! 😕

A couple of my early 3D printed prototypes, one of
my 'nutcracker' full-sized peg bodies and one of my
'50mm' half-sized bodies.

Typical of the comments was something along the lines of "...but if you 3D print them instead of crafting them out of real wood they will lose their charm!"

I was a bit taken aback, I didn't realise my toy soldiers were a thing that had 'charm'. I thought they were just daft little fun toys! But apparently, to some people, I'm somewhat spoiling part of the attraction of my peg soldiers. 😦

...My first though was along the lines of 'I didn't realise I had an obligation to others to maintain some sort of standards'! I thought I was just making these things to amuse myself. But, that's a bit ingenuous as I do get a kick from other peoples appreciation of what I do - that's why I post pictures on social media after all.

[Edit: Just read this back and it sounds like a bit of a moan! LOL But it's not, really. I like to hear other peoples' point of view.]

So, after pondering the issue I realised that some of these people had missed the point - I had never said I was replacing my original wood crafting technique of making peg soldiers with plastic 3D versions. I simply said that I would be investigating the possibilities that 3D might afford me for making prototyping easier PLUS I am thinking of making a range of easily duplicated plastic soldiers for war gaming where laborious wood crafting would be a bit of a hinderance.

I will still be making my wood crafted soldiers - but mainly for gifts, display and commissions! DON'T PANIC!

Phew! Anyway, I have begun my experimentation which involves learning how to 3D design the models, prepare them for printing and then learning how best to print them. This is not at all straight for ward as just pushing a 'PRINT' button and out would pop a finished model! 😁

I've certainly had a few minor print disasters! Luckily my printer allows me to monitor the printing remotely - via it's built-in camera - so I am able to hit the brakes if the print goes pear-shaped...

So, there's a learning curve which has to be overcome with 3D printing - it isn't such a hands-on 'build it and it will work out' experience that crafting with wood can be. But once this initial technical mechanics of building models in 3D and then printing them is understood - at least the basics - I should be able to do what I like to do best, tinker! 😁

In fact, this uneducated messing about started in earnest from day one of getting the printer, but now I am trying to get myself on a rather more methodical and formalised track, starting with the software.

I am starting with an easily accessible piece of software called (suitably enough) TINKERCAD, which is perfectly suited to my simple geometrically shaped figures...

 
At this stage I am just trying to understand how to combine primitive shapes - spheres, cubes, cones, tubes, etc - to recreate my 50mm wooden peg figure design.

Additionally, and perhaps a little more tricky, is my experiments in making multipart accessories and components that I can then add to the basic body to create different types of characters. I am finding the making of arms a bit of a challenge...


The main problem that I am encountering is that some of the shapes I used in my wooden figures simple do not translate well into a 3D printed model version. Due to the way my 3d printer works - which is to build up a model layer by layer - I have to reassess the way I construct components. In effect, I have to change my whole way of thinking.

Because of the changes I am having to make in the shape of my original component designs I am actually ending up with a slightly new style. Some small or thin parts - like the flat arm designs pictured above - have had to be made a little chunkier in order to work the way I want them to. Frustrating at times but also very interesting.


This has all given me an insight into why other small toy figure - like those made by Lego and Playmobile - look the way they look. It isn't all stylistic choices, some of the 'look' is led by the actual manufacturing process itself!

My arm designs changes from the old flat design into - first of all - tubes and then, eventually, half-tube shaped components...


Similarly, hats had to become a little chunkier and like my arms I had to come up with a way of easily attaching the component to the body...


However, little design quandaries aside, 3D modelling has - as I had hoped - made it easier for my to work out my design ideas and quickly prototype my doodles on paper into fully formed 3D models.

It's been an evolutionary process with minor adjustments here, amending dimensions there and tweaking things I wasn't quite happy with, but I feel I got there eventually and have produced a little character shape that I am happy with. though, this has left me with a little army of test pieces...

NEXT: It's time to see what my 3D figures paint up like and how they compare to my wooden versions!

Thursday, 10 December 2020

The Grinch Peg Doll Part 1

 Part of my Christmas Nutcracker series of figures are some that aren't so traditional as I thought it would be nice to make some of my nutcrackers a bit more relatable to my kids (I still call them kids despite the fact they are in their late 20s)! 😁

One of my figures is based on the wonderful Jim Carey movie 'The Grinch', based on the book by Dr. Seuss. It's a terrific 'kids movie' and Christmas favourite and I thought it would make a smashing wee peg character.

I decided that this particular peg doll would be a little more of a caricature than some of my other simplified models and I began by sculpting a little more detailed face for it than I would normally do...


As usual, I am using MILLIPUT modelling putty to do my sculpting, it's my favourite medium for jobs like this. I like how - once you have mixed the two part elements - you can decide just how firm you want your putty by how long you leave it before you start to work with it - use it straight away for a very soft PlayDoh consistency or leave it to cure for a while for a harder 'cold plasticine' firmness (if that makes sense). 


As you can see I've gone a bit crazy with the level of features for the face, but once I started I found I couldn't stop! 😂 I just got a bit carried away. I did calm down a bit after I finished the head, however, and dialled down the level of detail for the rest of the model...


And the legs are basically the same as my normal full-sized peg dolls. The one quandary I have now is how to model the arms, do I go for my normal 'nutcracker' style of arm - 2D flat style hanging off a rod - or do I try and model something a little more 3D? Hmmmm...

Well, we shall see in part 2 of this project.

Sunday, 6 December 2020

Sally & Jack 'Nutcracker' Dolls Complete

Some more Christmas gifts completed. Two sets based on Tim Burton's 'Nightmare Before Christmas' animated movie...

Two sets, one for each daughter! I actually wanted to do more
of the characters from the movie but I'm running out of time as
I have other projects to do before Christmas!


Phew! I knew I should have started my Xmas gift projects sooner! It's all a bit of a race now, my poor peg soldier projects are on the back burner until after the 25th. Apologies to those of you who are only interested in the military related projects! But needs must.

Thursday, 3 December 2020

Show & Tell - Figure Painting Base

Very much caught up in various Christmas related gift-making projects at the moment - tick-tock, tick-tock, tick-tock - so time for blogging activity is at a premium. So, I have been testing out the idea of doing little 'show & tell' video shorts, very rough and ready recordings that don't demand a lot of preparation or production time. Hopefully, these little movies will fill the gap as it doesn't take too much time out my schedule to grab my iPhone camera and press 'record'!

I've already posted a couple of these mini-movies on the Peg Soldier Facebook Group as their appeal is very niche and they make little concession a 'general audience'. But I think I have the process working well enough, now, that I'm ready to start hosting these sort of videos on this blog.

This particular movie clip covers some thoughts about mounting peg figure projects on a grip or stand so that the figures are easier to paint. I hope you will find it useful and like this new medium...

Saturday, 10 October 2020

Peg Pirate Complete - Yaaaar!

 Quick project update for my Christmas Mini-Nutcracker series of models - I've completed the first in the set. Here's my festive pirate (and no, don't ask me why I have made a pirate as a Christmas ornament - I'll just say that my older daughter is not into the whole kitchy Christmas thing)...

I was fairly please with the outcome, though there were a few issues that I will correct with the rest of the nutcracker series (going to have to revisit my choice of varnish). Hope you like him, I shall call him Stew - Stew the Pirate, Yaaaarrrr!

Sunday, 27 September 2020

Sunday Roundup 27/09/20

 Everything is sort of 'between' or 'in the works' at the moment so there's not much to show you, particularly by way of military models. 😟 (But they are definitely on the way!)

So, here are some snapshots of what is on the main painting bench at the moment...

My little Boeing P.26 is coming along nicely and should be finished soon. I've really enjoyed making this model, the design worked out very nicely, so much so that I can see me making more models based off the design. I'll probably be following up my original plan for this and make a slightly modified monoplane but in Molatarian colours so I can add it to my air force!

Next up are the series of Christmas tree decorations that I've designed - part of my plan to make a lot of my festive gifts this year - though, luckily, these little pegs are quick to do...

On a similar theme, I've also started painting my peg mini-nutcrackers, but I'm starting with a sort of un-traditional figure for my eldest daughter who is a bit grinchy when it comes to the festive season. So I'm making a set of decorations that are probably more to her twisted tastes! 😃

Yarrr be a Christmas pirate... Dunno what pirates have to do with Xmas, but who doesn't like pirates?

Even more left-field is the work I'm doing on my latest set of Lovecraft Mythos inspired figures, including this model of a Wendigo (no, it's not a reindeer for another Xmas gift idea)! 😂

And finally, a set which is totally unrelated to toy soldiers but has, in fact, taught me a couple of additional techniques that I will certainly be adding into future models - my completed Wedding Cake Toppers!

Now, this project has actually given me a few ideas regarding Funny Little War related models, specifically adding civilian costumed models into my collection. I have seen other FLW collectors who have already done this by adding nurses, photographers and members of the aristocracy to their game tables to add some amusing atmosphere.

I'd personally love to do some period costume models (especially Edwardian).

And that's it for this weekend! 👍

Tuesday, 22 September 2020

More Lovecraftian Mythos Shenanigans!

 Although my fantasy world of Molatero is primarily based on the principals of war-gaming H. G. Well's 'Funny Little Wars' I cannot help myself but imagine that while conventional warfare is underway that a very secret and weirder type of war is simultaneously ongoing. That war is the struggle against cosmic horror as conceived by the mind of H. P. Lovecraft! (Tongue firmly in cheek as I write this!) 😉

My latest Lovecraftian duo - A stalwart British Bobby for those mysterious
adventures in foggy old London town and a lowly Cultist foot-soldier,
minion of the creeping cosmic terror!

I have always been a fan of 'weird wars', whether they be a Steampunk version of Funny Little Wars, or the science-fiction influenced 'Luftwaffe 1947' which re-imagined a 'what if' scenario had WW2 extended and allowed the use of some of the more fantastical 'secret weapons' to come into play (including Nazi UFOs). But also, as a fan of Gothic horror, I have mulled over the idea that the fantasy world of Molatero might also have room for a dark and nightmarish sub-culture?

After all, I base my concept of Molatero on the real world cultures and geography of Romania and the Carpathian Mountains, the locale of Transylvania and the haunt of Dracula! 😃

The Molatarian Mountains - 'Where wolf?'

LOL... Enough frivolous fairy-tale nonsense, however entertaining it may be, as you can guess the above tenuous fiction is but an thinly disguised excuse for me to justify the inclusion of Gothic horror and the later Lovecratian Mythos into my blog! 😏


I've featured a few of my Lovecraftian peg figures in past passing before, but I thought it was about time to add 'Weird' characters as a regular feature on this blog. As if I needed extra incentive to do so, I posted a question on the H.G. Wells FLW Facebook Group enquiring whether other FLW enthusiasts added fantasy elements to their games and I was pleased to find that - indeed - other players do!

Unconventional units like Steampunk inspired airships and steam tanks are popular additions and I have even seen some models relating to 'Martian Wars' on sale (although these are intended for other rule systems). This should not be surprising, really, as H. G. Wells was - of course - better known for his fantasy fiction, including 'War of the Worlds'.

So, my sneaking in the fictional entities from another legendary fantasy author kinda has a president! 😆

Saturday, 29 August 2020

Let's talk about the 'C' word - Christmas!

 I can almost hear some of you groaning, but hear me out...


This year - due to tight finances - I am making several gifts for my family and friends. Now, those of you who follow my blog (all two of you LOL) will know that I am NOT the fastest maker of models AND I easily get distracted by other things! 😆

...SO, in fact, starting to think about Christmas now is not too early. It actually might be a bit late considering what I have planned.

Now, the reason I include this subject on this blog is that my gifts have a toy soldier related theme as I want to make some mini versions of German traditional nutcrackers!

Funnily enough, making mini peg versions of these popular festive ornaments is exactly how I got into the whole peg soldier making in the first place...


I followed an online tutorial for this prototype - you can find the instructions over at Kate's Creative Space - and although it turned out OK there were a couple of things I wasn't happy with.

First of all, the flock 'hair' was a pain in the ass. No matter how well you try to glue it down it molts and I reckon that eventually the poor old soldier will go bald! 😂 Also, I wasn't altogether enamoured with the hanging and/or standing methods (the standing 'ring' came from a special craft set specifically intended to allow you to make free-standing peg ornaments).

Back to the Drawing Board - My Mk. II Nutcrackers

I've had plenty of time to mull over how to make a better mini nutcracker, especially as I have been learning a lot over the year making all my experimental peg soldiers.

The main change I made in my construction was to sculpt the 'hair' using Milliput putty, in this way I was able to create specific hair-dos to suit the kind of soldier I was making (or period of uniform). My nutcrackers are mainly 18th century inspired so there's a lot of powdered wigs with pony-tails! 😁

The next thing I changed was the simple hat design, one thing I have really enjoyed making for my experimental figures was ever increasingly complex hat designs. So, I've gone a wee bit mad and created some 'interesting' military headgear for my new nutcrackers...

Above: A Guardsman Officer and a Jaeger (huntsman)

Above: A King and a Pirate... Yarrrr!

Above: The French Old Guard? :)

As you can see, there quite a variety here ALTHOUGH the wife spoilt my fun a bit by saying 'well, they aren't very Chrismassy though are they?'. 😑 So I guess I'll be adding a couple of extras (a Santa and a snowman maybe), this way I can make two sets of four which I can box up as nice ornamental gift sets for both my daughters.

Anyway, aside from these big changes to the original prototype design I also decided to add a smaller modification which I hope makes them all the more charming and 'toy soldier'-like... A nose!

This is just a simple wooden rod made from a section of cocktail stick, but I think it makes a big difference and is a nice improvement. 😊

And that's it for now, except - on a non-soldier related note - that among the other gifts I am crafting are some other festive peg figures for Christmas tree ornaments. In this case I'm making a set of Christmas angels and (for some reason) fairies!

Friday, 24 July 2020

Ta-dah! A Gaggle of Peg Figures

I've complete my latest batch of peg figure test models, so I've kinda jumped from the priming phase - covered in my lat post in this series - straight to the finished models in a single bound! Can't say if this is a good of a bad thing - it certainly means there's been a little longer wait between posts though.

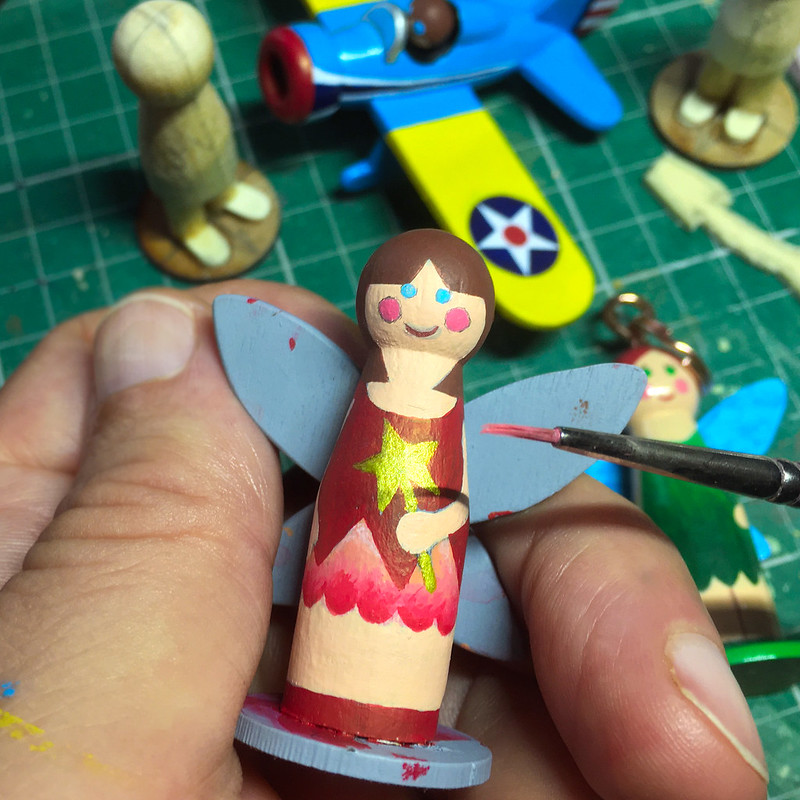
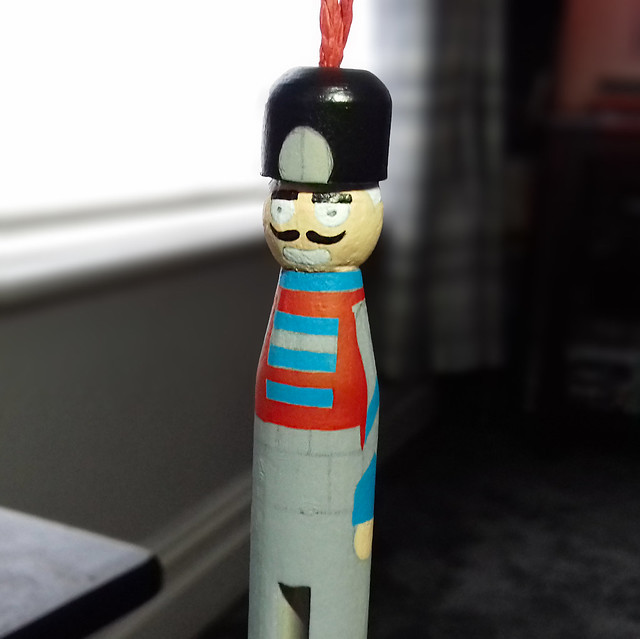
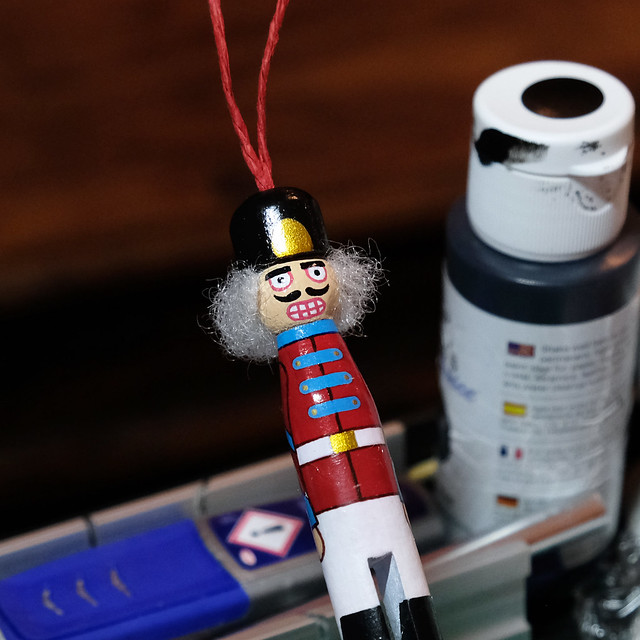
However, I did snap one quick photo of the painting process in progress...


I found it quite relaxing to be working on multiple figures in a sort of production line manner, although they were not all identical. It was also very interesting to see how the slight design and construction modifications I had made to each of these test figures worked out as paint was applied. There were very definitely things that worked and things that didn't, but that's why we do tests isn't it? 😄

Anyway, without further ado let's look at the finished models and talk about what I learned from them...

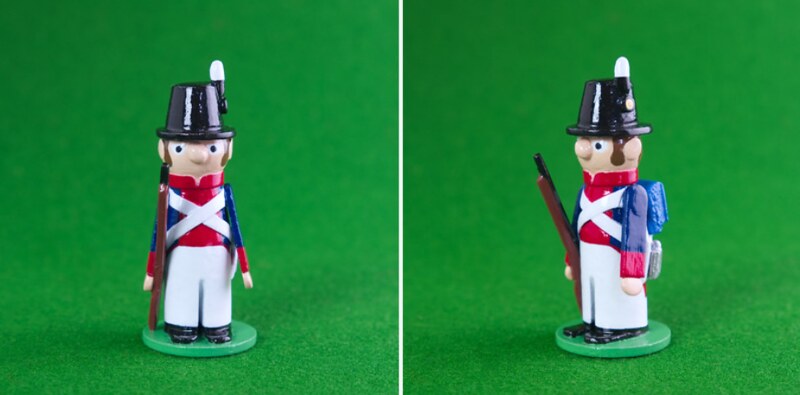
Figure 1: US Militiaman, War of 1812...

Continuing my original intention that any peg figure experimental model would be based on historical US army uniforms (this rule has already been open to bending, as you will see), my first test is a militiaman from the almost forgotten British-American war of 1812 (another win for the Yanks)!


There were a few new ideas I was trying out with this model with a view to simplifying some of the methods I used in my early peg soldiers.

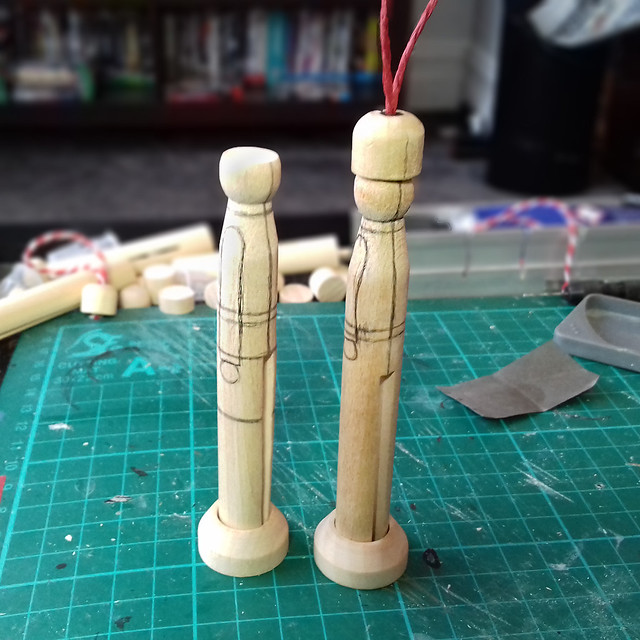
The main thing I tried out was cutting a gap in the lower peg to make separate legs (instead of the simple painted on line I previously used). This may seem a little strange if you consider that I already cut off the dolly peg 'legs' to make this smaller 50mm tall peg doll, but this is a much narrower dividing gap than the original peg pins.

The thinking here is twofold; I find painting a simple line to represent the legs a little tedious (especially if I have several figures to do) and also I wanted to see if an actual physical gap would look more effective (i.e. look better). Believe it or not, it's actually quicker and easier for me to saw this cut while constructing the figure than it is for me to carefully paint on a neat, thin line!

Other new effects used here include the nose! Yep, I'm trying out a cartoon hooter. 😀

This is simply a blob of Milliput modelling putty stuck onto the centre of the face. Again, this is both for quickness (another thing I don't now have to carefully paint or draw on) and to add some three dimensional interest. I'm constantly thinking about the times I have to construct multiple figures in a hurry, small changes like this add up and mean I can produce figures in shorter amounts of time.

And finally, I have opted to use the lolly-stick arms - once again (sorry) instead of painting on the arms. This make painting a doddle for me as I don't have to expend time carefully outlining 2D features but instead I let 3D add-ons do the work.

Figure 2: 'Perry Mason', 1930s Private Detective...

As well as trying out new construction techniques I also wanted to experiment with some new themes for my models. While I do immensely enjoy making peg soldiers I thought that switching themes might broaden my skill set and keep thinks interesting.

And so... Because I am currently enjoying HBO's 'Perry Mason' reboot so much I really fancied a crack at doing a classic noire hard-boiled detective figure! 😀


As with my 1812 figure I used the divided legs technique, in this case because I wanted my detective to be wearing 1930s style baggy trousers with turn-ups and just painting these on just didn't seem as evocative enough. I needed to model this look.

Next, I went for the lolly-stick style of arms but upped the technique a bit by cutting bent arms out of a thin sheet of wood. Additionally, I tried out adding an object - the revolver - to the component. This posed it's own problems as I ummed and ahhhed about the scale, but in the end, I decided to go for an oversized 'cartoon' (what fantasy modellers call 'heroic') scale.

And finally, there's the facial features. I am quite happy with the idea of adding a nose in 3D rather than painting one on. While the eyes and mouth  (which I now hate) were done in the simplest way I could think of in an attempt at a minimalist look... I don't think I will be doing this again! 😞

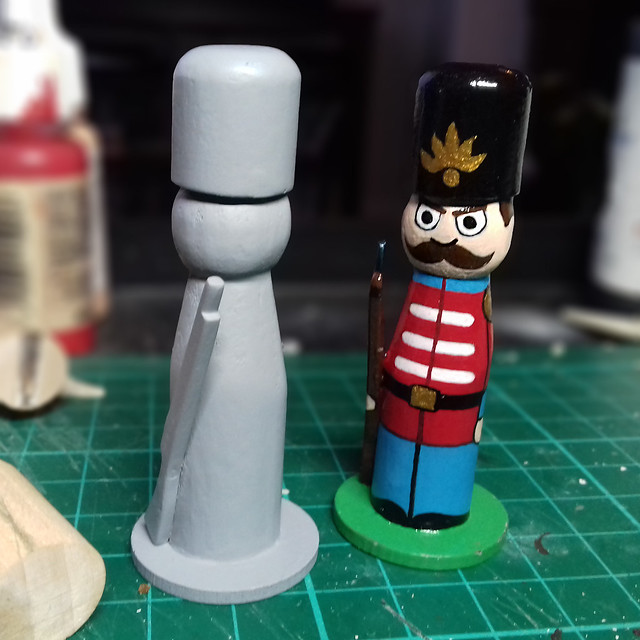
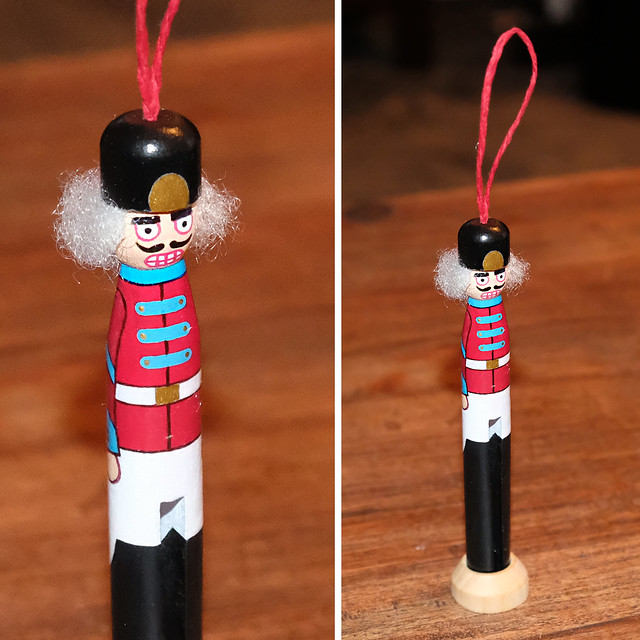
Figure 3: Pippin Fort Cadet...

This figure is actually a bit of a joke aimed at myself. When I posted up some photos of my peg figures to a Facebook group one of the comments I received was that my little peeps looked like they belonged in 'Camberwick Green' (you have to be a certain age to understand this critique)!


The classic children's' TV series from the 1960s was popular viewing and aired regularly well into the 1970s (and beyond) and has subsequently gained 'cult' TV status.

Whether it was the googly-eyed cartoon faces of my figures of just the simplified bobble-headed style I don't know, but I though 'what the hell' and for a laugh I decided to go full 'Pippin Fort' with my next peg soldier! But, anyway, the comment tickled me and as I was a fan of the show and so...


The big change here is that I cut down the peg 'body' and added a couple of wooden dowel pieces for the legs. Again, this was to do with the fact that I have become increasingly unhappy with my original method of indicating legs by just painting a line down the middle to indicate the separation.

My simplified shoes also got a make over by using some Milliput putty to create a chunkier boot.

For the facial features I returned to painting in the whites of the eyes, although - as with Camberwick Green - I made the eyes completely circular instead of my normal half-circle shape.

The arms are, once again bent cut-outs, though I chose to make the rifle holding a two-piece component this time. It was just easier (maybe if I had a CNC or MDF laser cutting machine I would have created a one-piece version).

Figure 4: Dad's Army's Captain Manwaring...

Classic TV nostalgia grabbed me and I decided to make another old British small screen character. This was a bit difficult as I am a massive 1960s and 1970s British TV series and so choosing one out of so many characters to model was a real quandary.

So...Which show? Hopefully you'll guess...


Yes? No? ...Well, it's supposed to be Captain Mainwaring from 'Dad's Army'. 😉

I'm not sure if this counts as a caricature as it's only a passing resemblance, but this is the first time I've tried to recreate a specific character.

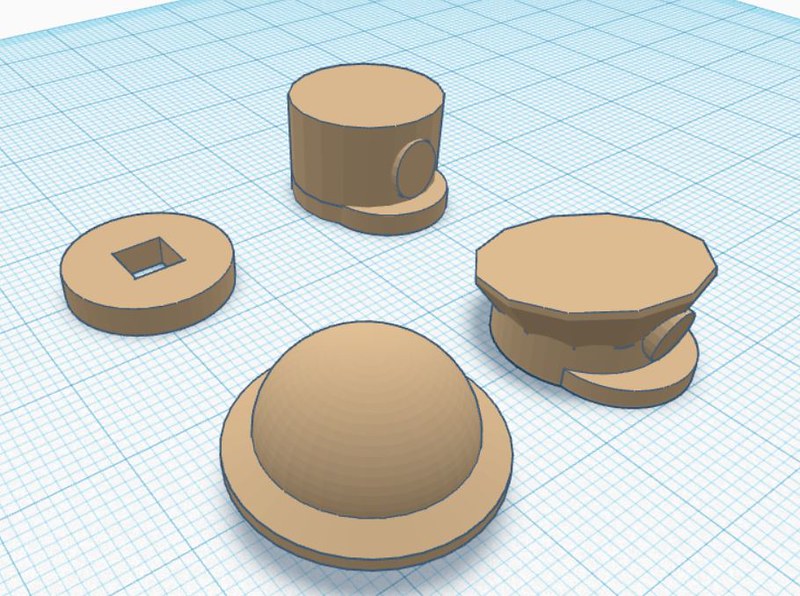
The major new technique here is the creation of a rounded lower body to which I have attached a couple of dowel legs. A touch of realism for the body...Just. I'm kinda liking the proper legs idea, not because I am trying to make my peg figures 'more realistic' but because it opens up a lot of possibilities for poses AND it's more satisfying than just a painted line.

The spectacles was a surprise 'win' - these would have normally been painted on but adding more appropriate 3D decoration seems to be the way I am going. But not too much!

Summing Up What I Have Learned...

Story short, my peg figures are not evolving. While I do really like some of the new techniques I've tried out here I still actually like my original way of doing things as well. So, no, this isn't an evolution it's more about finding new ways of doing different types of models for different types of projects. Sometimes my peg soldiers are toys, sometimes they are ornaments. Does that make sense?

I'll modify my techniques depending on what I'm trying to achieve. More detailed for 'caricatures' and my original simplified style for 'trinkets' (I'll elaborate what I mean by trinkets in a later post).

So, what did I like (and not like)?

I liked the dowel legs (for appropriate jobs), they give me the chance to model specific poses and slimmer body types for refined female characters (my original one-piece peg body can look a wee bit plump, especially towards the bottom).

The bent arms (for want of a better name for them) are also nice and open up options for more dynamic poses. To be honest, the painted on arms of my original figures were my least favourite part of my peg soldiers. Not because of their look but because they were a pain to paint on. One of the things I wanted to try out was faster way of creating the figures and I found that laboriously painting a whole unit of arms was a bit tedious!

The method of cutting out the arm with an object in one single piece interests me, I like how streamlined the flat component is. A two-piece equivalent would be a little awkward, I think. Though, I did like having the flat arm and the rifle in two separate bits, go figure. (Horses for courses again.)

Noses... Yes or no? ...Maybe, depending! 😁

I don't think the same fat rounded nose I did (made out of a blob of Milliput, btw) is suitable for every figure. I mean, what happens if I do a slim character or a female? It just wouldn't look right. So I like the nose idea in principal but I think I will have to modify the nose shape for specific body types.

Finally, facial features. I definitely didn't like the 'Perry Mason' simplified features (they were bloomin' awful). In fact, this is the one thing that I think I did better the way I originally painted them with the half-circle eyes. But the mouth poses a conundrum, I'm afraid I'll have to do some more tests to find a satisfactory way of doing this.

My original way of doing eyes and the rounded version for my Pippin Fort
cadet. I may just revert to doing my eyes the original way but may do them
slightly smaller. I also liked omitting a mouth, that works well.

All in all, I've enjoyed this experiment and I have learned a few new tricks. Let's see if I can apply what I've learned to a 'live' project! 😊

Thursday, 15 March 2018

First Commission - Peg Grenadier

Funny things just happen sometimes. No sooner had I started my latest toy soldier efforts than I had a request to make one up specially on commission.

I was asked to reproduce my initial '42mm' peg Grenadier...So, off we go again! :)


Reproducing an exact copy of one of these peg soldiers does highlight some interesting issues which should be given some consideration, especially if you intend to make a miniature army.

Take the rifles, for example. For an 'army' I will have to make exact copies of the simplified rifle shape so I will have to come up with a easy way to replicate these shapes. Initially, for my prototype, I carved the rifle out of a wooden lolli stick and I don't fancy doing that every time (and that's not the only part I will have to duplicate; there's the hats as well).

Hhhhhmmmmmm...

Anyway, on with the 'job'! LOL (Really flattered somebody likes my stuff!)

Sunday, 11 March 2018

Mini-Nutcracker Soldier - Part 2

I'm playing this - as with most everything I do - somewhat by ear. So far I have refined my design for the mini-nutcracker soldier by sketching the figure's proportions onto the pegs that I am using. In the following photo you can see my first attempt on the left - which had balanced proportions - compared to my final attempt with more stretched and stylised proportions...


I have attached the hat and hanging thread on my final design. It actually took a while and several tests to find the 'right' sort of thread to use with this (my original idea of using thin wire just didn't look right).

Additionally, I have these pegs sitting in the custom ring stands. Although I mean these are Xmas tree decorations, I kinda like the idea that they could also be places on the mantlepiece if I so desire (so alternative versions I have on the drawing board are a candleholder or place name holder for the Xmas dinner table).

Priming and Painting
As this is my first test of the nutcracker style of wooden soldier - especially in this miniaturised form - this is where things could go a bit wrong! In fact, I'm pretty sure they will as I will be experimenting  with my own ways of doing things like the facial features...I am not altogether confident. :)


It's bit frustrating that I will only know what has 'worked' once I finish this model, so I have to persevere and carry on to the end. Then I can use what has worked on the next model.

(I'm maybe being a little impatient here!) :)

Anyway, the uniform design is a fantasy 'toy soldier' one (nothing historic about this one) and I'm still using my Vallejo paints. The cheaper craft acrylics I have are OK, but don't apply quite as smoothly as the slightly more expensive modelling ones. I think I will try out some furniture paint next, but in the meantime I have a wide range of Vallejo colours so I will stick with them.

The next tricky issue will be how to make the hair...

The real Christmas Nutcracker Soldiers have a distinctive mop of white 'hair', and the tutorial I have for the mini peg version suggests that you use 'fluff' (soft-toy stuffing flock) to create the rather crazy looking 'powdered wig' look of a 17th century soldier. I was lucky here, as we have a family dog who has a intense grudge against soft toys and so we have a regular supply of newly toy innards to hand!

Left: A traditional Nutcracker Soldier displaying a head of hair. From what I remember this was 'fake fur', which poses the question of how I recreate a similar effect on a smaller scale?

I just had to give some thought on how best to stick the fluff to the peg-soldier. In the end, I decided to finish painting and then apply the gloss varnish to the model *except* on the part of the head that the 'hair' will be attached.

There'll be no beard. I just had the feeling that gluing fluff on for facial hair would end up looking like the nutcracker was foaming at the mouth! :)


 I would then use PVA glue to stick on patches of fluff until the bald scalp was covered. The tutorial suggests to stick on more than you need, initially, and then trim the hair into a neater style when the glue drys...


I have to admit, I'm not really a fan of the fluffy hair (it's difficult to stick on securely, and too loose and fibrous and pulls out far too easily) so for my next test I may try out something a little different - solid stylised hair. I found a picture of a full-sized nutcracker with this sort of hair-do...


This would entail my making the hair out of modelling putty (Milliput) which sounds like a lot of work, but if I wanted to reproduce lots of these I would probably cast and mould copies from resin.

But, now, the finished mini-nutcracker test model...

Obviously, I've had to stand the soldier up using a ring base, but it would
look far better hanging from a Christmas tree, as intended (I just wasn't
willing to put up a tree just for this photo)! :)

I have a few niggles with this prototype, but it's nearly there so I'm confident I'll rectify the problems with my next attempt. It's all good and I'm getting better with each new test model.

Anyway, onto the next project test...

Next up: More 'Midi' Peg Soldiers (my mid-sized pegs, but in historical uniforms).