Showing posts with label X-Ref: Nutcrackers/0920. Show all posts

Sunday, 27 December 2020

Merry Christmas! The Grinch & Co...

 I know I'm a wee bit late, but - as some of you may know - I work in a hospital (Operating Theatre Domestic) and so like many key workers I was working on Christmas Day. Because of that my festivities have been a little delayed and all of a sudden it's the 27th! 😁

...So, the big question is - did I manage to get my nutcracker gifts completes in time?

Well, mostly!😏

First off, I did complete my Grinch (one down, 12 to go)...


I must just say that I'm a bit unhappy that I mixed styles with this one, it was an experiment that didn't entirely come of. Plonking a sculpted head onto my simplified peg style of body was perhaps a mistake? In future, if I want to model a caricature I should maybe sculpt the whole figure in order that the final figure has a consistent look.

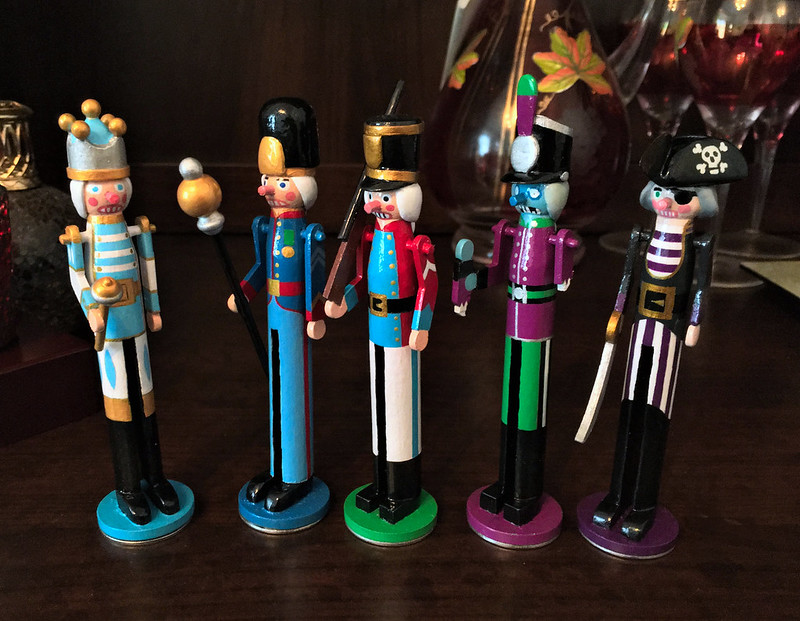
Anyway, onto the next job, or I should say 'jobs' as I decided I really needed to pick up the pace. I had just a week to go before I handed out my gifts. I decided to work through the group two or three at a time...

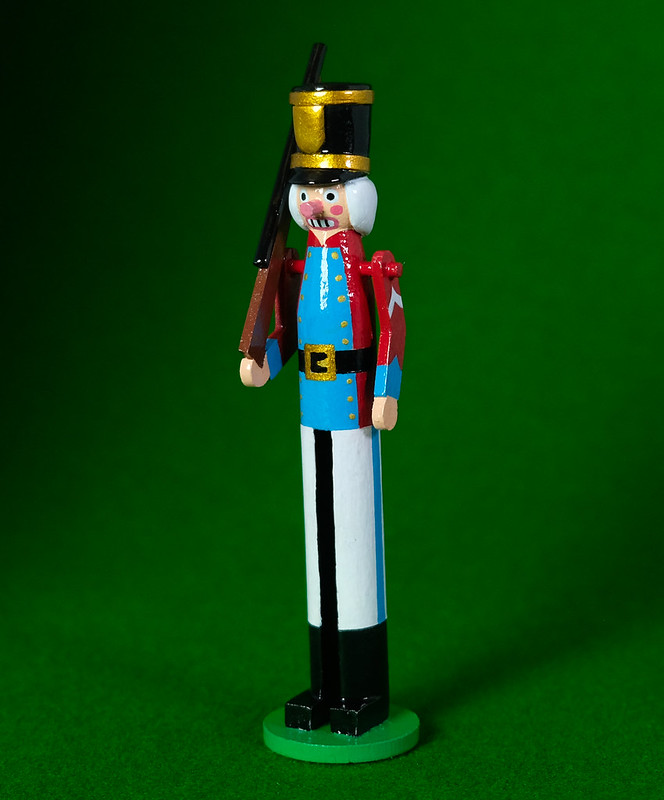
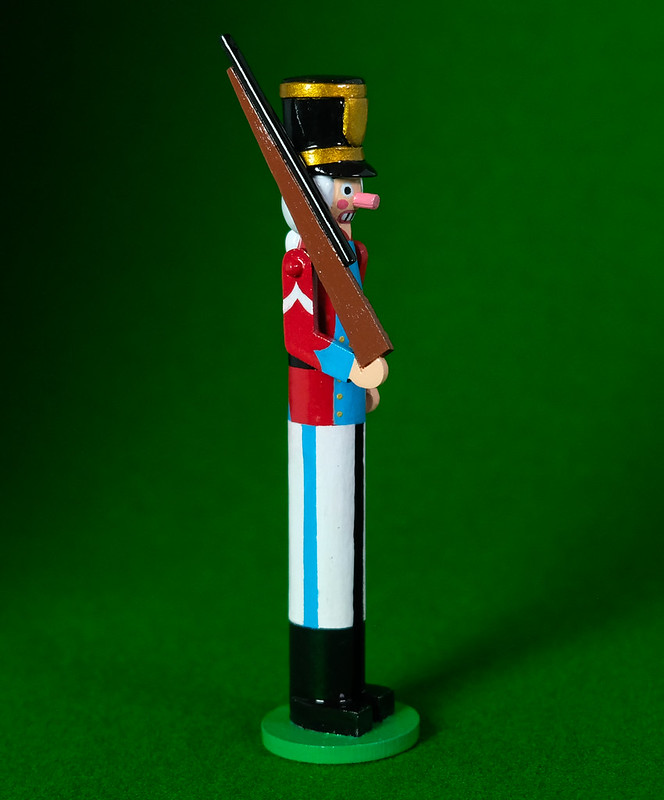
At this point, my main attention was my 'lumberjack' as this was a gift
for a work colleague and had to be ready before the rest of my figures.

This turned out to not to be such a chore as it meant I could paint some of one figure and while that dried I could paint some parts of another. And so I went, back and forth, until I had a completed set - as usual I finished on the facial features before the slightly traumatic varnishing stage (more on that later).

I should explain at this point that, because of the rush to get these gifts ready in time, I did not have the luxury of being able to much about - in my usual half-arsed way - setting up a proper completion photo. Instead I had to be content with a rushed snap with my mobile phone! Still, the pics didn't turn out too bad.

I was actually quite pleased with the base I came up with for my lumberjack. It was a piece of a branch - a set of which I discovered at our local craft store. It seemed very appropriate! And weighed a good deal more than my usual small MDF bases!

About the bases. I realised, a little too late, that my small round (30mm x 3mm) MDF bases were not really such a good choice as these tall nutcracker figures are a little top heavy. The stability of the based figures came into question (I kept knocking them over with the slightest touch) and I had to think of an remedial modification.

What I came up with was to add a 30mm steel washer to the bottom of the MDF base. This extra weight added just a little extra weight and provided a little more stability to the model...


In future, I will have to rethink my base design for full sized peg figures and come up with a far more stable platform.

Anyway, time was ticking away - 19, 20, 21, 22, 23... 😲


I made a bit of a mess of recording the above models (I didn't photograph them in proper order), but I was in panic mode by this time. Christmas Eve and I still had two more models to complete. I mean, I hadn't even started painting them yet...


The last models are a pair of Christmas elves loosely based of my youngest daughter's favourite Christmas movie - 'Elf'. Though I have taken a bit of liberty and created a 'bad elf' and a 'good elf'.

However, while I'd love to tell you that there was a happy ending to this Christmas tale and that I managed to finished the last models by the skin of my teeth I'm afraid I can't. 😕

Christmas Eve arrived and I was starting to flag. As I mentioned I was still working and my energy was sapped. I made an effort and was still working at 11pm but I knew it was a lost cause as the major sticking point (literally) was the varnishing!

I have been applying a spray lacquer and aerosol paints are a little sensitive to temperatures. We've been having a cold wet snap and with my man-cave out of action I've been having to revert to spraying in our back yard. Not ideal. The varnish has been taken over-long to cure and remained tacky longer than usual, despite my placing the varnished figures near our radiators.

The upshot was that I knew I did not have a chance of completing the last two nutcrackers in time and this is how far I got by Christmas morning...


I still have the arms to complete before even getting to the dreaded varnishing. So, I had to accept defeat and settle for 6 nutcrackers each for my daughters instead of 7. I guess that's not a biggy, but I was annoyed at my own lack of planning. Next year I will definitely start my gift making a lot earlier!

The good news was that my daughters - Stacey and Kayleigh - were delighted  with what they received. And we all had a wonderful Christmas (despite the current lockdown restrictions).

I hope you all had as enjoyable festive season that I have. MERRY CHRISTMAS! 🎅

Sunday, 20 December 2020

The Grinch - Part 2

 As usual, every year the time leading up to the Christmas period seems to drag and then - all of a sudden - we are on the final few days and time is flashing by... And I am struggling to complete my nutcracker gifts in time!

I did manage to make progress with my Ginch model, though I have had to simplify it's decoration in order that I can get some of my other Christmas gifts completed as well.

As a matter of fact, I am actually working of several projects simultaneously and am making several of the components in batches. I am making the arms for all my gift nutcrackers together and started by sketching out the poses I wanted for each figure and tracing the designs onto some leftover 3mm plywood tabs...

Once the arms were all drafted I took the tabs over to my Dremmel Moto-Saw (scroll saw) and cut them out. Here's the set of arms I made for my Grinch...

Had I had more time I was contemplating making some 3D sculpted arms - in fact, it crossed my mind to remove the peg legs and turn this figure into a proper model caricature - but I just didn't have the time to spend sculpting bits and pieces. So, I stuck to my flat 2D arms...

Maybe I will return to the idea of a fully sculpted character at some point in the future. But, in the meantime, I carry on as normal and so it was onto priming...

This completed gift set 1 of 3 I intend to get finished in time for Santa to distribute them! 😁 A bit ambitious, but left see if I can rise to the occasion.

Monday, 16 November 2020

Peg Nutcracker Guardsman Complete

 I managed to get another of my peg nutcracker figures done, though I'm beginning to wish I had started these earlier as Christmas looms ever larger on the horizon!

I'm pleased with this little fellow and I'm enjoying this particular project. The slight down side is that I have a lot more of these nutcracker figures to make in time for the 25th of December. Still, onward and upwards.

This character is based on the traditional toy soldier from the ballet 'Nutcracker', a suitably festive story. The uniform is fictional and I tried a new way of making a rifle, simplifying the construction even more. It's just made up of an elongated triangle of lolly stick for the stock and a piece of cocktail stick for the barrel - but I like this stylised shape in this instance as it is suitable toy 'pop gun' like.


Another slight change in my previous construction method for this kind of nutcracker peg is that I did not bother to sand down the 'shoulder' dowel, but left it protruding slightly. I think this looks quite good and it enhances the idea that this is a toy soldier. Less work for me to do! 😁

The only concern I have about this style of peg figure is - being very tall and thin - it's balance. I chose a 3mm thick, 25mm diameter MDF base for these figures and that only just does the job. After I complete this project I will have to think again about basing and stability and I may need to either look at enlarging the diameter of the base or weighting the base (I have been considering adding steel washers to the existing base to give it a bit of weight).

Still, you are always learning. As they are they should look very nice on a mantelpiece for the festive period. 


Saturday, 24 October 2020

Peg Nutcracker - Old Guard Construction


Christmas is firmly in the forefront of my mind now. As I am on a very restricted income these days I am trying to make a lot of my gifts, hopefully my family will enjoy the fact that I have made an effort (or they might think that I am just a big cheapskate)! 😂

Anyway, I am making a couple of sets of mini-nutcrackers which are loosely based on those traditional German fireside ornaments (see pic left) - here's a link to the real things, but prepare yourself for a bit of a shock as some of the prices are eye-watering: Erzgebirge Palace.com - Nutcrackers [Opens in new window.]

I've already completed my 'Pantomime Private' model and that went fairly well, so I'm moving on to something a little more traditional now with a Nutcracker Soldier. To recap (as I did some basic prep with a half-dozen dolly pegs for this series) I began by dressing the basic peg with some period hairstyles...

In a earlier experiment I did where I tried to work out how I would make a mini-nutcracker I followed the real example and did the hair using some synthetic flock to represent the faux fur hair. But this did not work out well and actually started moulting with little tufts of flock coming off. So I decided to sculpt the hair-pieces using good old Milliput putty.

Once the hair was on I then moved on to making various hats for my different nutcracker types. Here you can see the basic shape of my guardsman's hat (right), although they were not attached permanently at this point...

I then moved on to creating the shoulders and arms for my soldier. I drilled a hole though the upper body of the peg so I could pass a piece of dowel (a barbecue skewer) through...


And then I added the feet and a base to the peg (having sawn off the tips of the peg's prongs so they were flat). The boots were made of a couple of blocks of decorative moulding wood and I decided not to shape them as he is a regular soldier and leave him with big army clod-hopper boots! 😄

[I'm using Evo-Stik Impact Instant Contact Adhesive for these jobs. It's really strong and I don't end up sticking my fingers together like I used to do when I used super glue! It's also more economical.]

Finally, I made the arms and rifle. The arms were my usual flat designs cut out of some 2mm sheets of plywood. At this point there was a lot of head scratching as I was unsure exactly how I should go about how to design and attach the gun. 

With my short (50mm tall) peg soldiers I usually just make a proportionally sided rifle and stick it to the side of the peg in a grounded arms pose BUT because my nutcrackers have those long lanky legs a rifle to do a similar pose would be ridiculously long (I know, I tried it) and out of proportion to the soldiers body.

So, I decided to go for a 'sloped arms' pose instead, with the size of the rifle in proportion to the body of the nutcracker...

I also changed the design of how I usually do my rifles. Instead of carving out a stylised rifle shape from a single piece of lolly stick I made a two-piece stylised toy 'popgun' out of a elongated triangle of lolly stick and a length of barbecue skewer! I really wanted to emphasise the toy nature of this soldier.

And here is the completed nutcracker...

Generally I quite happy with the design ALTHOUGH something is still niggling me about the very crude way that I attached the rifle to the left arm. I may have to go back to the drawing board with that and come up with a more elegant solution.

But - in essence - this is the construction process for the soldier. Once I have solved the rifle problem I will them move on to priming the nutcracker ready for painting.

Saturday, 10 October 2020

Peg Pirate Complete - Yaaaar!

 Quick project update for my Christmas Mini-Nutcracker series of models - I've completed the first in the set. Here's my festive pirate (and no, don't ask me why I have made a pirate as a Christmas ornament - I'll just say that my older daughter is not into the whole kitchy Christmas thing)...

I was fairly please with the outcome, though there were a few issues that I will correct with the rest of the nutcracker series (going to have to revisit my choice of varnish). Hope you like him, I shall call him Stew - Stew the Pirate, Yaaaarrrr!