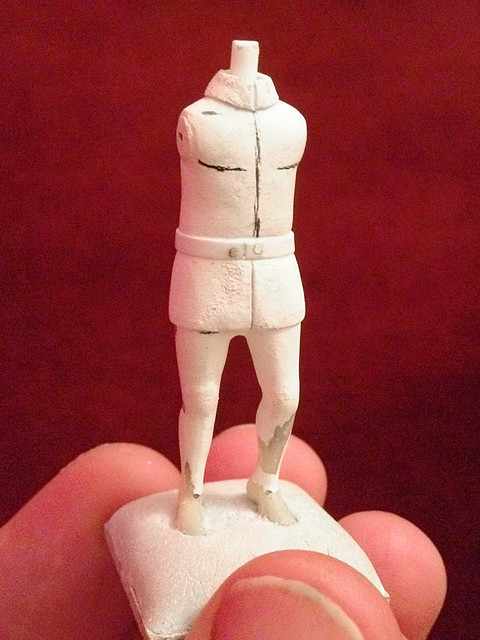
I have decided that as I named my initial head sculpts variations of 'Bert' I should have a name for my initial range of body sculpts too. So may I introduce you to 'Harry' - albeit that he is still in the making!
Today I have some more minor progress to report - Harry is visiting his taylor. I am making up his tunic, you can see some of my pen lines in the accompanying photo indicating features to be worked on.
The belt was made from a strip of plasticard, pinned and glued in place to give me some reference of where Harry's waist would be. He maybe a bit on the rotund side, but I am greatly influenced by the figures of Black Hat who - I think - have captured the 'manly' Edwardian figure very nicely (barrel chest and thin ankles)!
At this moment I am working on the jacket collar. It's a bit over-sized as I have just laid down a layer of Milliput, but this will be sanded back when dry. He will also be given epaulettes.
Left: Amusing to think that this sculpt started out with my rickety home-made armature!
My influence for the design is the Romanian M1893 tunic, depicted in Osprey's 'Armies of the Balkan Wars 1912-13' (colour plate E1). This means I will be adding a nice row of shinny buttons, and the belt will be receiving a buckle too.
Now, I was going to add the appropriate webbing for the period too, but have now decided I would like a figure without webbing, I will have my brother duplicate this in resin and then add the webbing to a freshly copied resin version of my mannequin. This is so I have a range of uniforms from the one sculpt - with and without webbing - so I can model both infantry and auxiliary soldiers.
Oh, what a tangled web we weave!
Being the Ethereal Embassy for the Kingdom of Molatero and it's participation in the Funny Little Wars
Friday, 4 October 2013
Tuesday, 1 October 2013
Lieutenant Cuthbert, gunnery officer
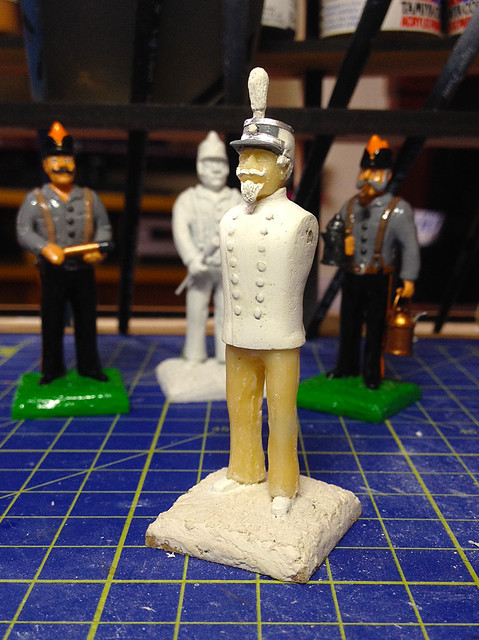
The last figure in my Molaterian heavy artillery team is the gunnery officer - Lt. Cuthbert. He is based - as with all my 'Berts' - on Black Hat's metal artillery crewman.
Unlike the rest of the Berts, however, I chose to start with a resin duplicate of Black Hat's figure as I imagined that tying to heavily modify a metal figure would be a bit of a pain. The resin that my brother is currently using is a joy to work with and very easy to cut and sand.
The job began with some major sanding back of the torso, removing the braces and shirt format of the original Black Hat figure. Once done I built up the officer's tunic with Milliput putty and added a double-breasted button arrangement based on a design from Osprey's 'The Belgian Army in World War 1'.
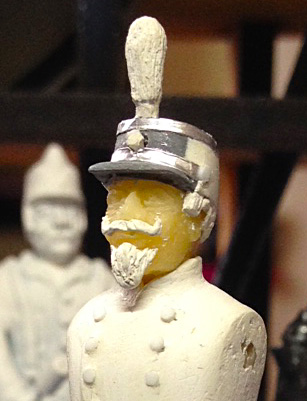
The head is my Mk. II 'Albert' resin head modified with new - and suitable 'upper-class' - facial hair and an officer's kepi (again, based on a Belgian army design).
Next I have to add his arms, I am thinking of poses but want him to be holding some binoculars in his right hand. The uniform will be mostly black - a nod to the Belgian influence - with tangerine detailing.
As I mentioned, this will be the last use of my Mk. II 'Albert' head for modelling my figures - I am working on a Mk III head sculpt to replace it - but it will be nice to have a unit in my army that will reflect the evolution of my sculpting skills (such as they are).
Unlike the rest of the Berts, however, I chose to start with a resin duplicate of Black Hat's figure as I imagined that tying to heavily modify a metal figure would be a bit of a pain. The resin that my brother is currently using is a joy to work with and very easy to cut and sand.
The job began with some major sanding back of the torso, removing the braces and shirt format of the original Black Hat figure. Once done I built up the officer's tunic with Milliput putty and added a double-breasted button arrangement based on a design from Osprey's 'The Belgian Army in World War 1'.
The head is my Mk. II 'Albert' resin head modified with new - and suitable 'upper-class' - facial hair and an officer's kepi (again, based on a Belgian army design).
Next I have to add his arms, I am thinking of poses but want him to be holding some binoculars in his right hand. The uniform will be mostly black - a nod to the Belgian influence - with tangerine detailing.
As I mentioned, this will be the last use of my Mk. II 'Albert' head for modelling my figures - I am working on a Mk III head sculpt to replace it - but it will be nice to have a unit in my army that will reflect the evolution of my sculpting skills (such as they are).
Saturday, 28 September 2013
Back to square one...
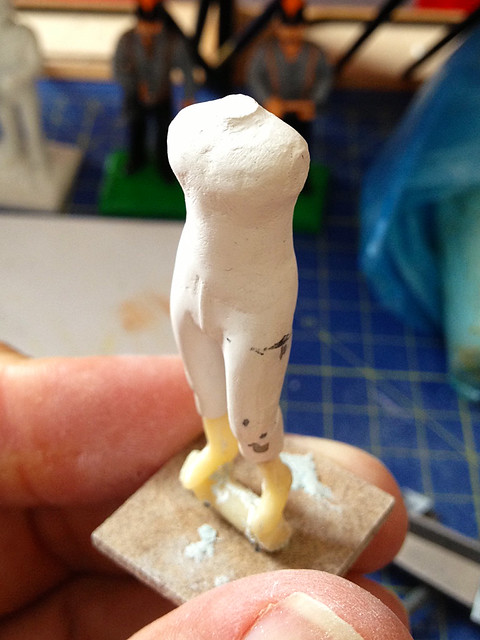
OK, surgery over and I've made good the joins. So now I'm back to where I was a few days ago, with the basic figure ready to continue with the uniform details...
I think it looks a bit odd at this stage, but maybe it will start to come together once more of the detail goes on...Hopefully!
![]() |
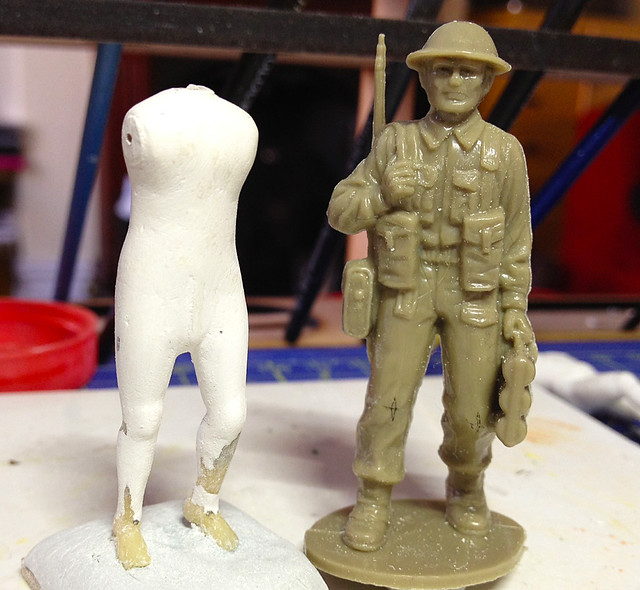
| My figure next to a 1/32 Airfix soldier which I am using as reference for scale. |
I think it looks a bit odd at this stage, but maybe it will start to come together once more of the detail goes on...Hopefully!
Thursday, 26 September 2013
Emergency surgery
And it was all going so well! But it turns out that my figure is too tall for the scale*, and unless I want a regiment of 6' 8" soldiers I had to something drastic...
I have removed a small section of each leg at the knee and I will shunt to two halves together - loosing my chap about 4 inches in scale height. Obviously I will have to reinforce the join with wire to make good the join. And then I will have to do some cosmetic putty work to hide the join.
Let's hope it all turns out well!
*You may wonder why I only just noticed why my figure was too tall. Well, my armature was a little tall, I admit, but this became more obvious when I started to add the layer of Milliput. I had underestimated how much mass was being added by my modelling putty. You live and learn (the trick seems to be making the armature slightly undersized to begin with).
I have removed a small section of each leg at the knee and I will shunt to two halves together - loosing my chap about 4 inches in scale height. Obviously I will have to reinforce the join with wire to make good the join. And then I will have to do some cosmetic putty work to hide the join.
Let's hope it all turns out well!
*You may wonder why I only just noticed why my figure was too tall. Well, my armature was a little tall, I admit, but this became more obvious when I started to add the layer of Milliput. I had underestimated how much mass was being added by my modelling putty. You live and learn (the trick seems to be making the armature slightly undersized to begin with).
Suits you Sir!
My progress in my body sculpt is slow, deliberately so. I'm just doing a very small bit at a time, stopping, sanding back and then continuing again. So, unfortunately, despite hard work I don't have that much to show you.
I'm starting to build up the upper body, readying it for the tunic...
I've been doing some research in the background and I'm thinking along the lines of a uniform based on Romanian infantry from about 1890-1900. But I want it to be suitably generic enough to be useful for a variety of nations from that period (by simply changing the hat).
One of the things that I will have to think about is how I intend to attach the arms and head. I will have to make some sort of socket or peg arrangement onto which I can place the interchangeable parts of my figure.
Now at the moment my little figure looks like he's in his long johns, but this is just the basic layer before I start to detail the clothing (I will add the boots last by the way). So I'm concentrating on getting the surface nice and smooth at the moment.
I'm starting to build up the upper body, readying it for the tunic...
I've been doing some research in the background and I'm thinking along the lines of a uniform based on Romanian infantry from about 1890-1900. But I want it to be suitably generic enough to be useful for a variety of nations from that period (by simply changing the hat).
One of the things that I will have to think about is how I intend to attach the arms and head. I will have to make some sort of socket or peg arrangement onto which I can place the interchangeable parts of my figure.
Now at the moment my little figure looks like he's in his long johns, but this is just the basic layer before I start to detail the clothing (I will add the boots last by the way). So I'm concentrating on getting the surface nice and smooth at the moment.
Subscribe to:
Posts (Atom)