Now here's a blast from the past! The continuation of a long 'dead' project, reanimated due to my new 3D printer acquisition...
It all began way back in 2013, when I was first beginning to dip my toe in the murky waters of scratch-building model conversions. My intension was simple - I could not initially afford to buy the classic Britain's 4.7inch Naval Gun model as the prices were stupidly high on eBay, so I decided to see if I could make a cheaper 'look-a-likely' artillery piece for my Funny Little Wars collection.
 |
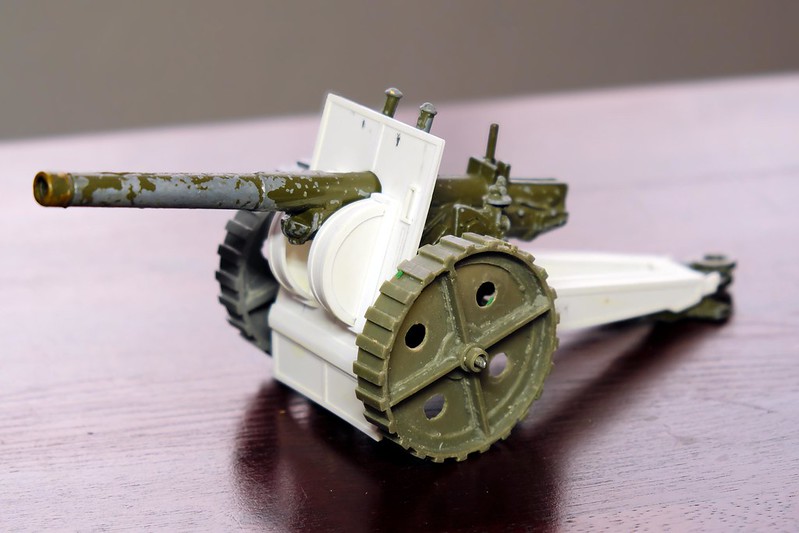
| Above: Britains' 4.7 Naval Gun model the classic FLW artillery piece. Now out of production and limited in supply, this die-cast model much sought-after and prices can be astronomical! |
You can read all about the project and how it initially progressed by following this link (opens in new window): Poor man's 4.7 Naval Gun Project Series
Anyway, to cut to the chase, a couple of things happened that put this project into moth balls, so to speak. First of all, my reach out exceeded my grasp as back then my scratch building skills were pretty basic and I got stuck when it came to the - for me - trickier building. And secondly, a change in my personal finances meant that affording the real Britains 4.2 gun model became less of an issue (in fact, I ended up buying two and so my need for a fake copy became somewhat redundant)...
Fast Forward Eight Years! >>
First of all, I can't believe I started this project eight yeas ago! But having dusted off this old job (literally) I now feel a lot more confident that I can actually complete the thing - thanks mainly to my new 3D printer!
What makes the difference is being able to model design ideas in virtually before committing to a build. Whereas before my scratch constructions were very much 'suck it and see' affairs I can now - thanks to the TINKERCAD software - experiment with objects and components to see if they are viable...
 |
| Above: The result of a short session in TinkerCad, playing about with shapes and ways to connect shapes together... No cut fingers here! |
As the name suggests, I can tinker away to my hearts content - never worrying about spoiling a laboriously crafted wooden or plastic component and then having to start all over again! I soon had a collection of small parts which solved the quandary I originally had with my faux-Naval gun - how to attach the modified plating to the die-cast model.

Yes, I could have probably - eventually after lots of trial and error - have produced exactly the same components the traditional way with pieces of styrene cut to shape, but being able to model these shapes and alter them on the fly in the software meant I ended up with a more accurate end product in a fraction of the time.

Everything fitted together exactly how I wanted them and if something was slightly wrong it was ridiculously easy to tweak the dimensions and run off another component. This also solved another of traditional modelling's great bug-bears - 3D printing kinda kills the 'carpet monster'! I no longer have to worry about losing some small component as I can simply print off another. 😁
NEXT: Parts now assembled it's time to strip off the old paint!
Very clever. I hadn't realised how much the guns has gone up in price. 10 years ago I amassed a large collection of various Britain's guns and didn't pay more than £5 a piece and often £10 for a whole pile of them.
ReplyDeleteI did pay £40 for a Britain 18" Howitzer because it came with the firing shell, which I was missing for the other model I have. I have 3d printed new shells for the howitzer.