
In breech-loading times this act of rendering a gun inoperative - usually to prevent it falling into enemy hands - was achieved by obstructing ['plugging'] the barrel and then firing a charge. The resultant explosion burst or 'spiked' the barrel.
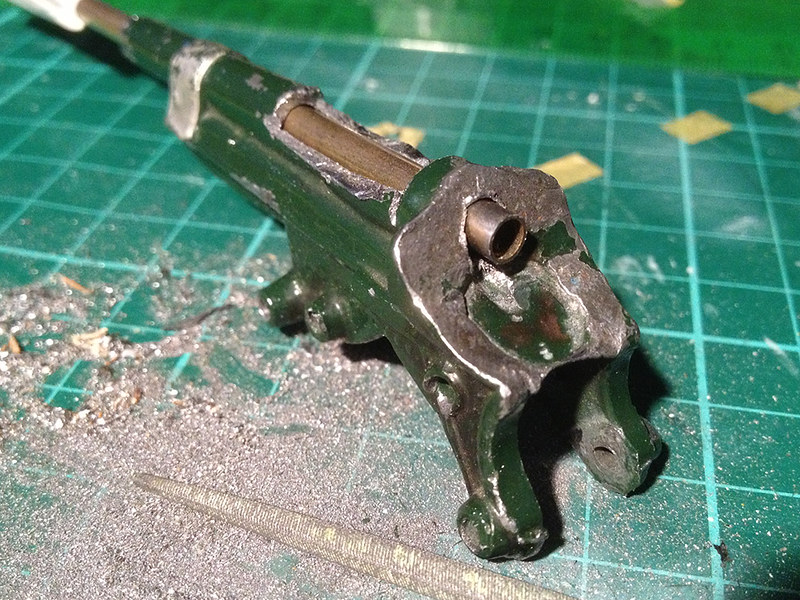
When I bought this Britains' Royal Horse Artillery gun (No. 1201) toy on eBay I was surprised that I picked it up so cheaply, but I can't imagine that others knew something I didn't when it turned out to be a bit of a lemon. What I thought was a simple obstruction in the barrel turned out to be a determined attempt to spike the gun!
For whatever reason the original owner of this toy had driven - or glued - what I thought was a metal rod into the barrel. Despite all attempts it simply wouldn't budge and so in the end I had to resort to very drastic measures with my Dremel and having done so I was shocked to discover just how good a job had been done of breaking this lovely model...

I could not understand why someone would do such a thing, but my daughter quipped that perhaps some long suffering parent had finally tired of being assaulted by 'little Jonny's' barrage of match sticks and so resorted to capping his mischievous fun!
Anyway, having performed my surgery - once I determined how far the blockage extended up the barrel - I cleared not one but several metal spikes which had rusted themselves together...

Well, having taken this model appart I now had to think of a way to put it back together again. As well as the obstruction it seems like the toy had been stepped on as well - talk about adding insult to injury! The barrel was slightly bent, as was the gun carriage and one of the wheels, and the muzzel was deformed.
The extent of the damage done to this 'lemon' 1201 now clear I decided that a full renovation was in order. Obviously this toy would never again be considered a collectors piece after my butchery, but I hoped at least I could make the toy operational again.

sawed my way through the rear of the barrel. Happily this turned out to be
quite easy and would allow me to strip the paint off the parts effectively.
I supposed that my rebuilding would involve two phases, first I would have to repair the barrel so that the to could operate again and then I would have to conceal my work. The easiest way to do this I reckoned was to strip the paint off the various parts and then to repaint the gun once I had performed my work.
First thing was to start to repair the bent, gouged and rusty inner barrel and the best way to do that - I thought - was to install a barrel sleeve or inner tube of some sort...
I bought a hollow brass rod from my local model shop (80p) and enlarged the existing barrel bore until it slid snuggly inside. The diameter of my new inner barrel matched the diameter of Britains' original bore. This new inner barrel gave me a smooth and straight barrel again and to finnish off all I had to do was to trim off the excess length at the mussel and at the breech.
Next I had to fill in the hole I had made in the upper barrel. There are various materials I could use - my trusty Milliput which is design to work with metal (among other things) or I could go the whole hog and try something like Evo-Stik's Hard and Fast Metal Epoxy Putty. The Evo-Stik is a true metal putty so would complement the die-cast of the toy very nicely, but the down side is that it dries within 10 minutes and can't be smoothed so easily (though it can be filed and sanded when dry).
I am more comfortable with Milliput, it's slow hardening time means I can tinker with smoothing the surface to get the ultimate match to the barrel. It's not as hard as the Evo-Stik, but Milliput is hard, and it's shock absorbant. So Milliput it is - but first must strip the paint off my toy and for that I brought out the big guns (pun there for Tim!) with Nitro Mors stripper...
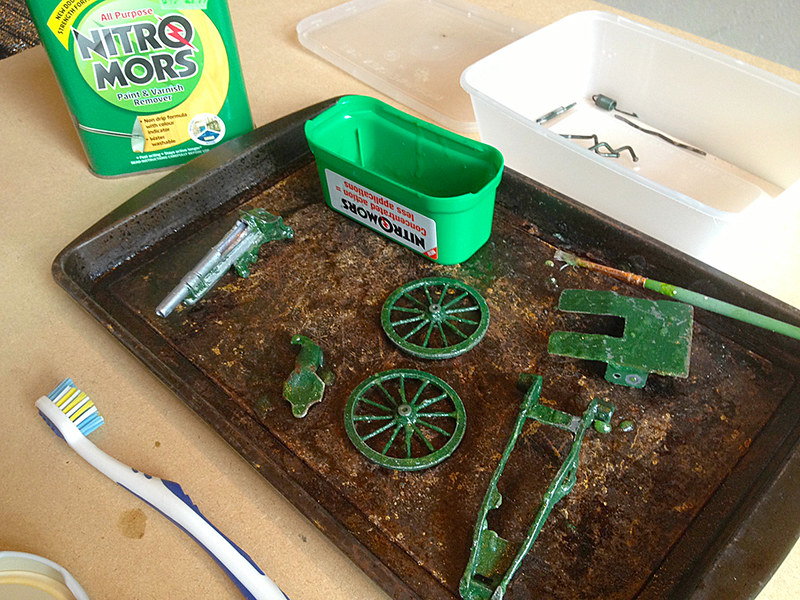
away nicely here as the thick Britains' paint slowly lifts off the toy. (Tip: Ventilation!)
Having stripped the parts down to the original metal - more or less - I'm ready to start my re-building...

In Part 2 of this renovation I put everything back together again and finish off by repainting the gun. Hopefully the finished toy won't look too much of a disaster,
I received one as a Christmas present in about1953 and it was one of my favorite toys. I now have a small collection of Britains artillery. Good luck with your project
ReplyDelete